
Board Feet vs Linear Feet. What Does it Mean and How to Calculate
How to calculate board feet vs linear feet and what it all means.
Ever been confused when purchasing wood either at a hardwood dealer or home center? Here's everything you need to know about calculating board feet and linear feet.
In this video we interview Tracy from Kencraft and find out why some boards are priced at board feet and some are priced at linear feet. Tracy also covers what "four quarter" and "eight quarter" means. This is important information when buying lumber. I remember the first time walking into a hardwood dealer and feeling overwhelmed and not knowing the language. This is a first in a series of videos all about buying hardwoods and is aimed at taking out the confusion and intimidation.
Board Feet Formula
Thickness × Width × Length ÷ 144 × Price
"Four Quarter" = 1 inch
"Five Quarter" = 1¼ inch
"Six Quarter" = 1 ½ inch
"Eight Quarter" = 2 inches

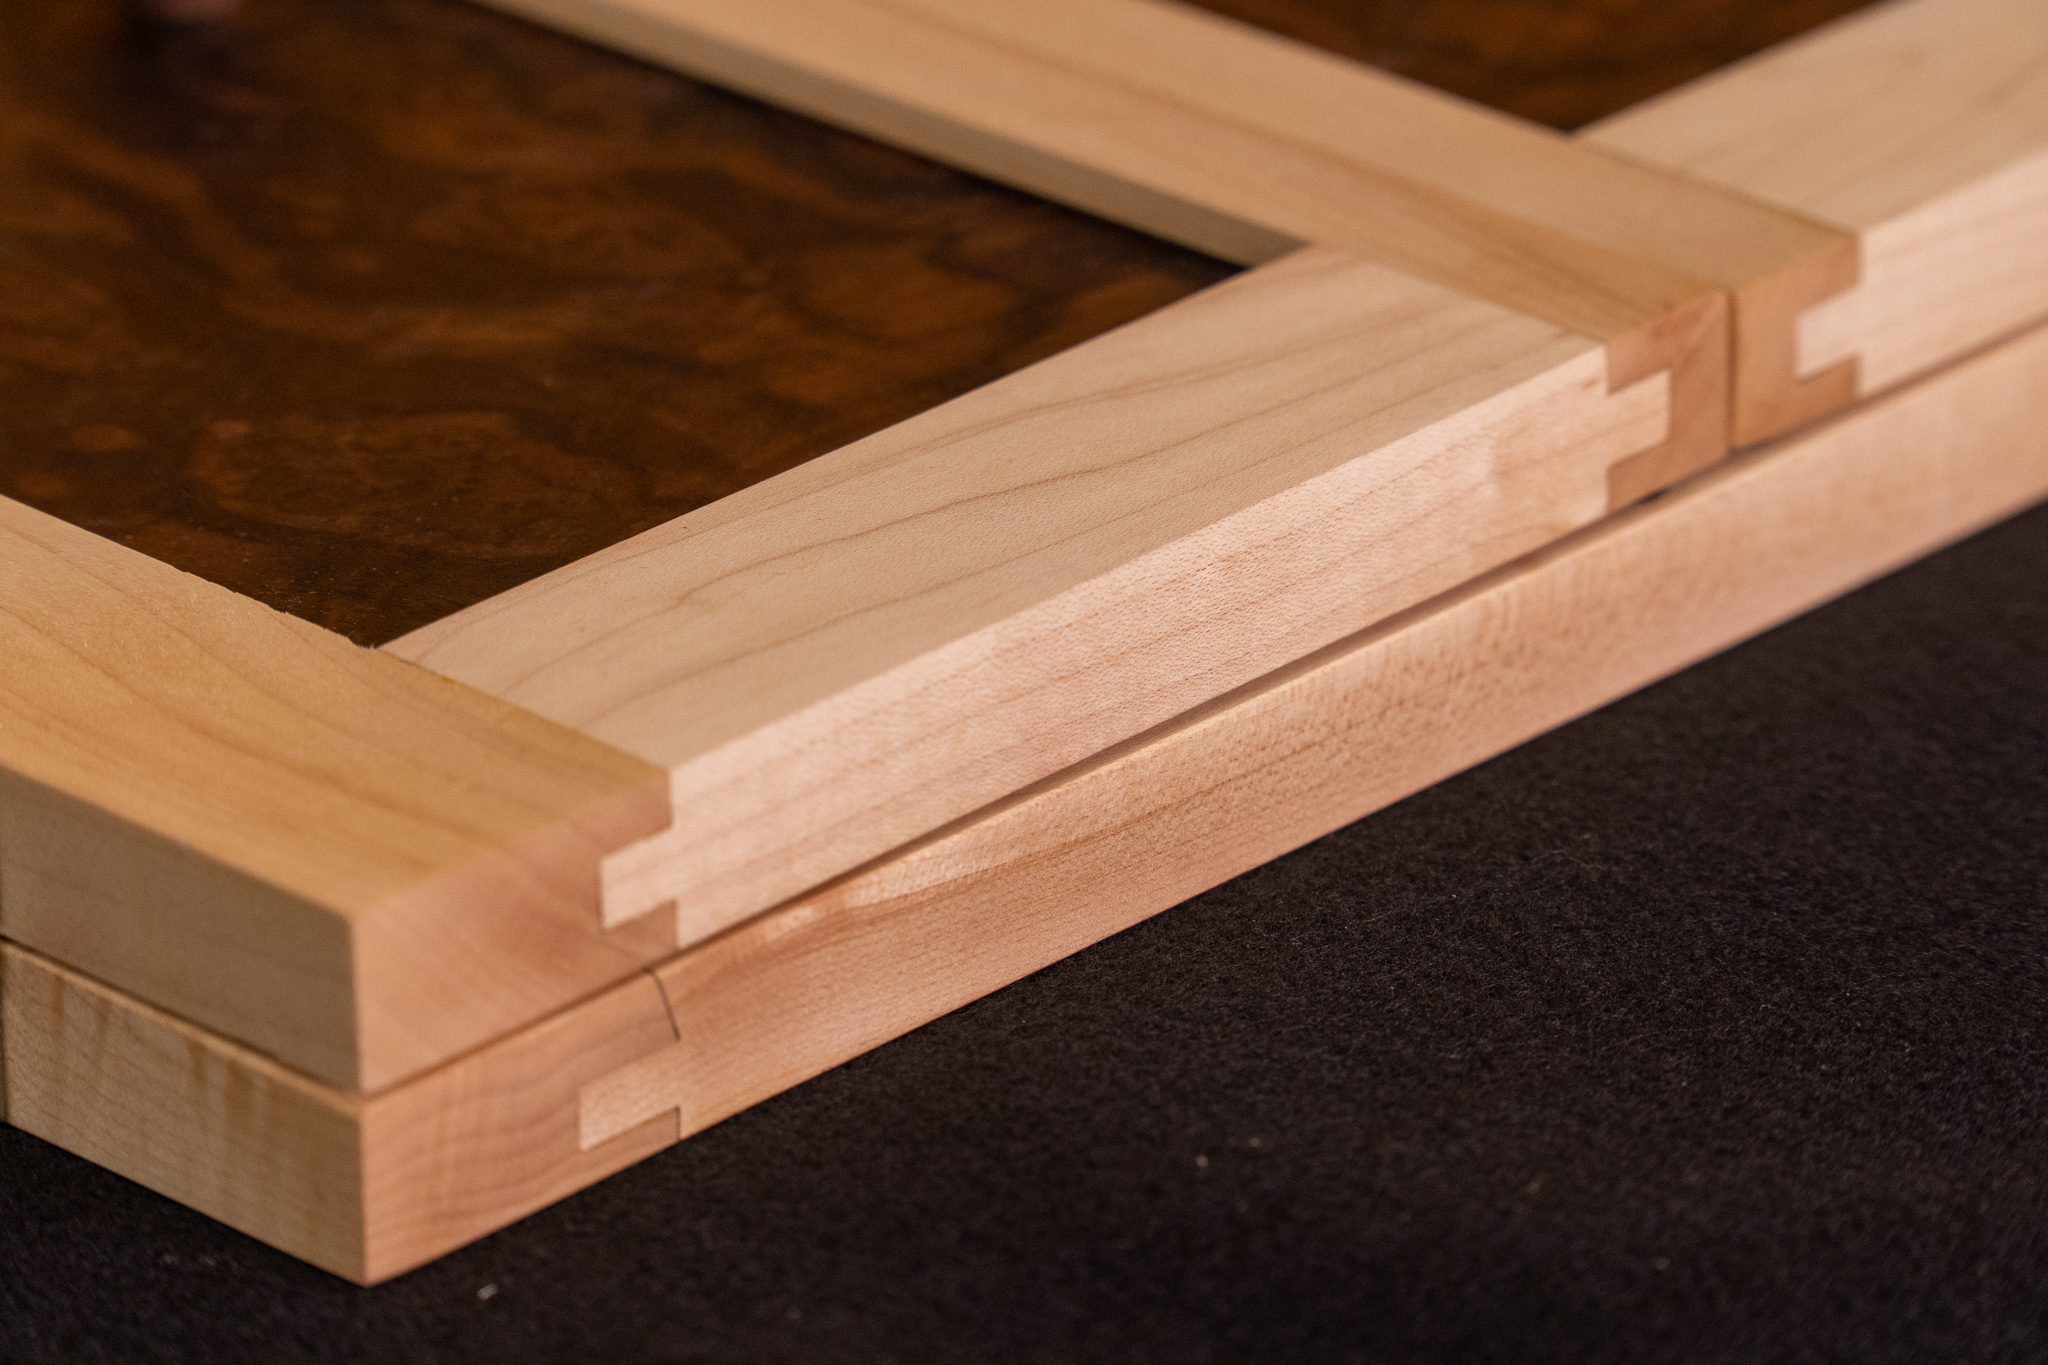
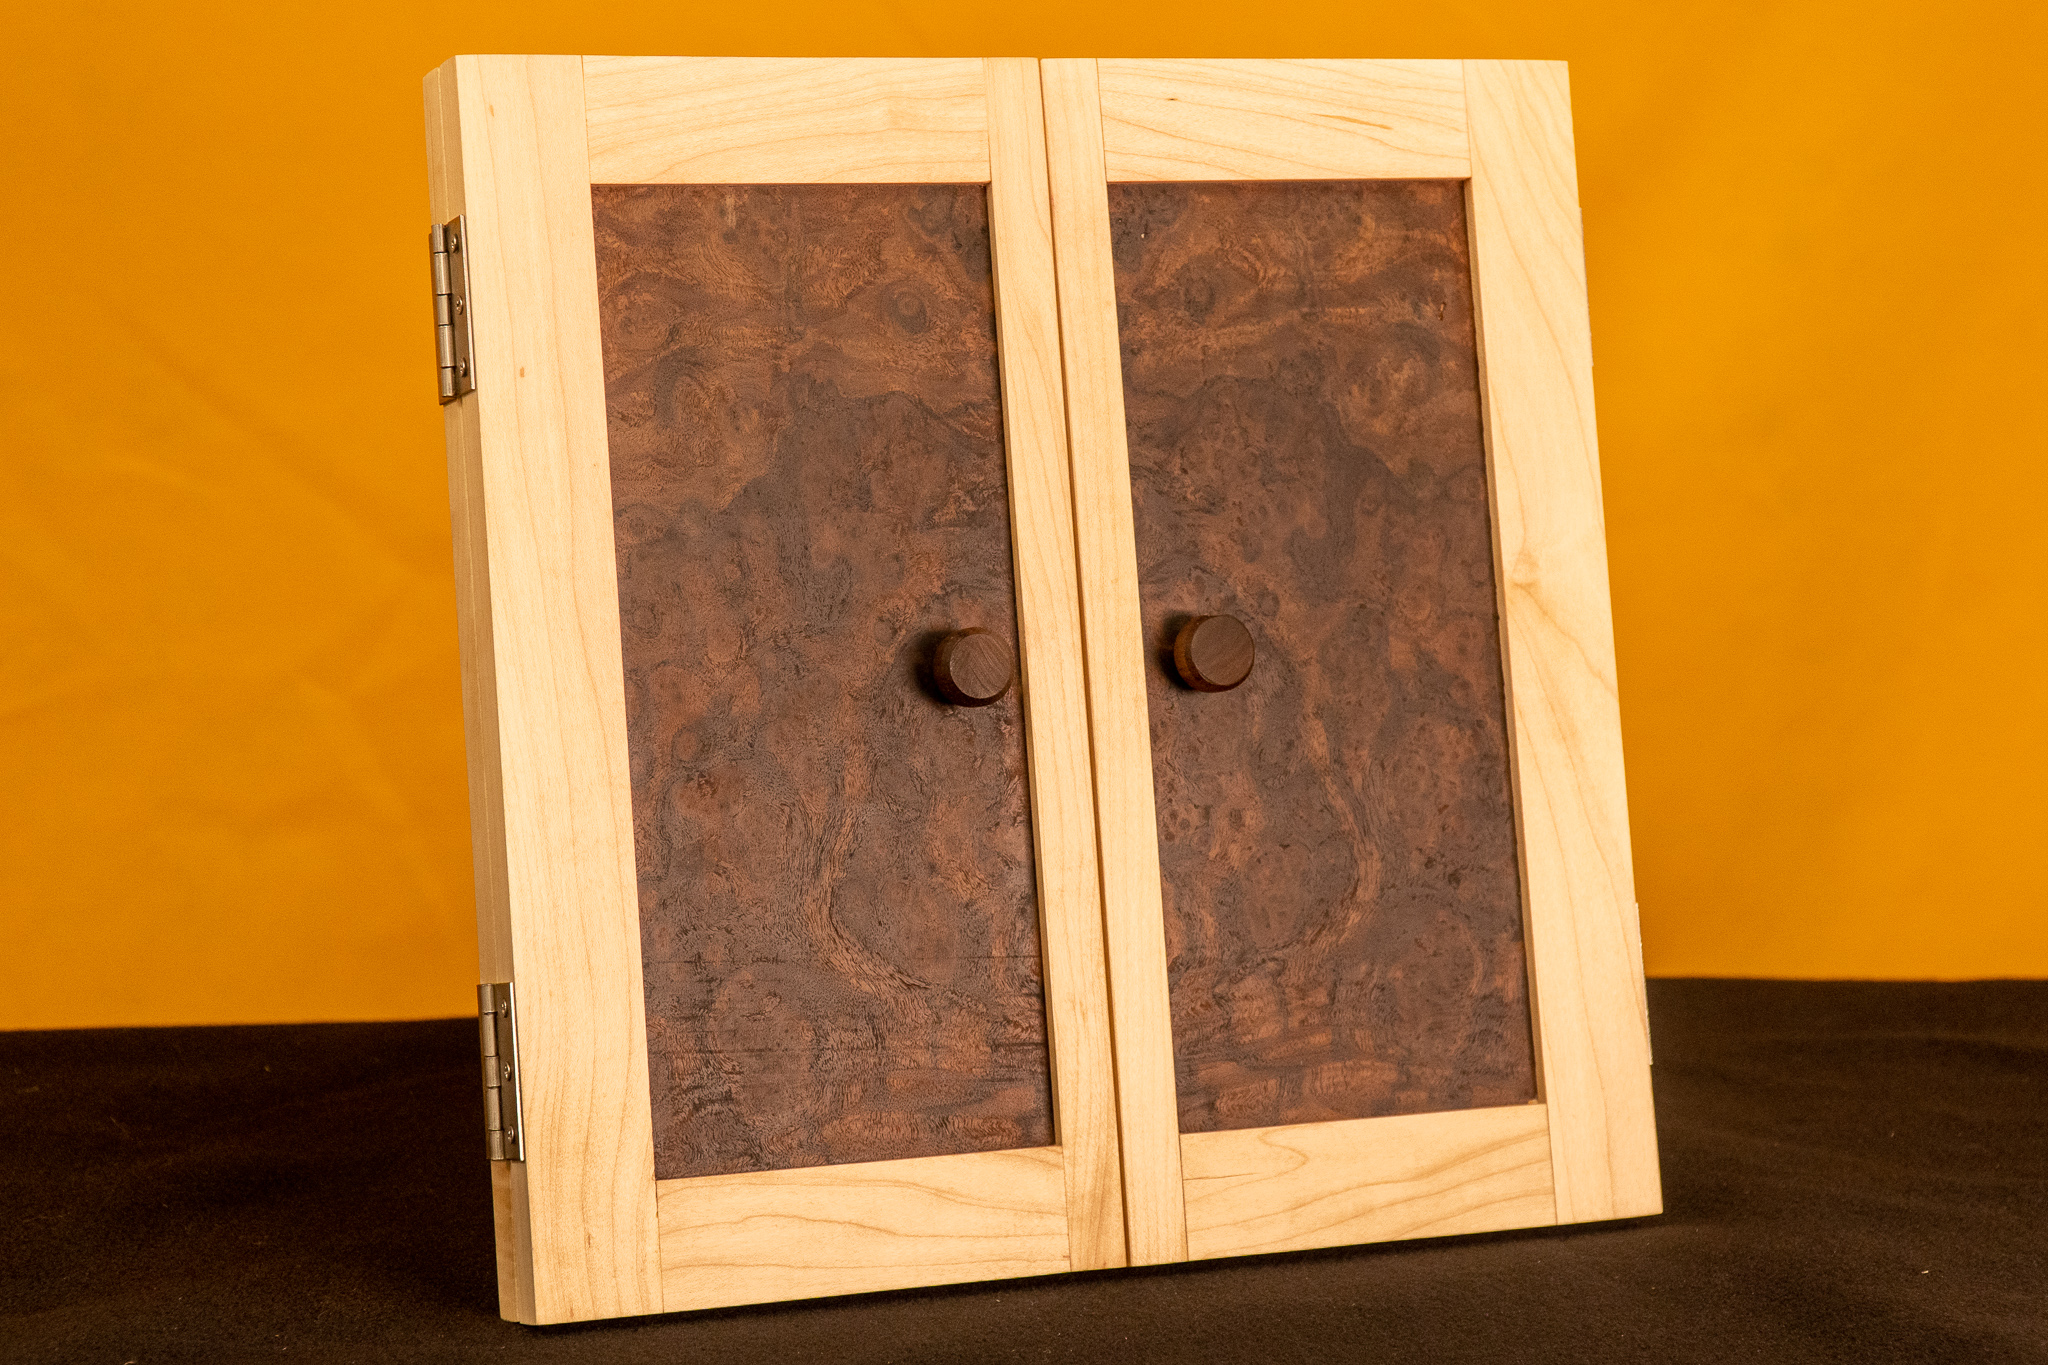
3 Easy Ways to Make Frame and Panel Doors
How to make frame and panel doors with tongue & groove and cope & stick techniques on the table saw as well as the router.
Tongue & Groove and Cope & Stick Joinery
How to make frame and panel doors with tongue & groove and cope & stick techniques on the table saw as well as the router. The first method is tongue and groove panel doors on the router using a single bit. The second way is the same process but at the table saw using a single blade. No dado blade needed! The final method is a traditional cope and stick frame and panel door done at the router using a matching router bit set. There are many ways to perform a single task in woodworking and I want to give you options that works best for your situation.
Tools and Supplies Used In This Woodworking Project


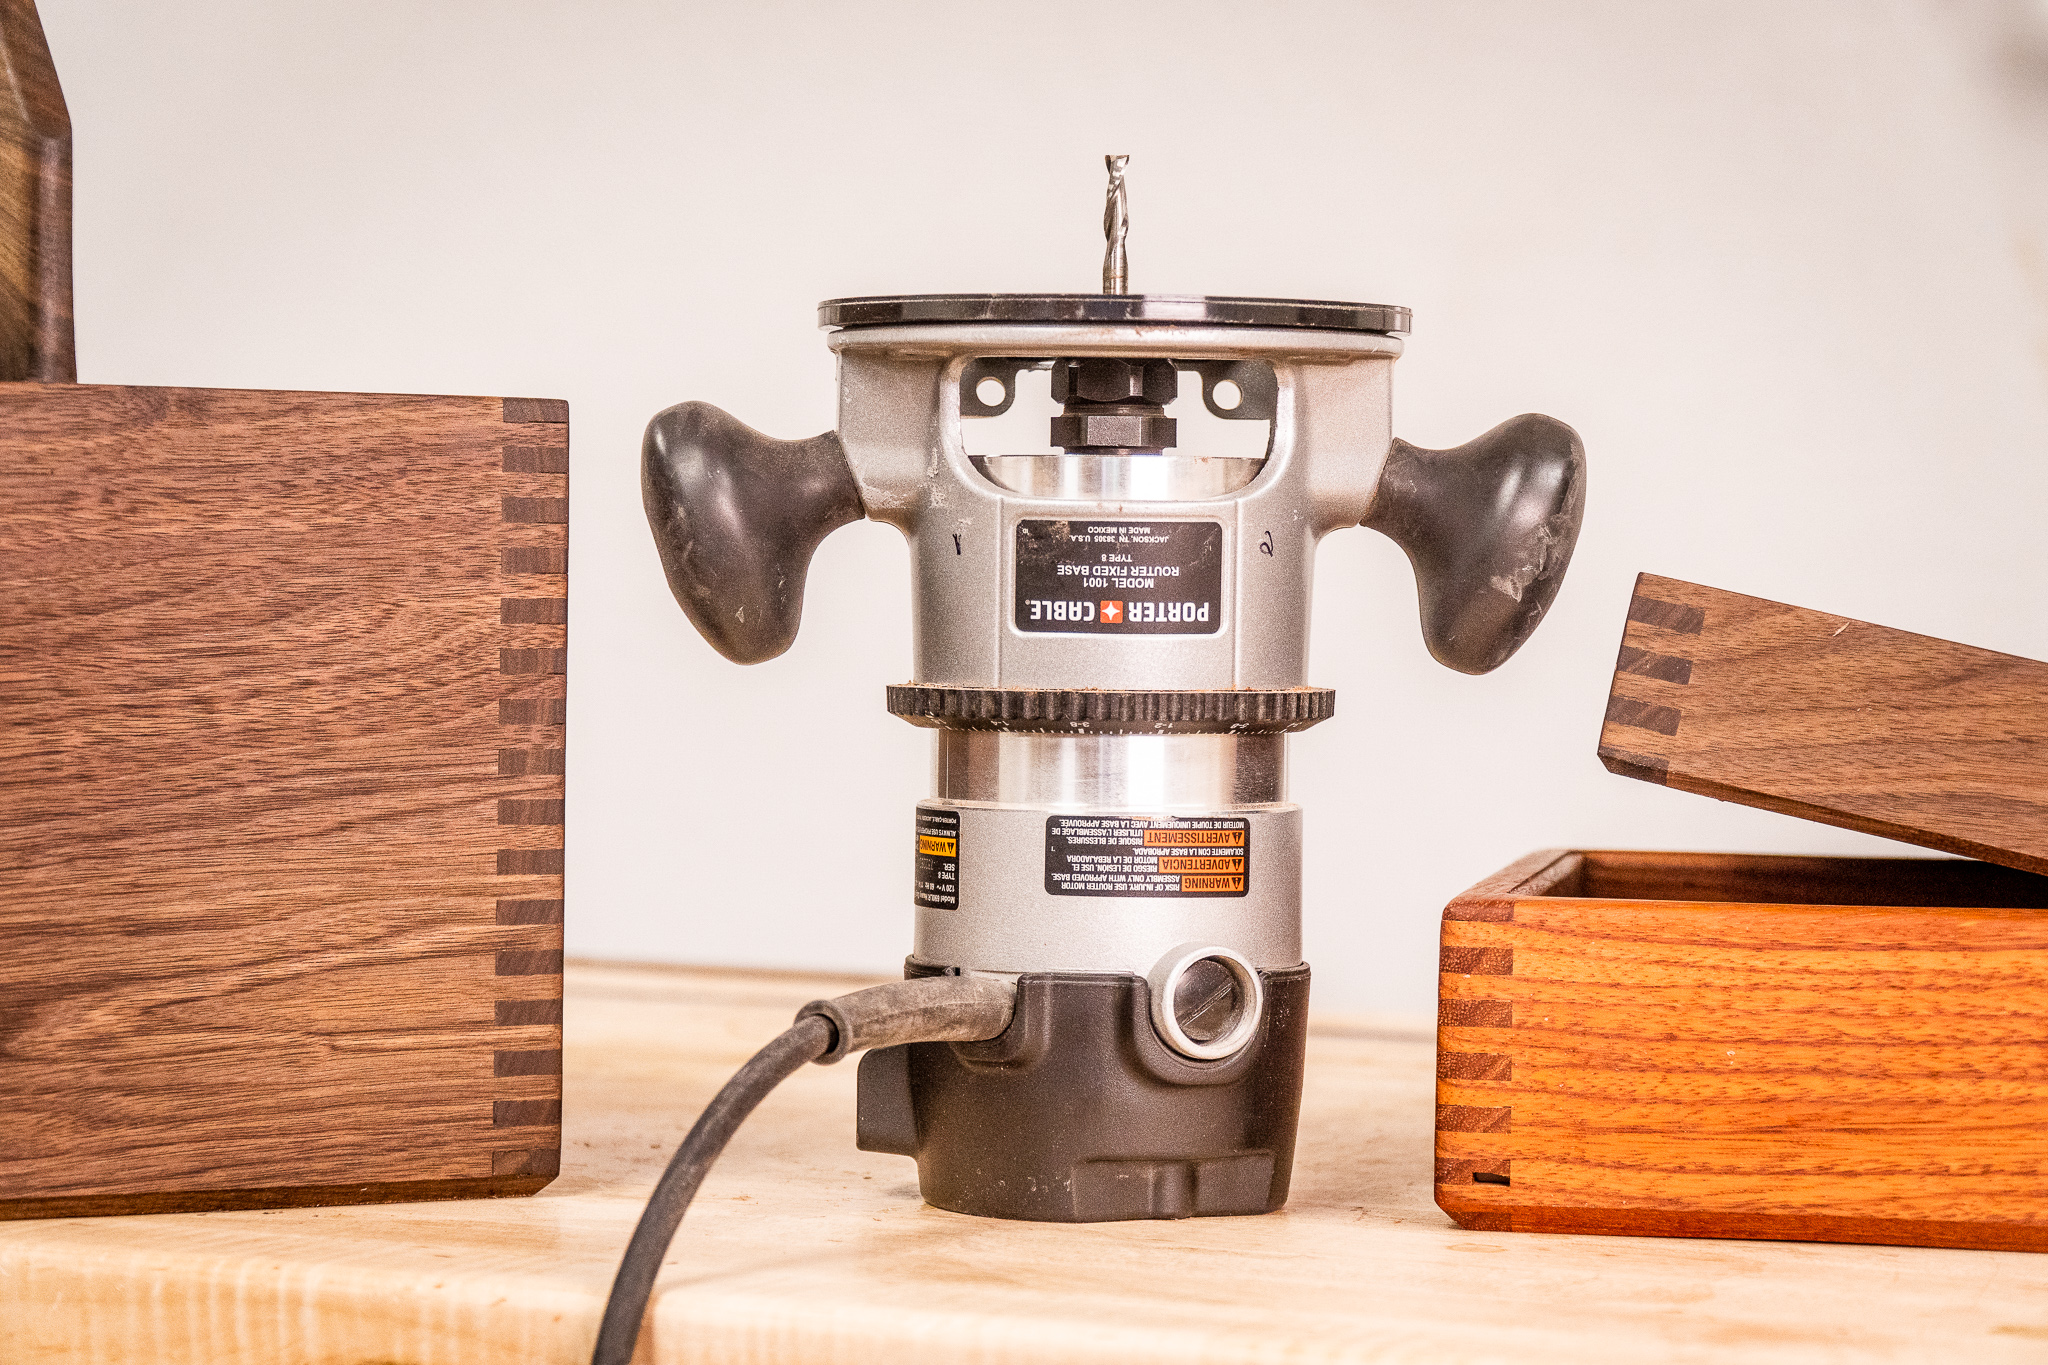
How to Make Box Joints with a Router
How to make finger and box joints with only a router. No table saw necessary!
Make Box Joints and Finger Joints with Only a Router. No Table Saw or Router Table Necessary!
How to make box joints (sometimes called finger joints) using only a router. Making box joints on the table saw requires a dado stack which isn’t available in all areas. The next best method is at the router table but not everyone has the space for a dedicated router table. This tutorial video shows a simple method on making a jig out of plywood for a hand held router that attaches to the base. Once you make this woodworking jig you’ll always be set up for box joints and finger joints. If you choose to change up your box joint finger width you’ll need to swap out the bit and make a dedicated fence for that bit.


DIY Closet Organizer With Laundry Hamper
How to make a DIY closet organizer out of plywood with simple joinery.
Closet Makeover with DIY Closet Organizer and Shelf Divider
How to make a DIY closet organizer out of plywood with simple joinery. In this easy woodworking project I'm using maple plywood and pocket hole screws to make a closet divider that takes full advantage of the space with an accessory drawer and a clothes hamper drawer. Watch this woodworking tutorial video for step by step instructions on how to build your own custom closet shelves.

Tools and Supplies Used In This Woodworking Project


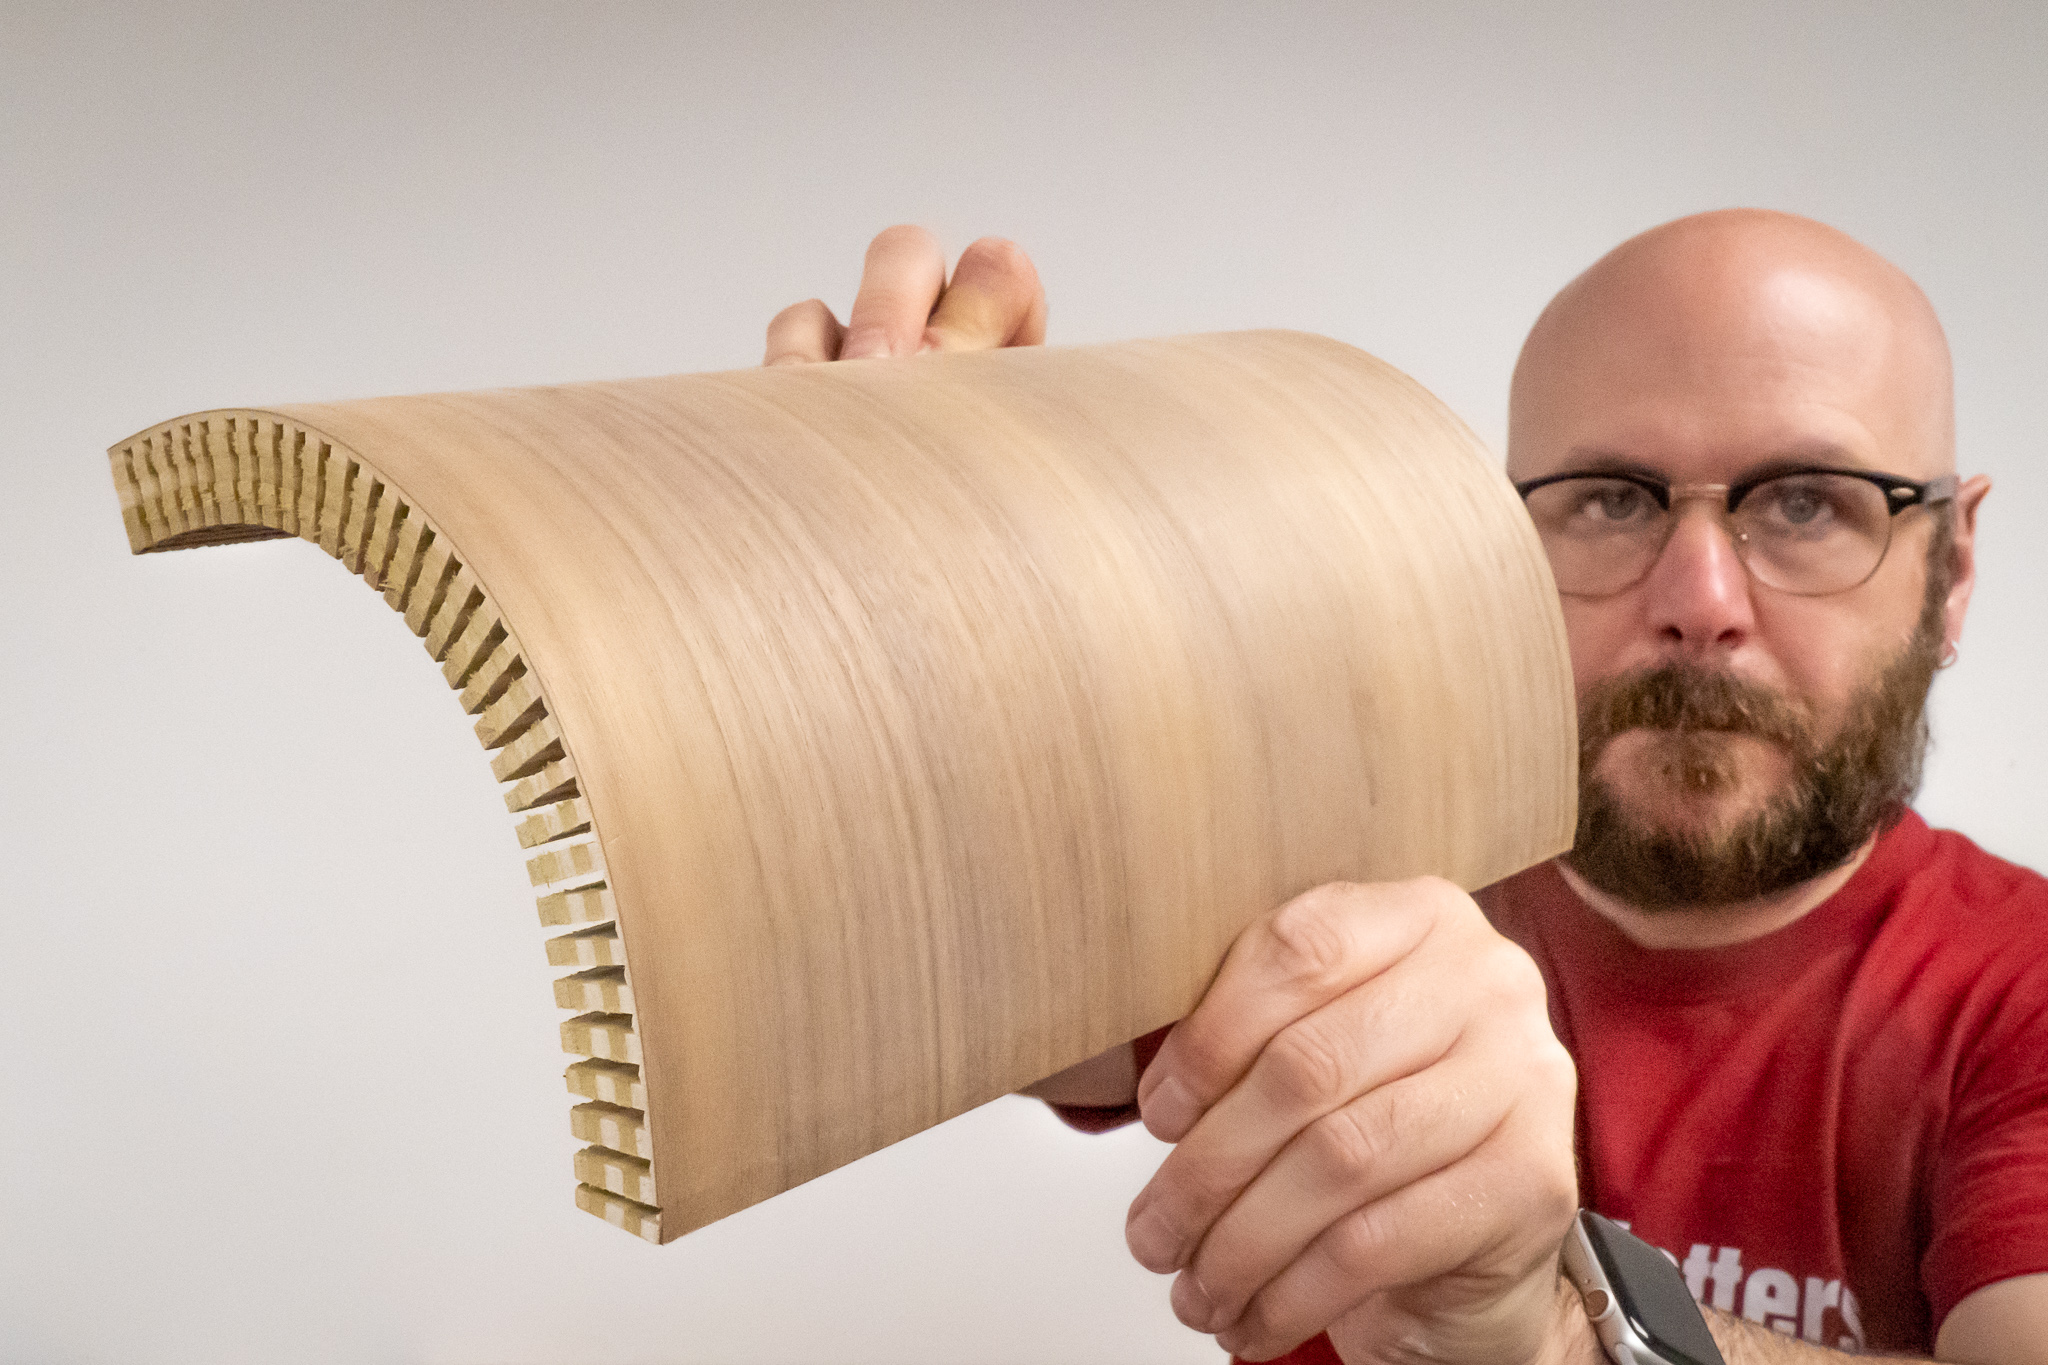
How to Quickly Kerf Bend Plywood and Solid Wood
Kerf banding is in most cases the quickest and easiest method and doesn't require any special jigs.
Easily Bend Wood With Kerf Bending. No Math and Measuring Required.
There are 3 common ways to bend wood; steam bending, bent lamination and the technique used in this video called kerf bending. Out of the three, kerf banding is in most cases the quickest and easiest method and doesn't require any special jigs. The process if fairly simple in which you make a series of kerfs in your wood spaced apart depending on your desired radius. The kerf is cut almost all the way through leaving a little more than a 1/16 skin (veneer) on top. This skin is thin enough to allow it to bend and can be held in place with glue. I prefer using polyurethane (Gorilla Glue) for this technique as it expands when it comes in contact with water filling the gap. This wood bending technique works with both plywood and solid wood. In this tutorial video we go over how many kerfs to cut, spacing and depth without getting into unnecessary math. I use the kerf bending technique to make a stylish coat rack and at the end of the video I'll go over some tips and tricks to get up bending wood with ease!
Tools and Supplies Used In This Woodworking Project


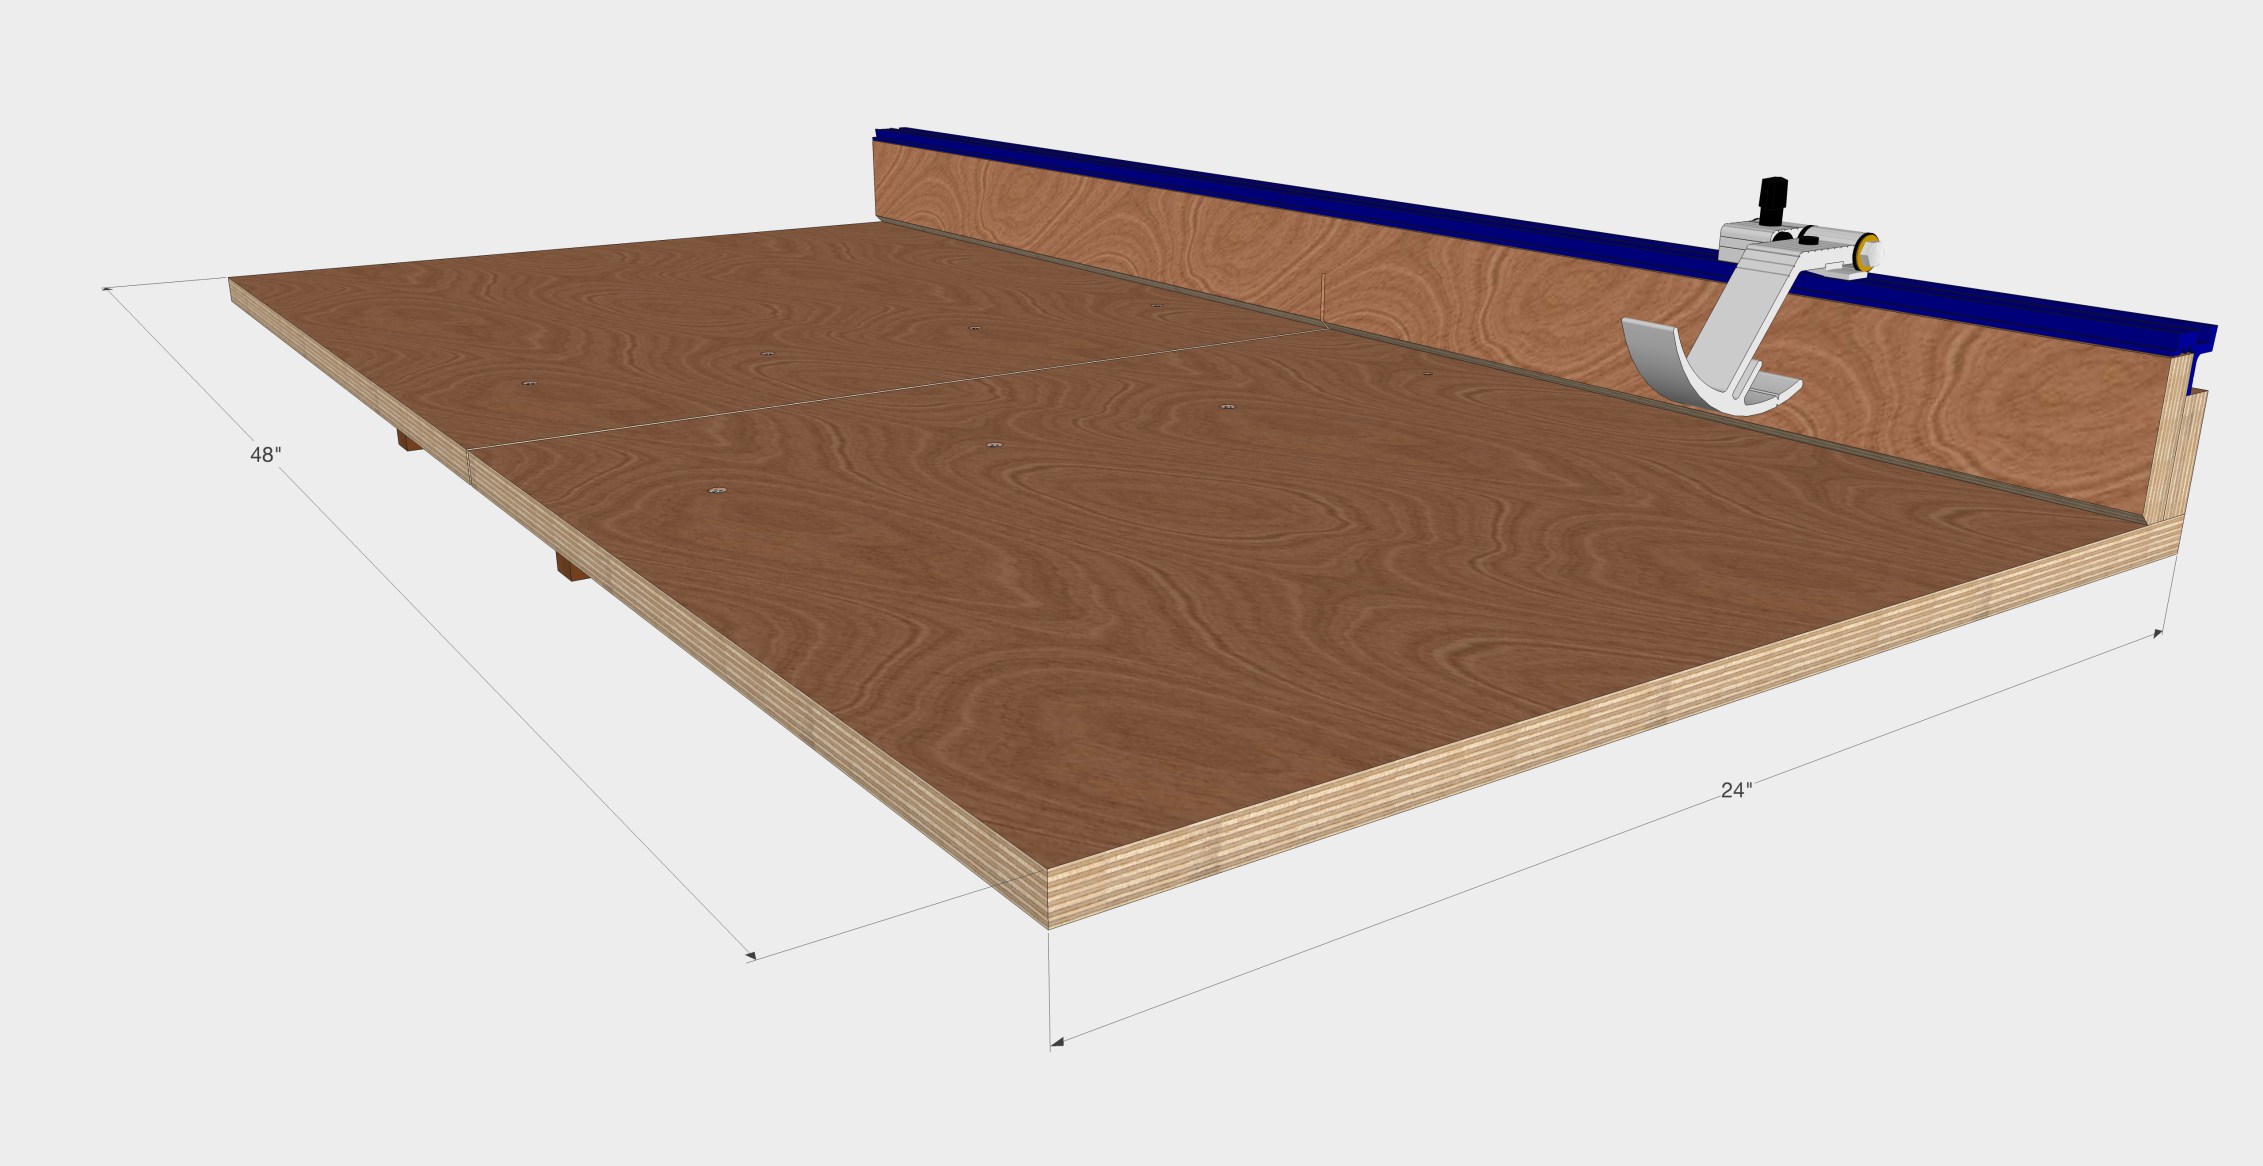
Quick and Easy Tool Bench From Plywood With Free Plans
Step-by-step instructions on making a tool bench from plywood. Very easy woodworking project with basic tools.
Perfect for Bench Top Tools with Lots of Storage
This tool bench is easy to make and made almost entirely out of 3⁄4" plywood. Goes together quick and can be made with almost no clamps. The width of the base is 40" which can easily be modified by lengthening the rails. You can also easily modify the height by adjusting the leg size. You ready? Let's Make Something!
Tools Used in this Woodworking Project


How to Make a Box Joint Jig. Quick Simple and No Dado Needed.
How to make a finger joint/box joint jig. Quick and easy and you don't need a dado stack. Step by step tutorial that can be used on any table saw.
How to make a finger joint/box joint jig. Quick and easy and you don't need a dado stack. Step by step tutorial that can be used on any table saw.
Tools and Supplies Used to Make This Woodworking Jig

Bandsaw Tips and Tricks
Tips and tricks to help you succeed on the bandsaw.
Bandsaw Blade Selection
Most bandsaw problems come from either a dull blade or using a blade with too many teeth per inch. For the type of woodworking I do I only need two blades.
3/16″, 4 TPI Skip Tooth Blade
This is the blade I use for 95% of all my bandsaw cuts. This blade works great for cutting tight radiuses and can also be used for resawing pieces up to 3″. If you’re thinking about making bandsaw boxes then this is the perfect blade. Having only 4 teeth per inch is perfect for efficiently removing all the waste while cutting the curves. Get the blade here.
Wood Slicer 1/2 inch Resaw Bandsaw Blade
I only use this blade for about 5% of my bandsaw cuts but it’s a must if you plan on resawing wood over 3″ tall. Get the blade here.
Bandsaw Blade Tension
Bandsaw blade tension is a subject I think receives too much unneeded attention. I rarely worry about tightening and tensioning the blade and just throw it on with any issues. If you do want to properly tension your blade the only thing you need to keep in mind is that the blade should defect about 1/4″ with moderate pressure. Watch the video above to see how this is done.


How to Make a Crosscut Sled for Tablesaw
How to make a cross cut sled for the table. This is a must have shop jig for every woodworker.
Tools and Supples Used In This Woodworking Project


How to Make a Block Plane
How to make your own wood block plane. It’s easier than you might think!
Making a Hand Made Wooden Block Plane
Even though I’m not much of a hand tool user I find myself reaching for my hand made wooden block plane all the time. It’s great for rounding over corners or cleaning up an edge. The block plane I’ve been using comes from a kit by Hock Tools. In today’s project we’re going to make a new block plane that’s just a bit bigger using the same methods and shapes. Making your own planes is much easier than you might think and just as good as those expensive metal planes.
In this tutorial I’m breaking a few rules and using coconut palm wood. This is not the type of wood typically found in wooden hand planes but I love to experiment and have fun. Coconut palm is just absolutely beautiful and visually unlike any other wood. It’s is a bit splintery but once you get everything sanded smooth and rounded over it works just fine.
Tools and Supplies Used in this Woodworking Project
- Festool Miter Saw
- Table Saw
- Microjig GRR-Ripper
- Digital Angle Gauge
- Jet Drill Press
- Hock Tools Block Plane Kit
- Titebond Wood Glue
- Adhesive Sand Paper
- Grizzly Bandsaw
- Disc Sander
- Spindle Sander
- Sharpening Stone
- Diamond Sharpening Stone
- Honing Guide
- Random Orbit Sander
- The Perfect Edge Book
- Boiled Linseed Oil
- Wood Files: Wood Files


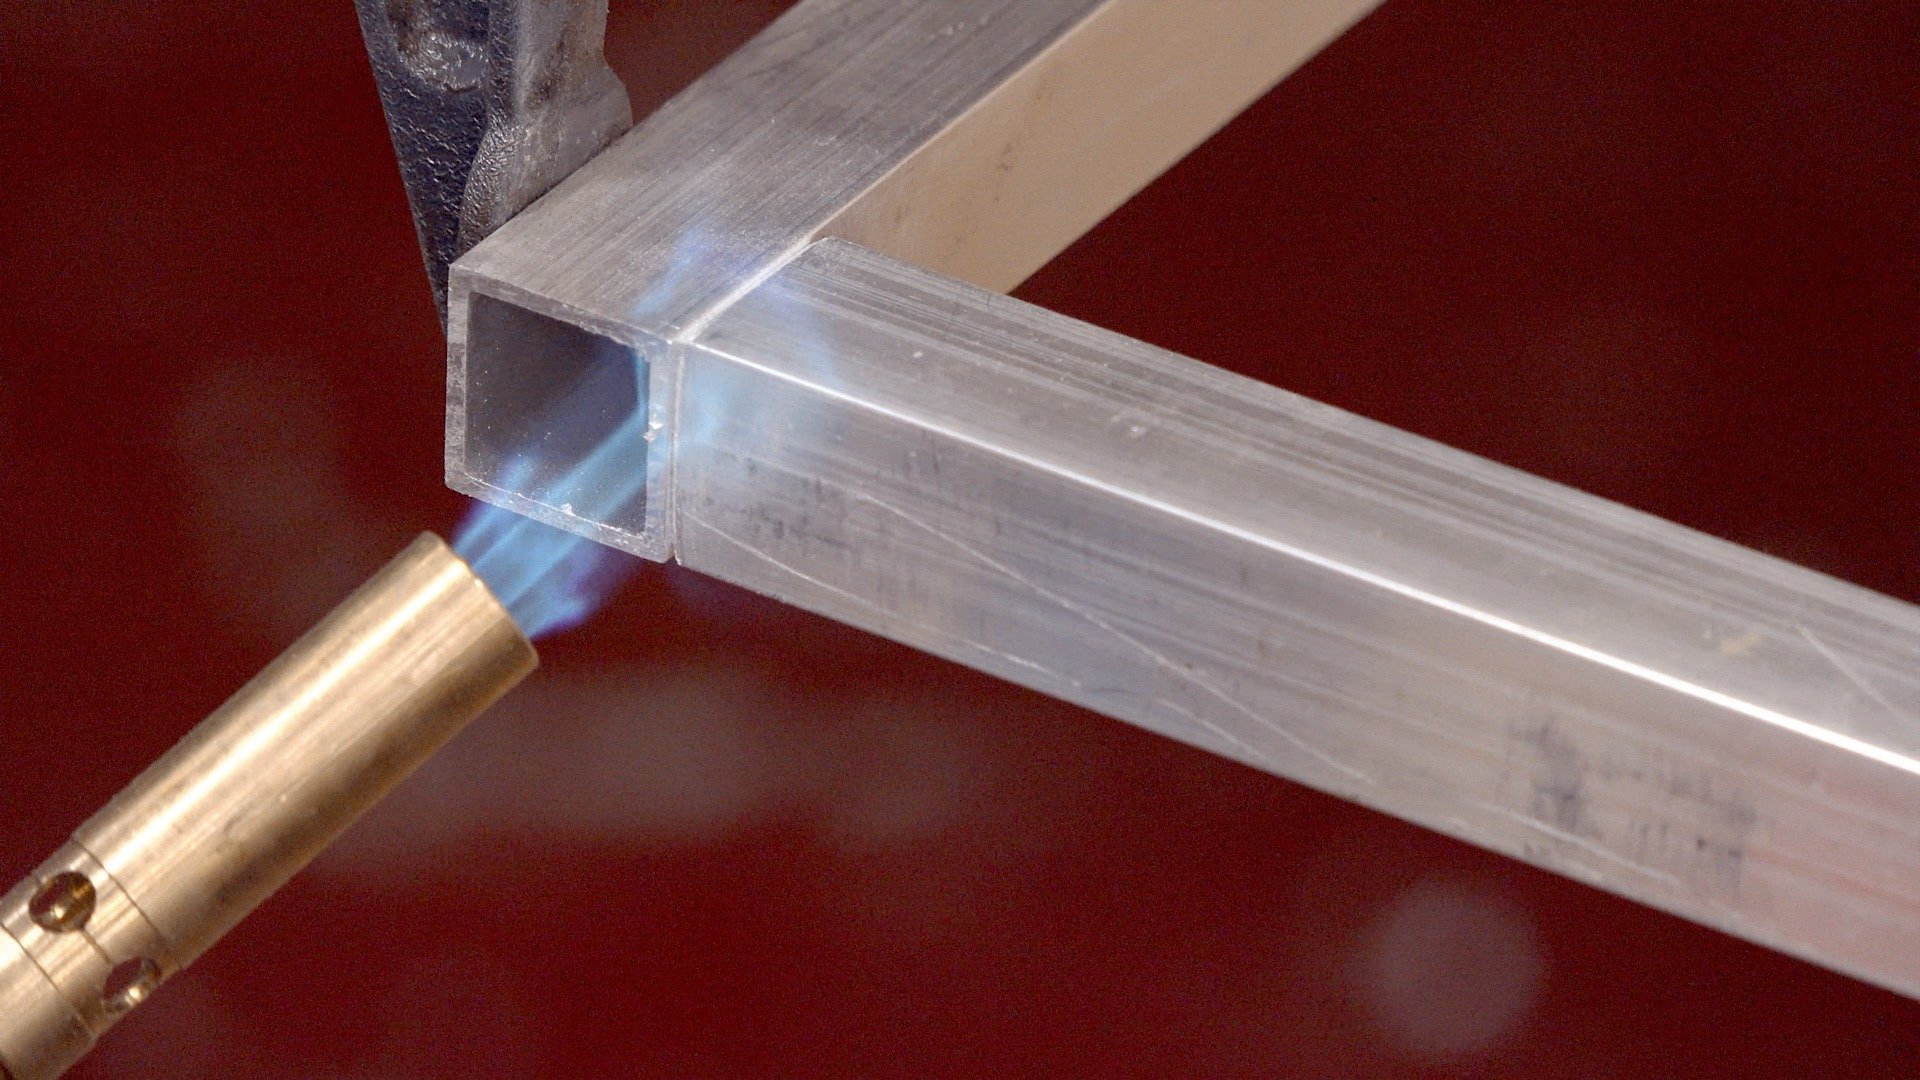
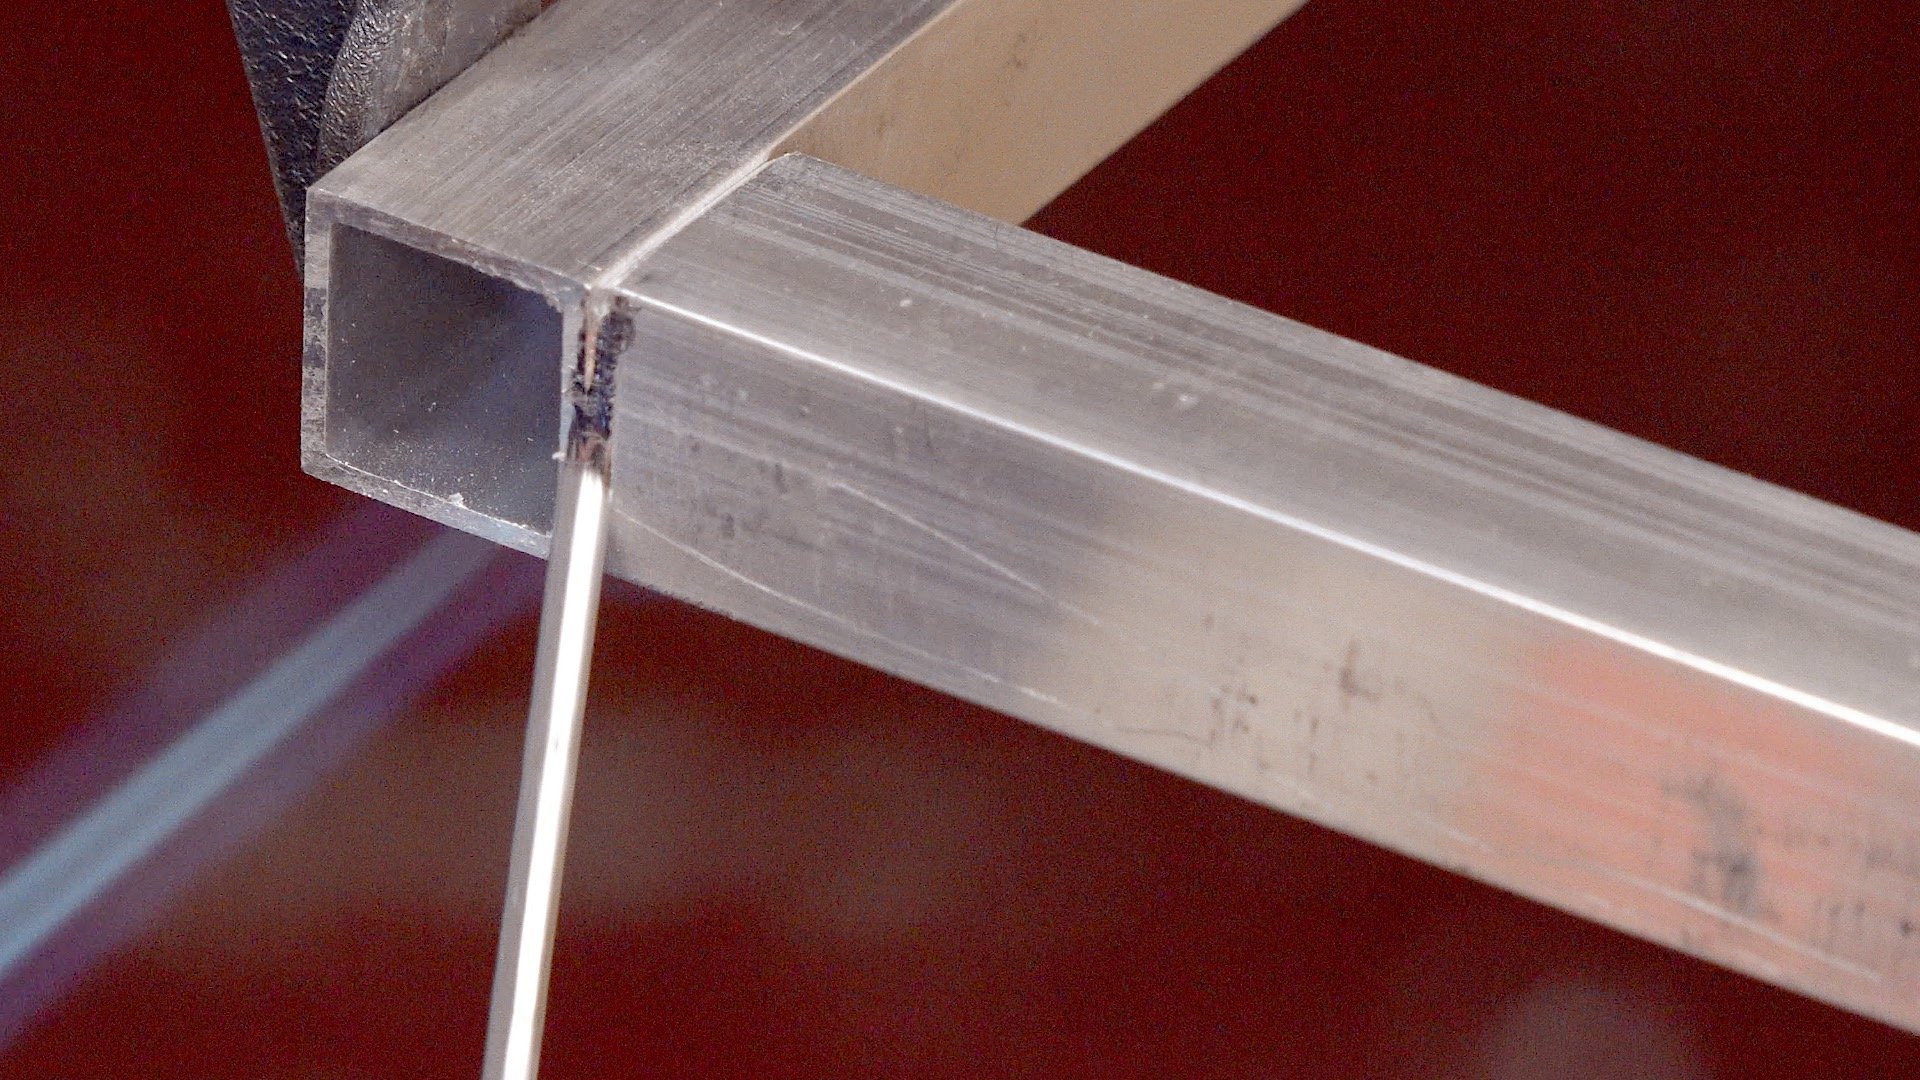
How to “Weld” Aluminum Without a Welder
Using a propane torch and some aluminum brazing rods is a quick way to bonding aluminum without using a welder.
Using a propane torch and some aluminum brazing rods is a quick way to bonding aluminum without using a welder. It makes for a very strong bond and with a little practice can be done quickly with great looking results.
Items Needed for Brazing Aluminum


Wood Staining: Coca Cola vs Coffee
In this experiment I’m trying out Coca Cola and coffee as a wood stain.
In this experiment I’m trying out Coca Cola and coffee as a wood stain. I have seen in the past many people use coffee as a wood stain but never soda so I thought I’d try them both out and compare. I wanted to use these wood stains on real projects and not just scrap wood to show the results so I made 3 mitered corner boxes with splines out of red oak. I normally don’t use stain in my projects but when I have I’ve had the best luck with red oak as it seems to take stain well.
The coffee definitely stained the wood much more than the soda but had a slightly greenish tint to it. When compared to the other two boxes it seemed to have an unnatural color. The Coca Cola stain only slightly darkened the wood compared to the non-stained box but had the best results. The soda gave it a natural amber tint and was surprisingly not sticky at all once dried.
Would I stain a project again with soda or coffee? Probably not but I will experiment more with other products in the future. Maybe next time I’ll try motor oil and wine. Let me know in the comments down below what you’d like to see me experiment with in the future!

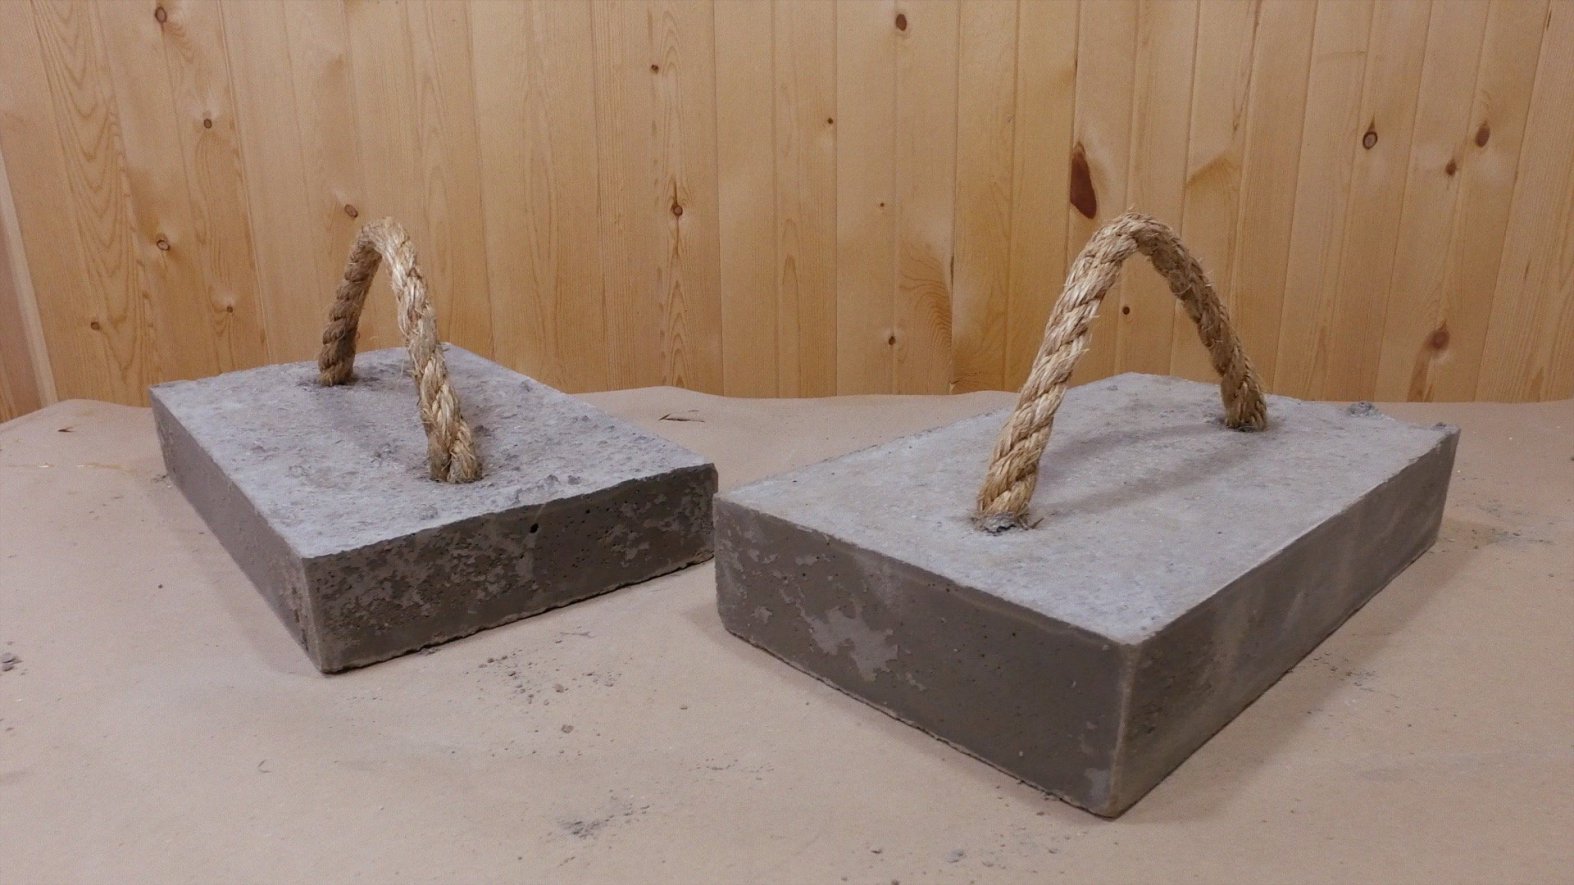
How to Make Concrete Weight Clamps
Making a pair of concrete weights with rope handles for the shop.


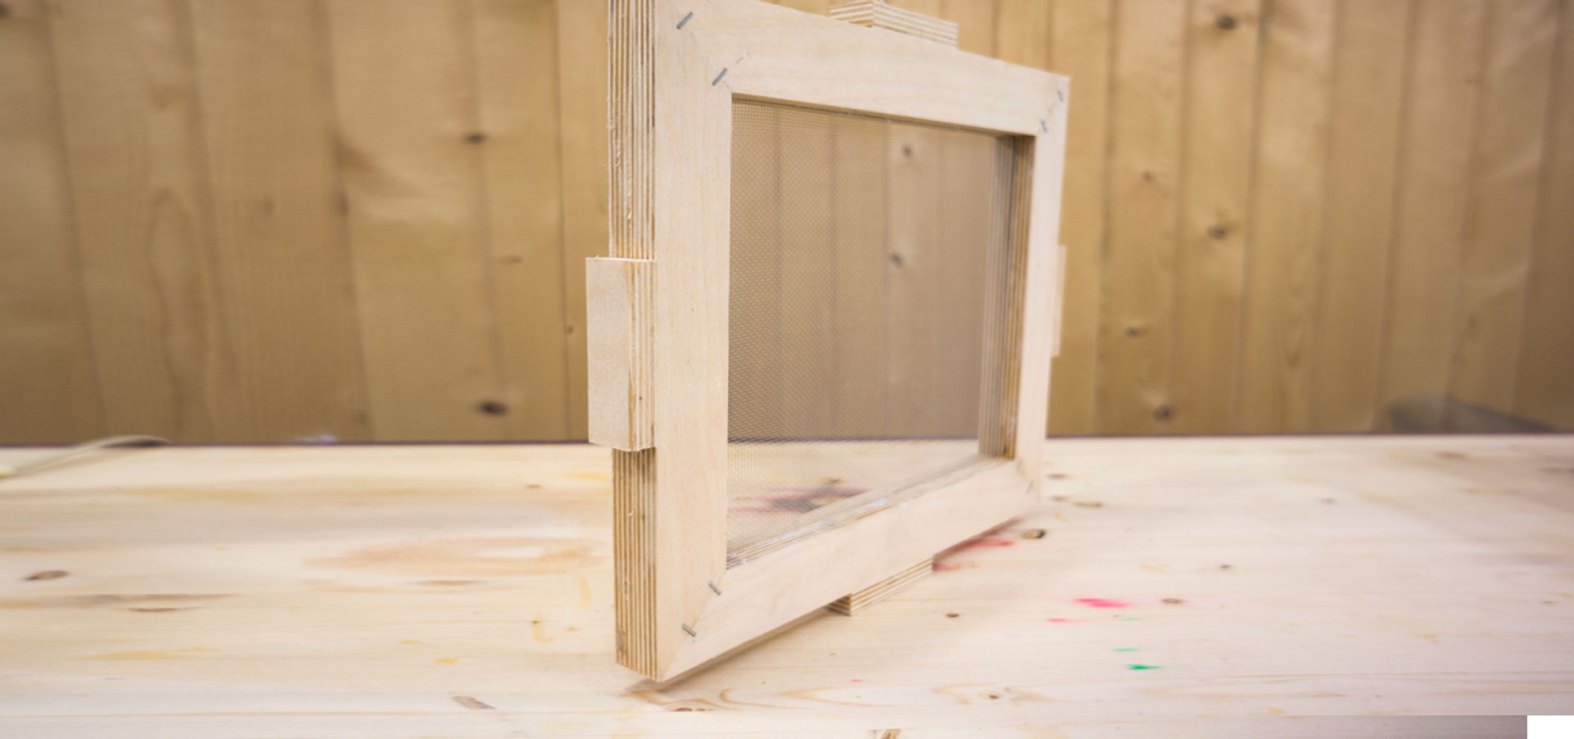
How to Make a Deckle For Paper Making
Making a homemade paper deckle is a real quick and easy project that anyone can do.
Products Used
Making a homemade paper deckle is a real quick and easy project that anyone can do. If you don’t have power tools you could make this paper making deckle with old picture frames. I’m using some scrap 1/2” baltic birch plywood and gluing the mitered corners with CA glue and staples. The screen used on this deckle is just ordinary aluminum window screening. The top half of the deckle is used as the paper mold and friction fits on top of the bottom half of the deckle.

Dowel Joinery Technique and Tips
The method I’m about to show you doesn’t require any specials tools except a drill and a mallet.
Using Dowels for Joinery
There are many ways to join two boards for case work. My favorite and easiest way is to use the Festool Domino. There’s also biscuit joinery, pocket holes and traditional methods such as mortise and tenons. All of these techniques takes expensive special tools or jigs. The method I’m about to show you doesn’t require any specials tools except a drill and a mallet. To make life a little bit easier you’ll want some dowel centers to help you place your mating hole. These dowel centers are very cheap and can be picked up for just a couple of dollars.
Tools and Supplies Used


How to Price Your Work. A Simple Technique
A simple formula for crafters and woodworkers to price your work.
What Should I Charge?
How to price your work. Whether you’re making a piece of furniture or monster pillows you sell at craft shows, you have to have a day rate. Everything takes at least one day to make. Your day rate will change over the course of time.
How Much Do You Value Yourself?
For example my day rate used to be $500 a day, now my day rate is $1000 a day. It’s how much value you want to put on yourself, what you do and what you know. So let’s apply this to a piece of furniture. Like I said before everything takes at least one day to make. If your day rate is $500 a day and it takes two days to make a bed, your going to charge $1000 plus the cost of materials. If you are making items for a craft show you have to figure out how many of those pieces you can make in one day.
Pricing Your Work for Craft Shows
When it comes to craft shows, batching out things it’s extremely important because it makes efficient use of your time. So I know I can make 30 of these wine displays in one day. If my day rate is $1000 a day, that comes out about $35 per wine display that includes the cost of materials. Someone else may have a lower price or a higher price depending on what value they give themselves and their time. That is how you come up with a starting point for your work. And after that then you can adjust the price based on how well it sells or if it doesn’t sell. If you sell out of a certain item very quickly then you know you need to raise your price. And if it doesn’t sell you may need to lower your price. It’s that simple. Not taking into consideration that your product may be complete crap. If it doesn’t sell and it is crap, time to rethink.
Do Not Charge By the Hour
If you charge by the hour you will screw yourself. Because you will forget the cost of gas, you’ll forget how much time it actually takes to go to the store and pick up the materials, or you won’t factor in a mistake that you might possibly make. Charging by the hour and estimating hours will lead to you getting screwed. Plus having a day rate makes the math very simple and understandable for your client. They’ll know up front what it’s going to cost them. Employees charge their employer by the hour. Craftsmen and artists charge by the day. How do you come up with a day rate? Let’s start with a time value per hour.
Stop Screwing Yourself
For someone creating and making things with their skill and knowledge then you should never value yourself under $50 an hour. $50 per hour times a ten hour workday is $500. Start there and work your way up over time. Or start higher if you’re worth it. $500 a day for someone who has spent their lifetime building up their skills and knowledge is nothing. High end craftsmen and artist can charge $5000 a day because they have built up a reputation and a portfolio. Stop screwing yourself over and charge what you are worth.

How to Duplicate a Record
Duplicating a vinyl record using silicon and and resin. A fun lesson in mold making!
Listen to the audio ripped from the duplicated record below.
One of my most fun projects to date! I take a Johnny Cash reissue 7” vinyl record and duplicate it with a silicone rubber mold and liquid plastic. To be quite honest I was surprised on how much detail the mold can handle as the duplicated record played almost perfectly. You can listen to the ripped audio above. There was a few more pops and clicks than the original record and I’m guessing that’s from dust or not cleaning the original enough beforehand. Obviously pirating and duplicating any copyrighted material is prohibited but in the spirit of making and experimentation this was a fun project.
A couple of fun facts about this 7” single: Get Rhythm was the 1956 a-side of this record but it was the b-side that became the huge hit for Johnny Cash. I Walk the Line was the first number one single for Johnny Cash and sold over 2 million copies in it’s original pressing. The copy that I own is a reissue put out by one of my favorite record labels, Third Man Records owned and operated by Jack White.
Original music in the video by Lance Neil Hulsey, Toledo, Ohio
Items Used


Preventing Tear-out When Crosscutting Plywood
Crosscutting plywood with a combination blade almost always results in tear out and I find the easiest way to prevent that is just cover the plywood with painters tape.
Crosscutting plywood with a combination blade almost always results in tear out and I find the easiest way to prevent that is just cover the plywood with painters tape. The tear out tends to happen more so on the bottom side but I like to play it safe and cover both sides before running it through the saw. And that’s how you get a perfect edge with crosscutting veneered plywood on the tablesaw.


Use Flocking to Enhance Your Boxes!
Use flocking on the inside of your drawers to enhance the look and feel of your boxes.
I show you a technique called flocking. This is commonly used in lining the drawers of boxes and cases. It leaves a soft velvety feel and adds a touch of class to your projects. The fibers used in the process are very small and lightweight so I highly suggest proper air filtration and a dusk mask. I flock all the drawers of my bandsaw boxes and sometimes I will flock the cavity the drawer slides into. I really like the look and feel of flocking fibers.
Tool and Supplies Used


Super Simple Way on How to Make Paper
How to make homemade paper from recycled materials you can find around the house.
I show you how to make homemade paper from recycled materials you can find around the house. For this easy craft project you will need a paper making deckle (link below), blender, tub of water, sponge, window screen, bath towel, paper towels, an iron and a heat gun. This is a fun craft project that anybody can do. I use my homemade paper to print my photographs on for framing. This adds and extra element of uniqueness to my art.
Links and Products Used

Woodworking Books

Make Your Own Cutting Boards
15 cutting board projects to make as gifts or sell! Get your signed copy!

The New Bandsaw Box Book
8 bandsaw box projects you can make and sell at craft shows. Signed copies now available!