
How to Make a Filing Cabinet Using Walnut Plywood
Making a pair of walnut file cabinets out of plywood and solid wood.
Woodworking Tutorial on Making a Modern File Cabinet
I’m working on building my dream office here at Make Something HQ, and this tutorial is the latest installment in that series. The two walnut file cabinets I’m making in this video are going to serve as the base for my desk, but the plans also allow them to be built as free-standing units.
This how-to walks you through every step of the build using basic woodworking tools, from cutting the carcass to specs to putting the file folder slip-ons in place. I’ll be using walnut plywood for the top, sides and drawers, as well as creating a bottom footer with a router profile. Because you want your drawers to slide with maximum precision, I’ll also show you how to use a universal drawer slider jig.
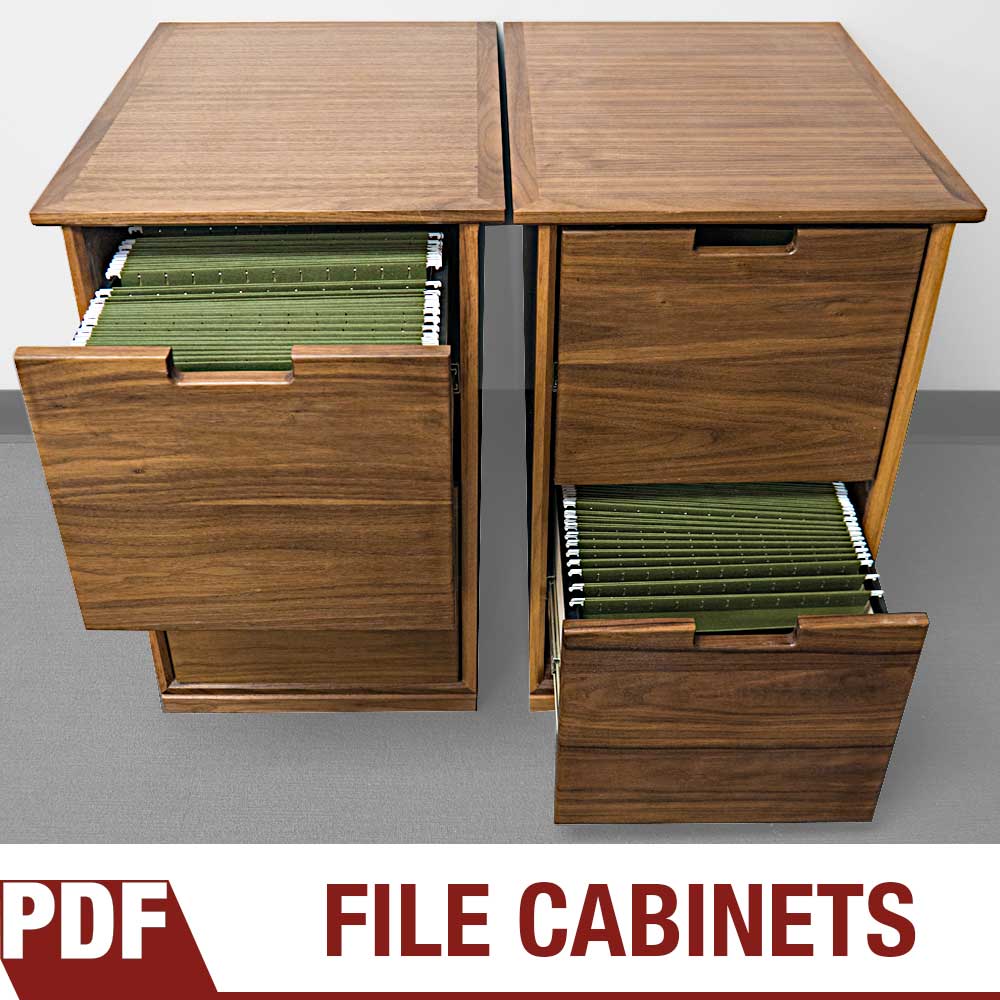
Detailed, step-by-step instructions on how to make a filing cabinet out of plywood and hardwood. Plans contain a 12 page PDF with photos, illustrations, tool & supply list and exact measurements. Watch the video down below to see how easy it’s made!
Along the way, I’ll give you a quick glimpse into my shellacking process, so you can get just the right finish for your filing cabinets. Plus (spoiler alert) I’ll even show you how to work through a minor woodworking mistake. Whether you’re planning to use hanging filing folder cabinets as the base for an awesome dream office desk or just create a place to put all those papers that are piled up all over your floor, this is the tutorial that can get you started.
Tools and Supplies Used in the Woodworking Project


Making a Dozen Christmas Ornaments // Woodworking & Basket Making
12 Quick and easy Christmas ornaments.
Quick and Easy Christmas Decorations
The folks at True Value Hardware issued a challenge: Create a dozen ornaments (for the twelve days of Christmas, we presume), using their Black Friday specials, everything from Christmas lights to a crock pot. A tall order, so I called in the big guns—my wife and basket-weaving genius Kelly Johns.
Between Kelly’s basket weaving skills and my woodworking, we were able to decorate the Christmas tree in style. Some of the ornaments were simple enough and would make a great activity for the whole family. Other more intricate ornaments came from the turning of the lathe.
What did we make? How did we make it? And what exactly did we do with the crock pot? You’ll just have to watch. Kelly and I were inspired enough to make this an annual holiday woodworking / basket weaving tradition, adding new handmade ornaments to the tree every year. We hope you’ll be inspired to make something as well!
Supplies Used in This Project


Multipurpose Drawer Organizer & Travel Case | Woodworking Project
What if you could make a drawer organizer that doubles as a travel case? Let’s give it a shot!
Simple and Quick Woodworking Project!
When it comes to keeping clutter off your bathroom counter, drawers are OK. But eventually they just become a big box you throw stuff in. What if you could make a drawer organizer that doubles as a travel case? Something you could just lift out of the drawer and take with you? It’s surprisingly easy, and this tutorial will show you how to do it.
With a removable lid and a sliding drawer, which provides a second layer of storage, the organizer/travel case is a clever design, that’s actually pretty straightforward from a woodworking perspective. I’m building this ingenious contraption out of walnut (for the sides) and plywood (for the bottom and lid). I use mitered corners and splines for the build.
I’ve also designed the compartments within this piece to be modular, so you can arrange the storage levels to meet your needs. As you watch this easy woodworking tutorial, I hope you’re inspired to make modifications that work for your available space and personal toiletry habits. (No judgment here.)
Tools and Supplies Used in The Video


Making Segmented Wood Wedding Rings
Every year my wife and I retire our wedding rings and make new ones.
A Yearly Woodworking Tradition
Every year my wife and I retire our wedding rings and make new ones. This is a yearly tradition and this year we’re celebrating our fourth set of wooden rings. Each ring contains 17 segmented pieces meticulously glued together one-by-one. The outside of the wooden rings are made from cocobolo that sandwiches a thin piece of maple.
Wood Provided By Kencraft Company Hardwoods
Tools and Supplies Used in This Woodworking Project


Outdoor Halloween Decor Ghost | DIY Project
How to turn an ordinary outdoor lamp into a spooky halloween ghost.
Easy Halloween Decoration | Spooky Ghost
How to turn an ordinary outdoor lamp into a spooky halloween ghost. All the materials used in this DIY project are common supplies found at your local True Value hardware store.

Tools and Supplies Used in This Halloween Project | True Value Hardware

STEP 1: Rough out the head and shoulders shape with a marker and cut it out with a jigsaw. It doesn’t need to be pretty as we’ll drape some cloth over it in the next step. Also, ghosts ain’t pretty! Now’s also a good time to paint the cutout black.

Step 2: Take some drop cloth and using a staple gun tack it to the head and shoulders. Make sure to not cover the eyes and keep it lose for a spooky effect.

Step 3: Cut the drop cloth to length and start ripping it to long thin shreds. This will help “age” the cloak and add movement in the wind.

Step 4: Now with some grey, black and brown paint you can randomly spray streaks and spots to give it that century warn look.

Step 5: To add a tombstone to your halloween yard decor take some insulation foam board and cut out a tombstone shape. This can easily be done with a utility knife. In this example I also carved out the letters “RIP” and scalloped the edges for a more authentic look.

Step 6: Now you can add some color to your tombstone with some grey and black spray paint.

Step 7: Use what works best for your yard. For my halloween display I needed my tombstone to peak over the bushes so I cut out a stake and attached it using zip ties.

Step 8: Finally, you can attach your spooky halloween ghost to your light pole. Now just wait for it to get dark and turn on your light!
CAUTION: Make sure your light doesn’t get hot as you don’t want to start a fire. If you find it does get hot you can fine replacement LED bulbs that don’t throw off any heat.

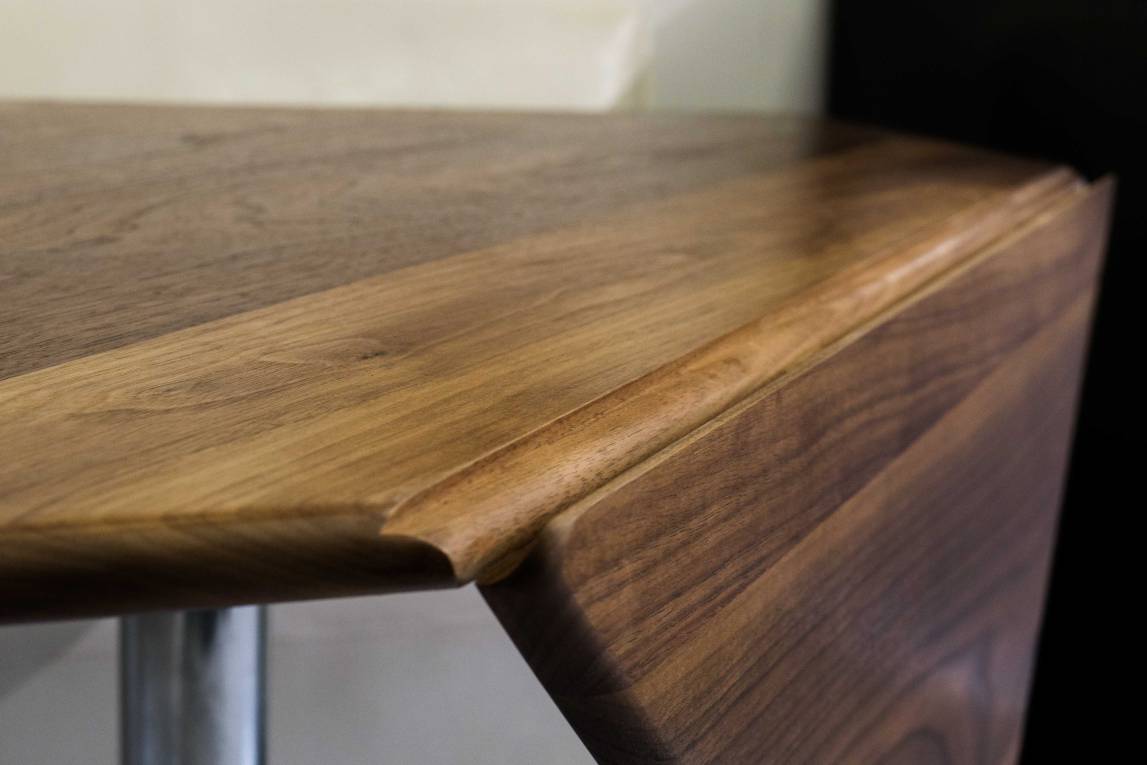
How to Make a Drop Leaf Table With a Rule Joint
Making a drop leaf kitchen table out of walnut.
Making a Drop Leaf Table Woodworking Project
Our kitchen has this built-in restaurant booth that looks cool but doesn’t fit the space very well. In this woodworking tutorial video I replace the round laminate table with a square solid walnut table that has a drop leaf on one corner. I’m using Brusso drop leaf hinges and a match set of router bits to make the rule joint. Watch the video above to see how this is done.
Tools and Supplies Used in This Woodworking Project


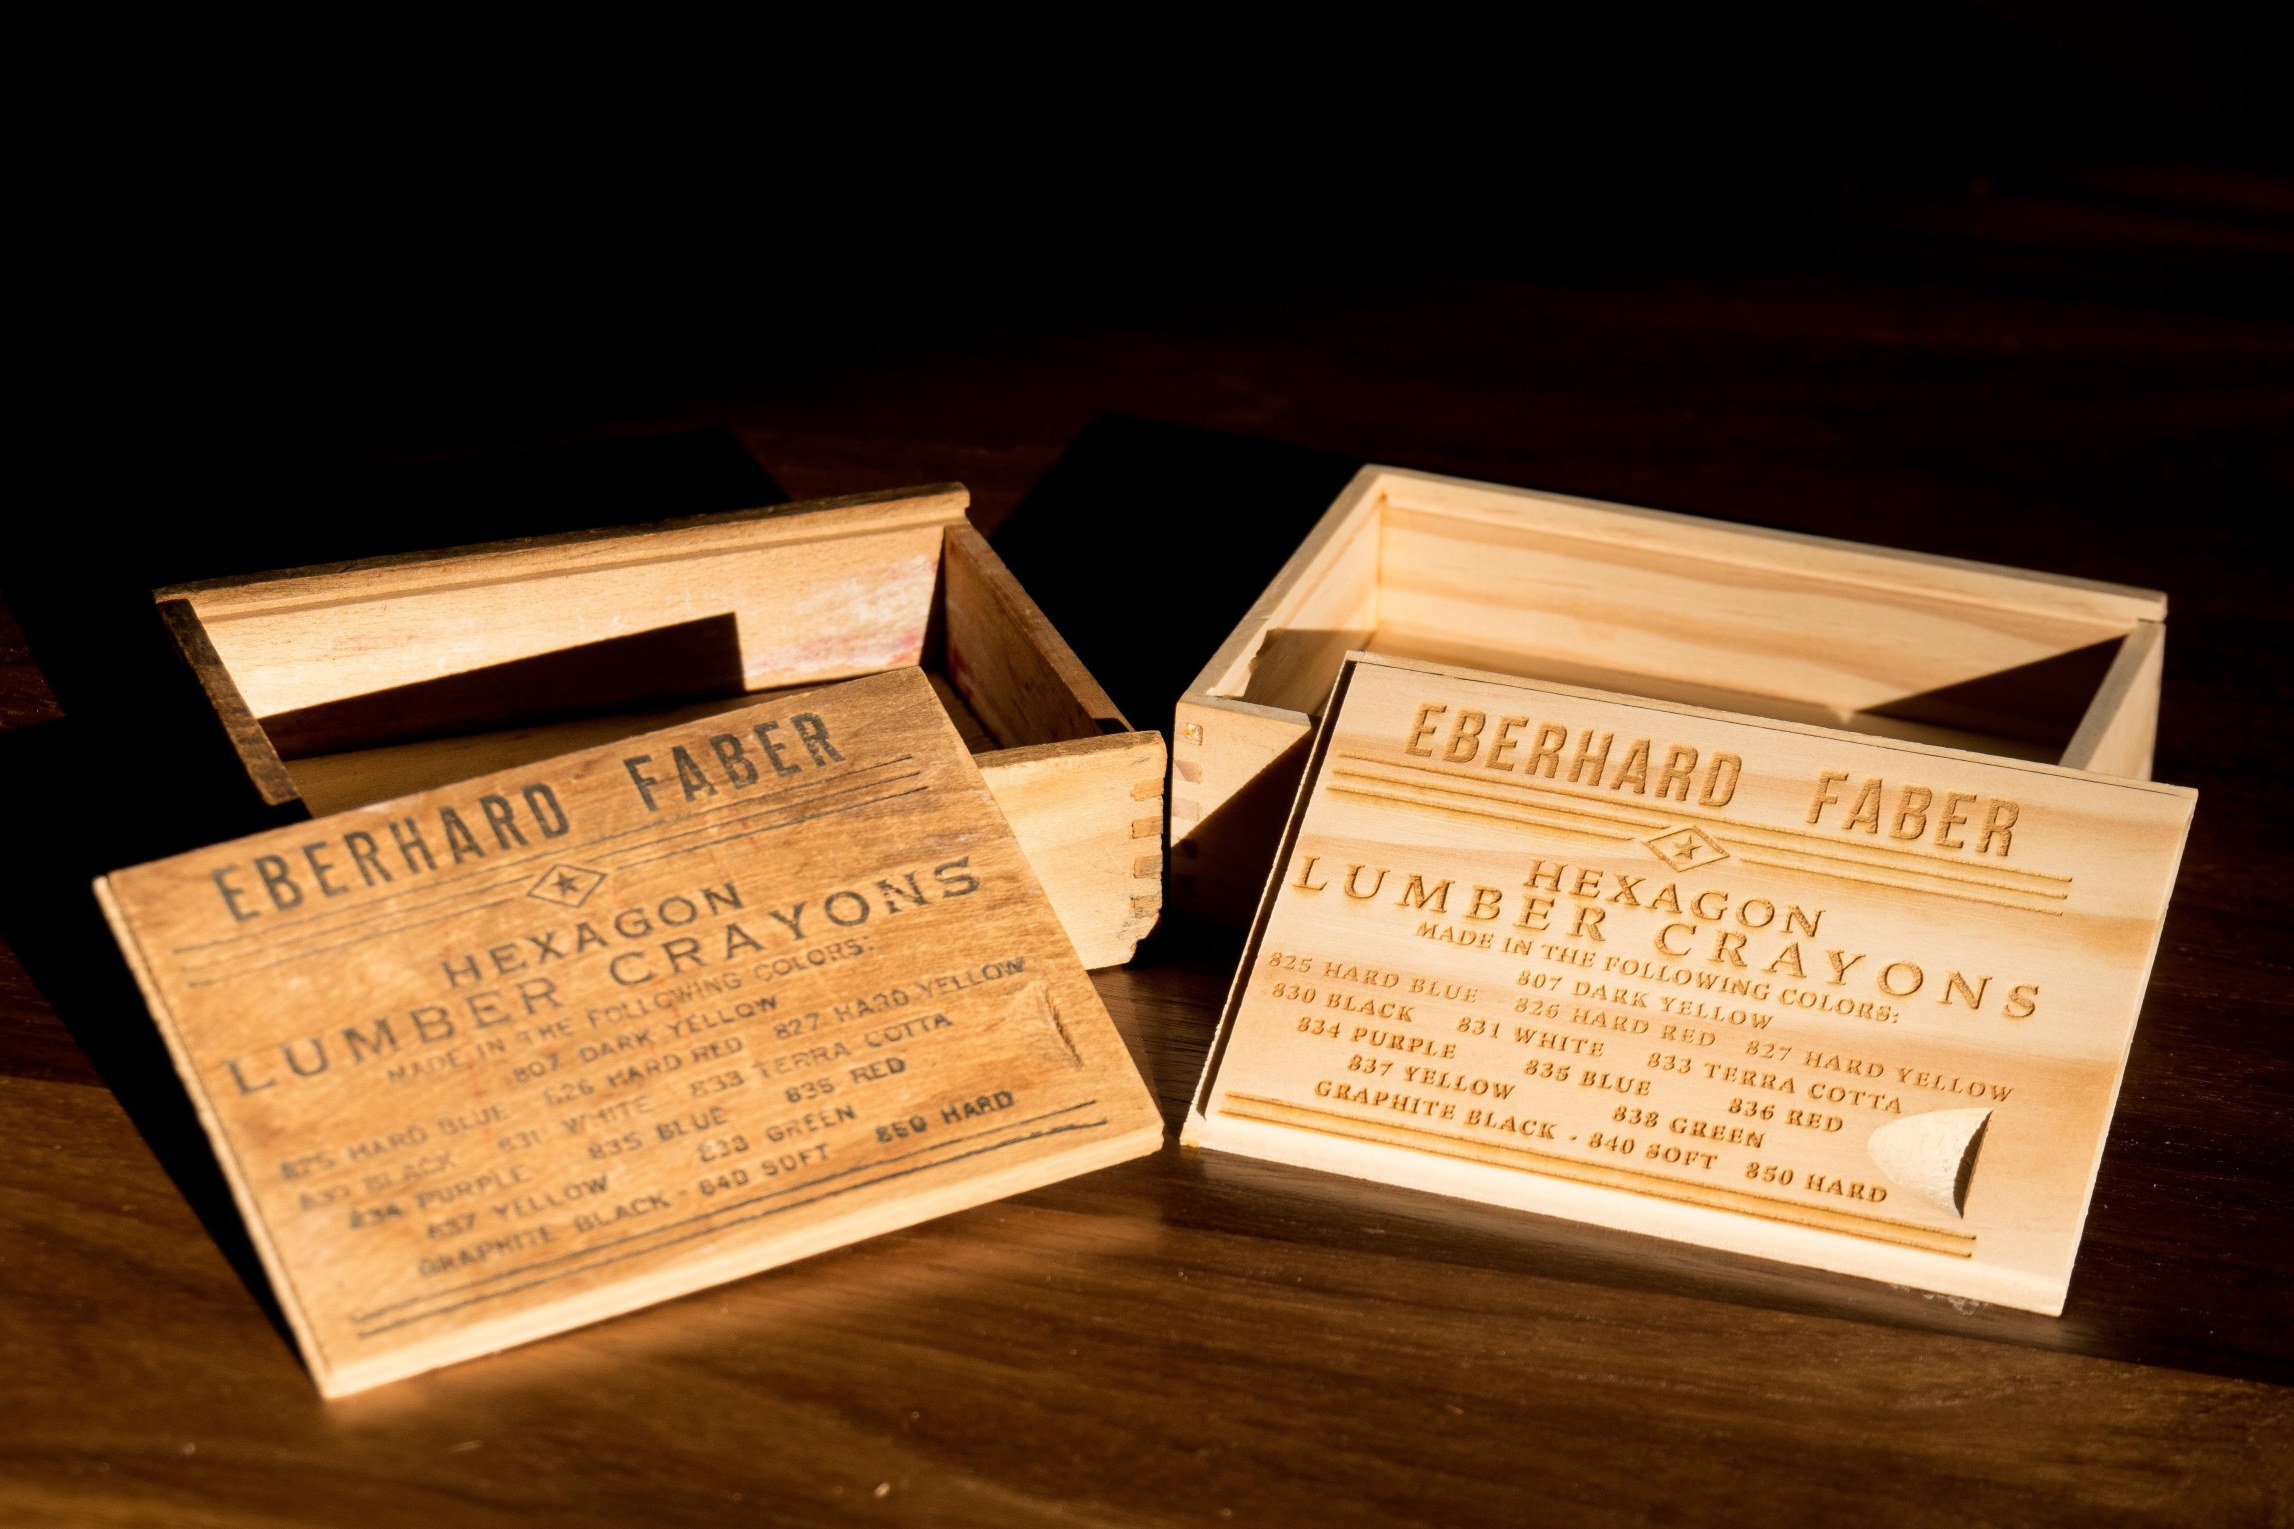
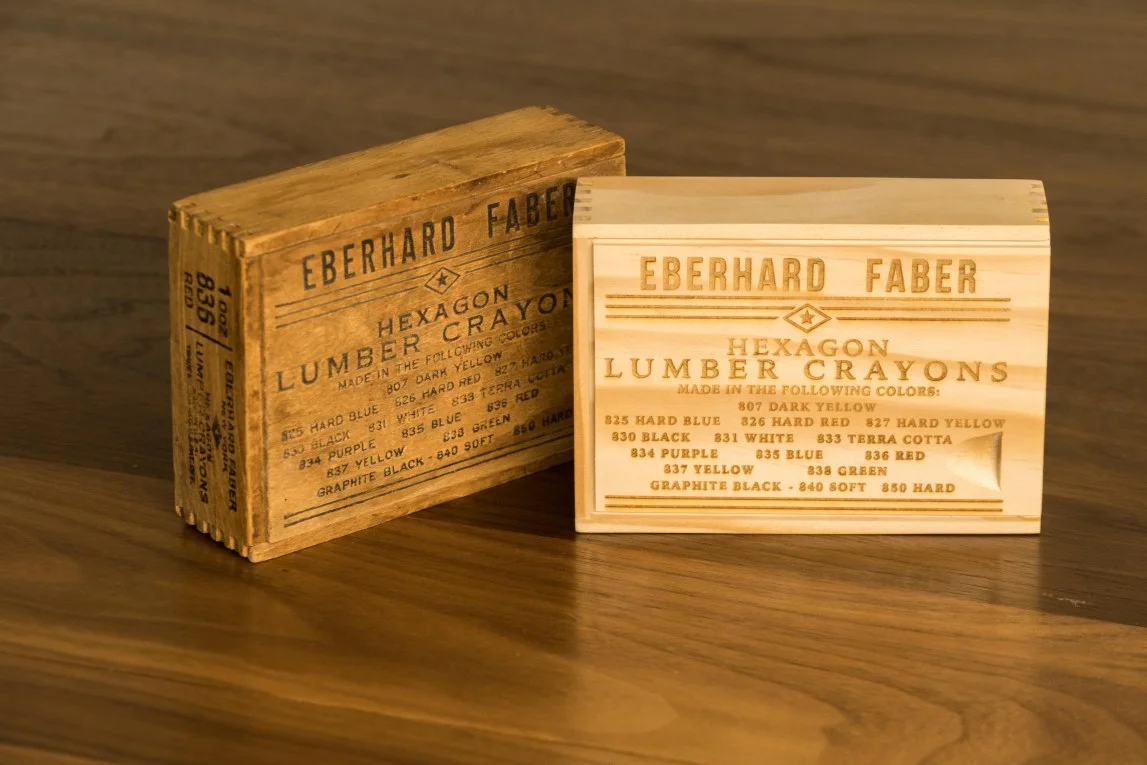
Recreating a 100 Year Old Finger Joint Box
Deconstructing a vintage Eberhard Faber Lumber Crayon box and making a replica.
Box Joints and Finger Joints Made Easy
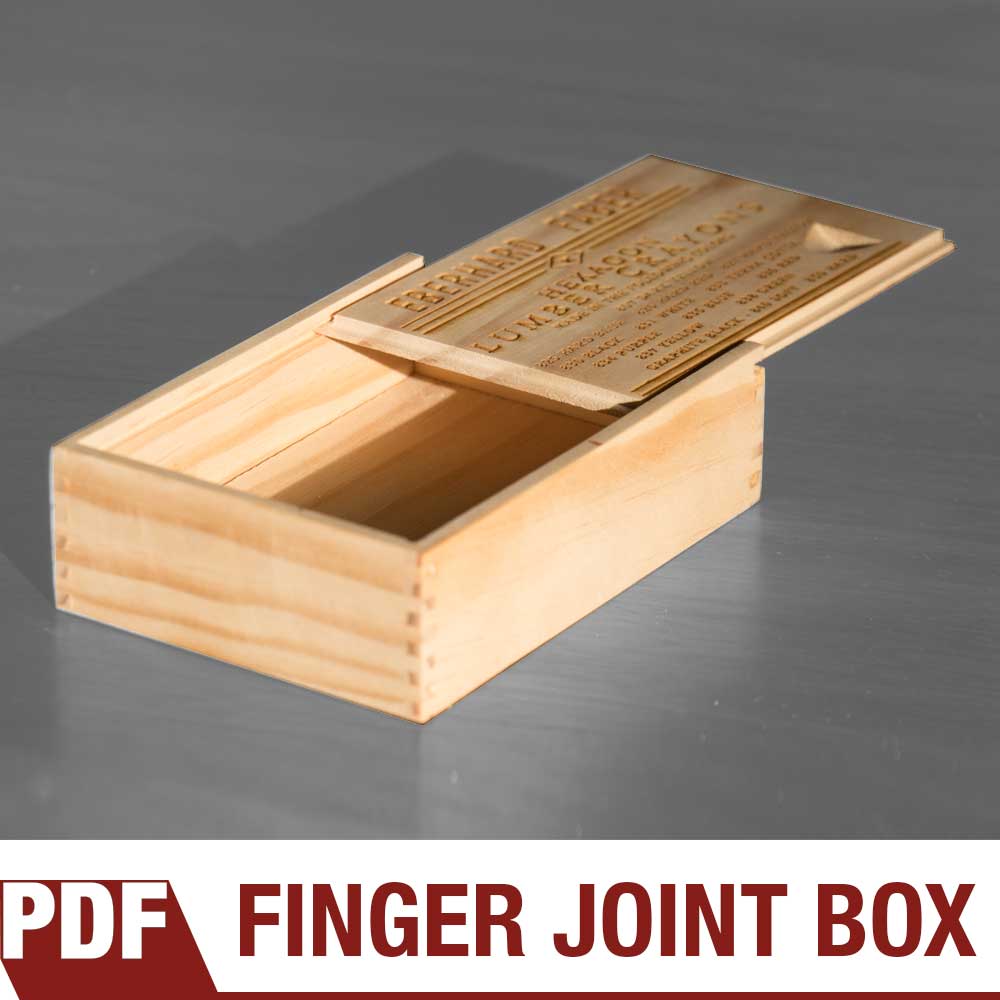
Detailed, step-by-step instructions on how to make a finger joint box. IMPORTANT: You will need a box joint jig to make this project. Either purchasedor shop-made. lans contain a 9 page PDF with photos, illustrations, tool & supply list and exact measurements. Watch the video down below to see how easy it’s made!
Deconstructing a vintage Eberhard Faber Lumber Crayon box and making a replica. This classic box features box joints (also called finger joints) and a sliding lid complete with engraved and branded lid. Makes for a great woodworking project you can sell at craft fairs.
Tools and Supplies Used In This Woodworking Project


Turning Rotten Walnut Wood Into Art
I take a trip to my local hardwood dealer to look for walnut that would typically be thrown out so we can turn it into art.
Woodworking Project. Nature Made Art
This week we take a trip to my local hardwood dealer Kencraft Company in Toledo, Ohio to look for walnut that would typically be thrown out so we can turn it into art. We found a large gnarly piece with a rotten worm hole that we resawed into a book matched pair. The heart shaped hole left by the worm holes was backed with a bright red velvet fabric to highlight the beautiful pattern left by nature.
The overall size of the piece is 25″ x 25″ framed with a nice contrasting cherry and finished with boiled linseed oil.
Tools and Supplies Used in This Woodworking Project


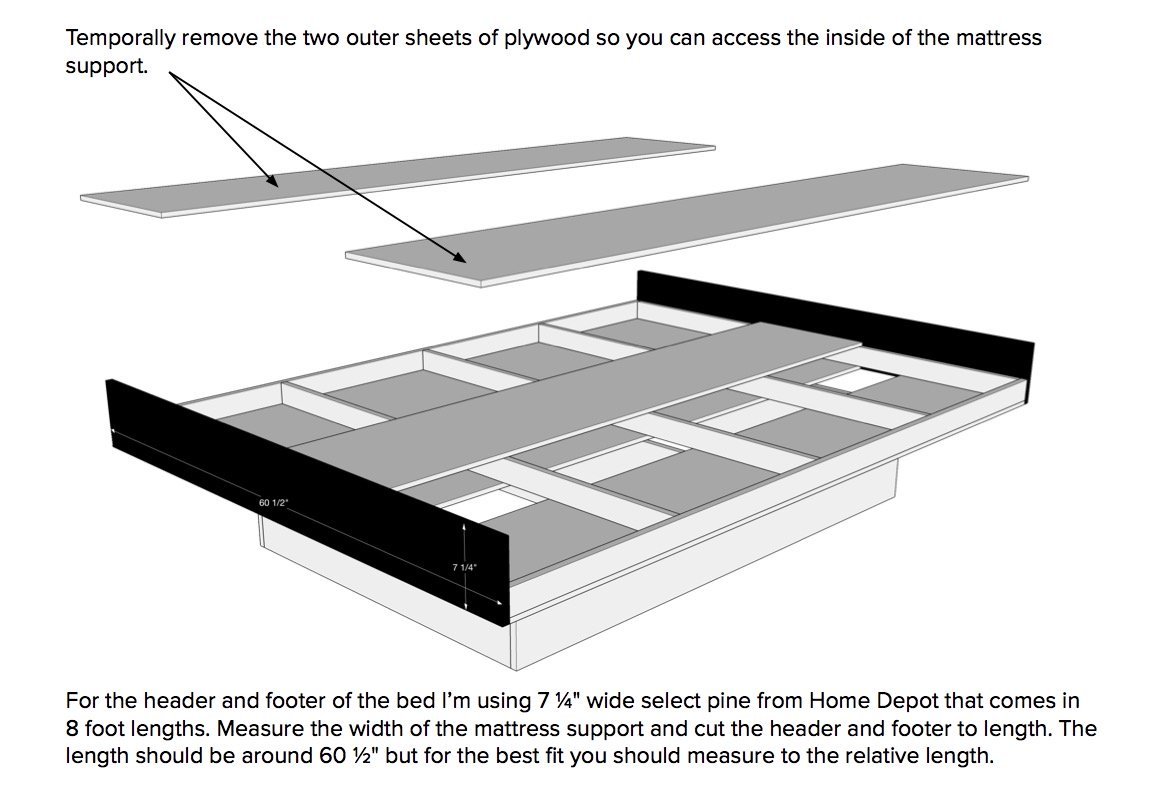
How to Make a Queen Platform Bed | DIY Project
I designed this queen size platform bed based on lumber that can be purchased at your local home center.
Make This Platform Bed With Limited Tools and Lumber from Home Depot!

Detailed, step-by-step instructions on how to make a queen size platform bed. Easy to make project with lumber you can get from your local home center with limited tools. Plans contain a 8 page PDF with photos, illustrations, tool & supply list and exact measurements. Watch the video down below to see how easy it’s made!
I designed this queen size platform bed based on lumber that can be purchased at your local home center. All of the boards I bought came in pre-cut widths so all I had to do was crosscut to length and screw them together. You don’t need many tools to complete this project since all that really needs done is some basic crosscutting and drilling and screwing.


Making Art Out of Walnut Knots
Super fun and easy woodworking project using walnut knots to turn into wall hanging art.
Instead of Throwing Away Those Ugly Knots Turn Them Into Art!
Super fun and easy woodworking project using walnut knots to turn into wall hanging art. I went to my local hardwood dealer and asked them if they had any ugly knots and while I was there I had them resaw it into four slices. This will allow me to book match them into a 4-up configuration inspired by Andy Warhol. I used home center paint chips taped to the back to allow the color to pop through. These colorful chips can be swapped out to compliment the colors of your wall, match seasonal colors or show off your favorite sports team.
Tools and Supplies Used In This Woodworking Project


How to Make a Modern Retro Magazine Rack
How to make a vintage modern magazine rack. Easy woodworking project that can be made in a couple of hours with very few woodworking tools.
Simple Woodworking Project with Limited Tools
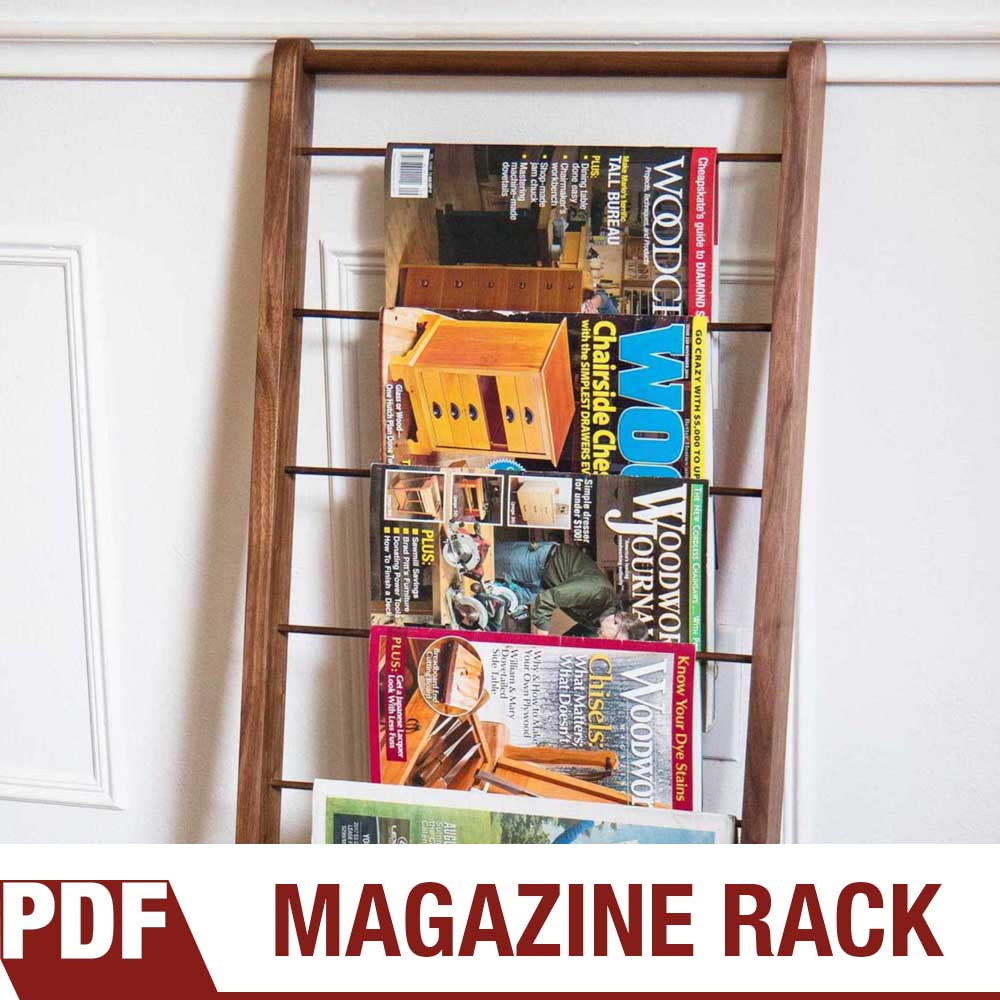
Detailed, step-by-step instructions on how to make a simple magazine rack. Requires very little wood and a few pre-made dowels. Watch the video below to see how easy it is!
How to make a vintage modern magazine rack. Easy woodworking project that can be made in a couple of hours with very few woodworking tools. Even though we live in a digital age I’m a firm believer in holding physical books and magazines. There’s something special about turning through the pages and the effortlessness about picking up a magazine and flipping through it. Here’s a great way to showcase and store your favorite newspapers and magazines!
If you’d like the free plans for this woodworking project, fill out the form on the bottom of this page and you’ll get immediate access to the 8 page PDF with step by step instructions.
Tools and Supples Used in This Woodworking Project


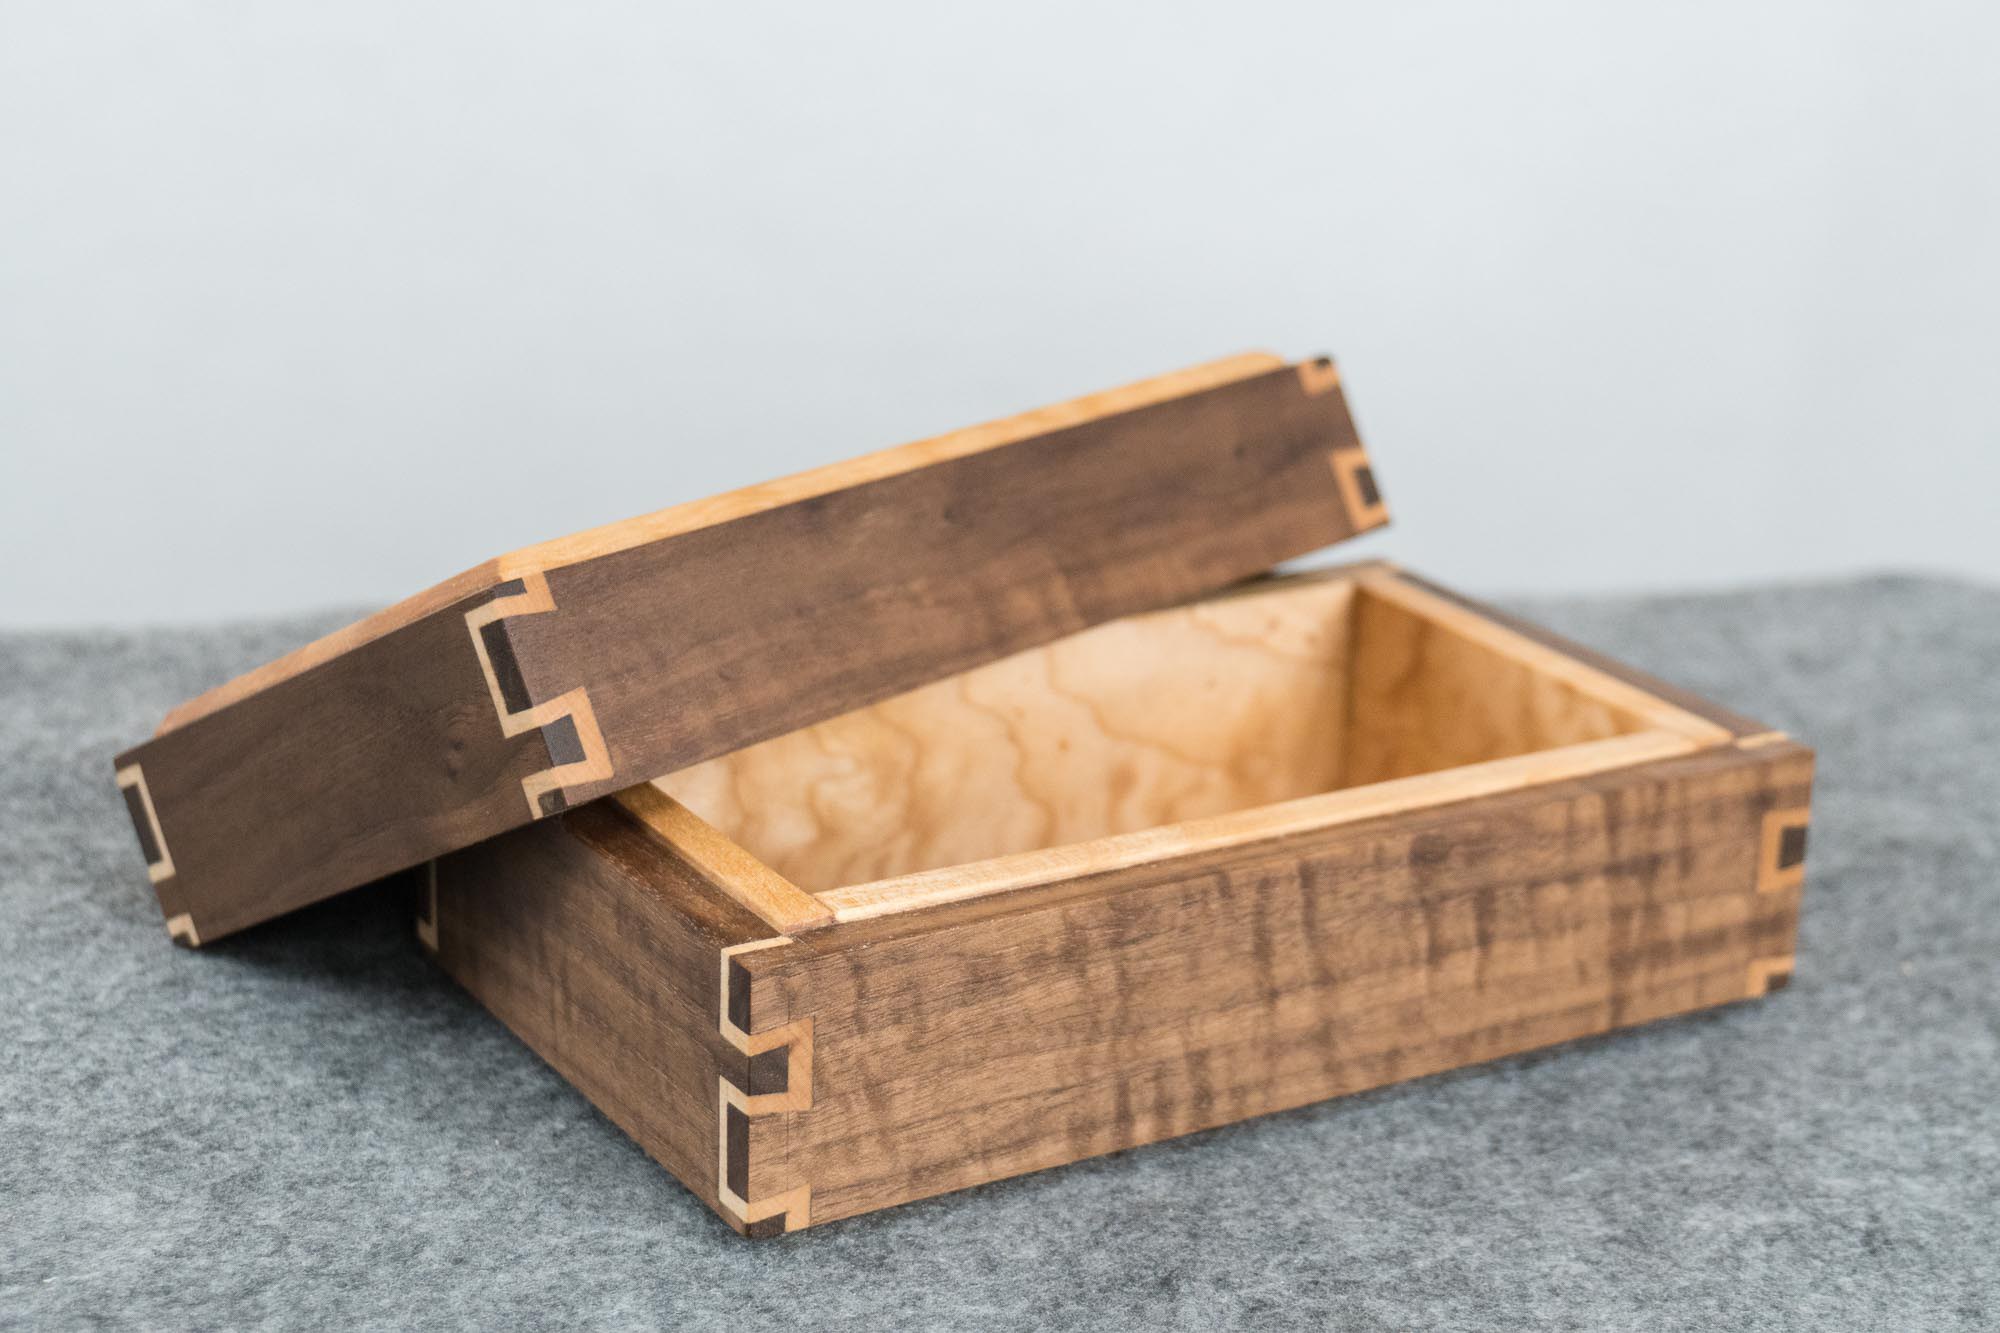
How to Cut Inlay Dovetails With Hand Tools
Step by step video tutorial on how to cut inlay dovetails.
Inlay Dovetail Joinery. Easier Than You May Think!
Step by step video tutorial on how to cut inlay dovetails. Jonathan Katz-Moses walks us through the process and shows just how easy it is to cut double dovetails.
I am giving this box away along with a set of the Katz-Moses dovetail jig. Sign up for my email list with the form for the bottom of the page and I’ll draw a name on August 24th.
Tools Used for Cutting Dovetails


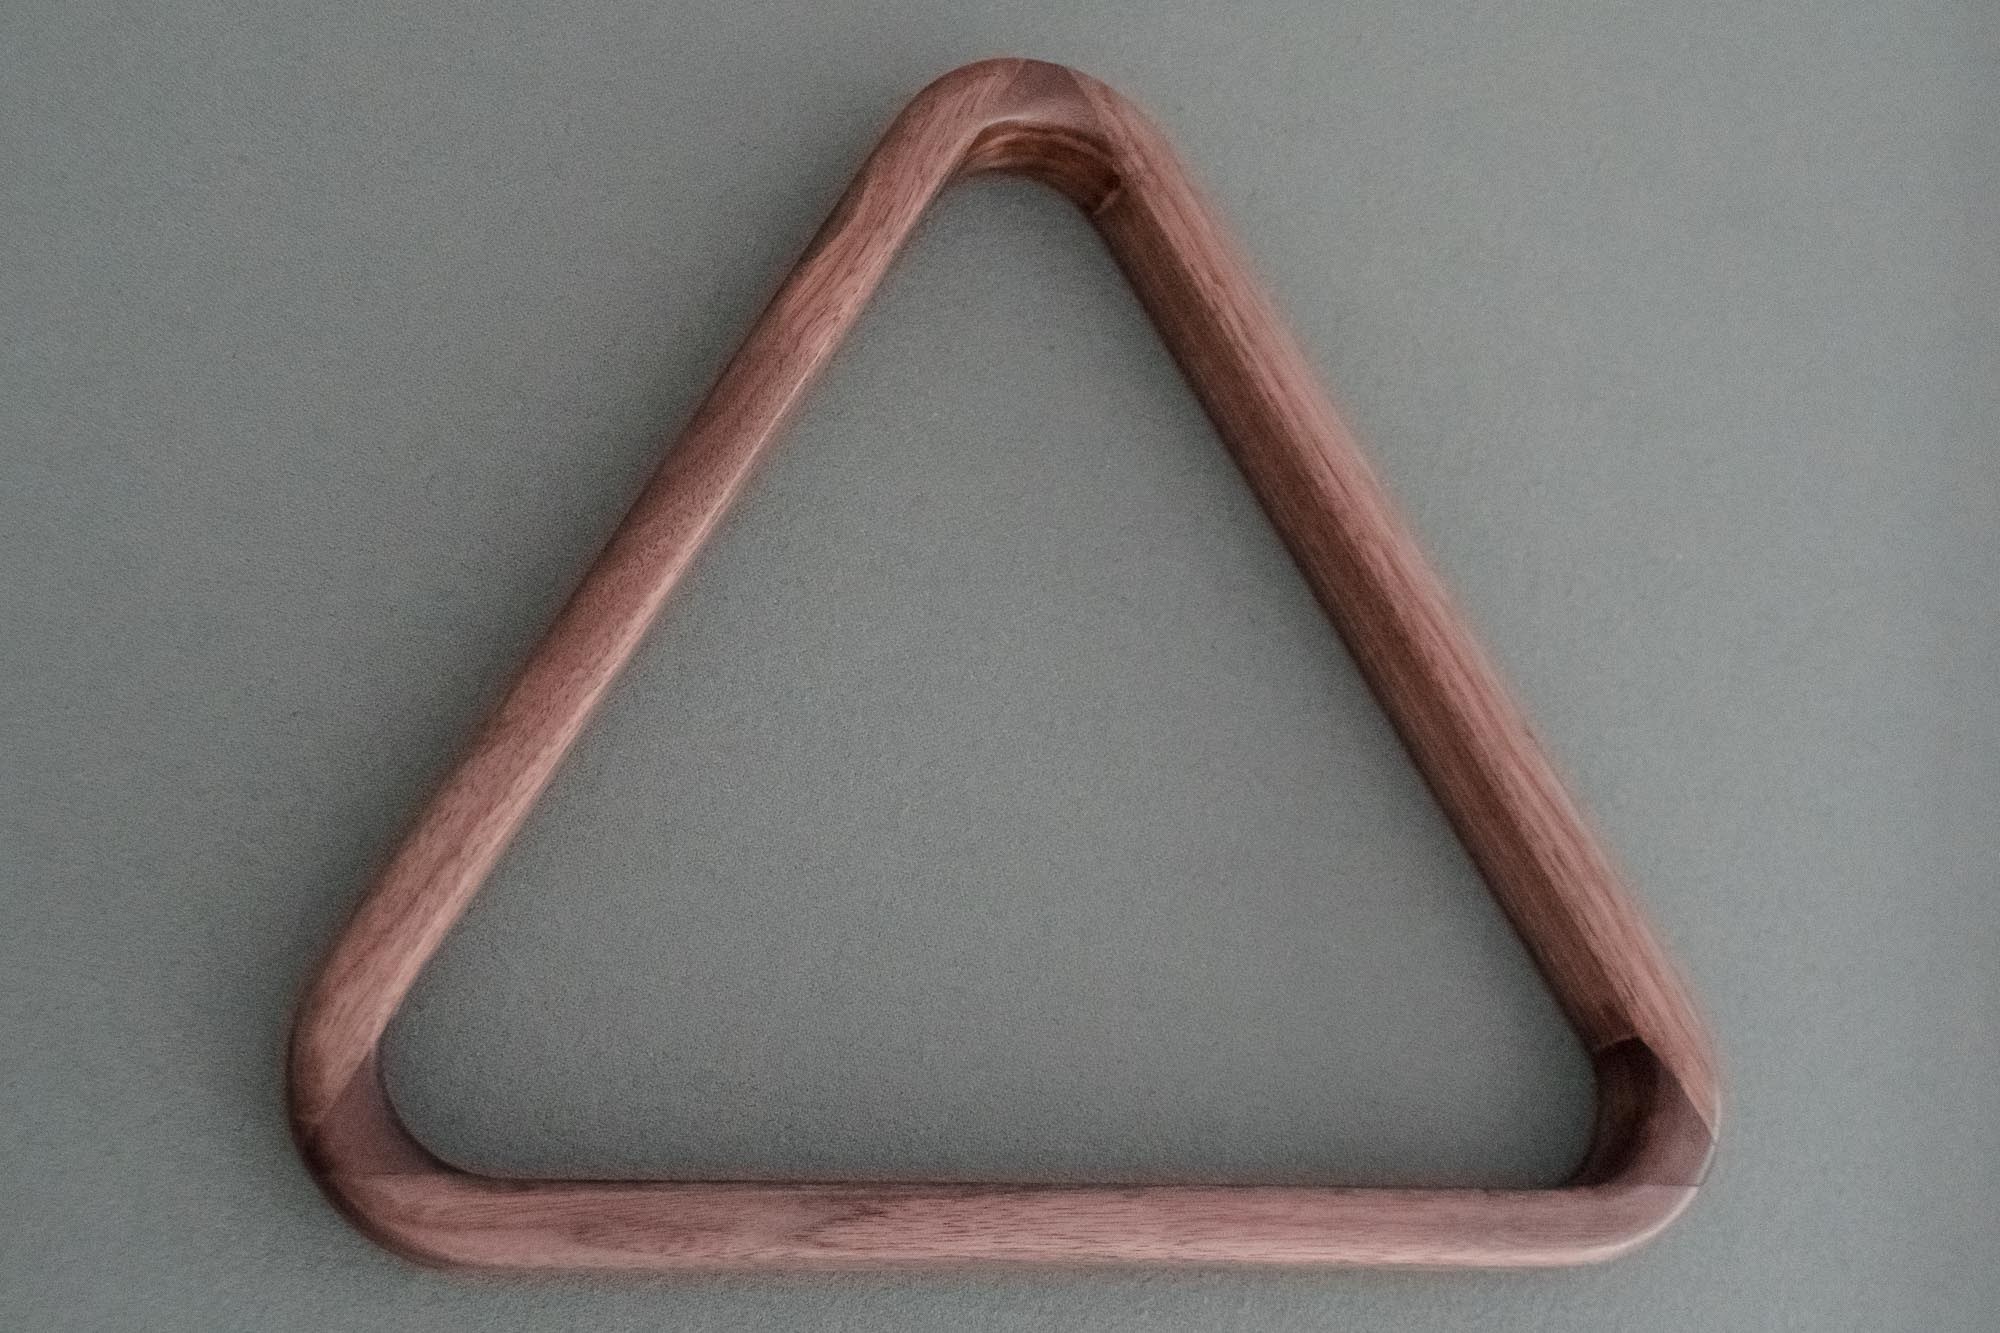
Pool Billiard Ball Rack Made With Black Walnut
Turns out making a billiard rack was a bit more challenging than I originally expected. Watch the video to see some of the challenges!
Making a Walnut Pool and Billiard Ball Rack
Turns out making a billiard rack was a bit more challenging than I originally expected. The three main pieces are joined together at 60 degree angles. To cut these angles I use my table saw sled and a 60 degree triangle as a guide to push it through the blade. Technically once you glue up the three pieces you have a working billiard rack but this makes the rack too big to fit into the holder in my pool table. To allow me to cut the corners down I added some reinforcement triangles in each one of the corners. This also gives me plenty of glue surface which eliminates the need for splines.
Tools and Supplies Used in This Woodworking Project


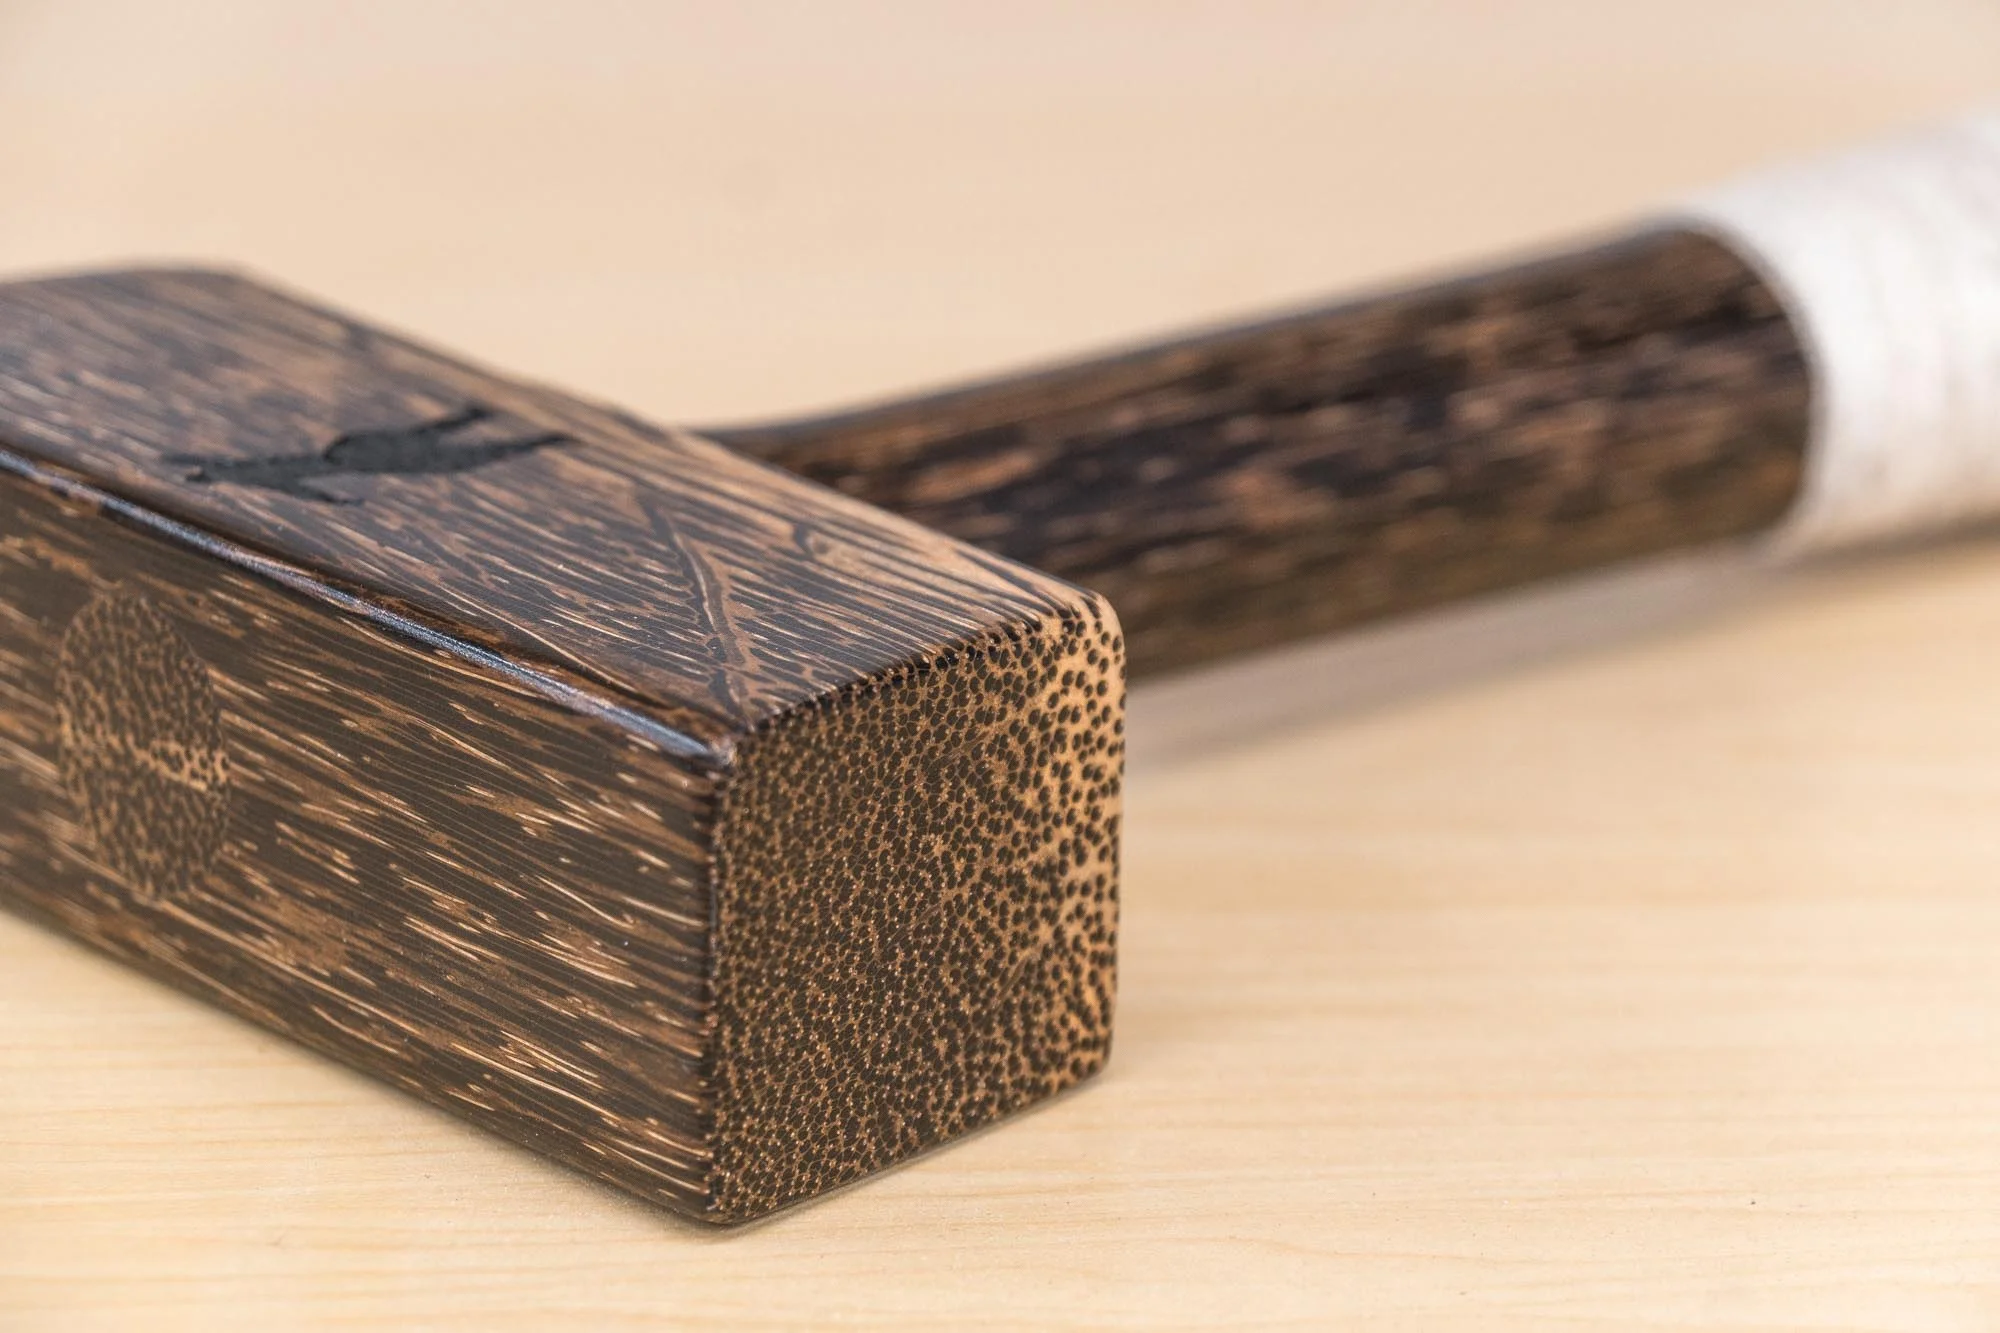
How to Make a Wood Mallet
Making a wood mallet is a quick an easy woodworking project anyone can do with some basic woodworking tools.
The Making of a Wood Jointers Mallet
Making a wood mallet is a quick an easy woodworking project anyone can do with some basic woodworking tools. For this project I decided to use some fancy leftover coconut palm wood but any wood will do. I begin by cutting the hammer head to 5.5″ long, 2″ tall out of 1.5″ thick stock. I then drill a 1″ hole completely through the top as this will hold the handle tenon. The handle is cut to 11.5″ in length and turned on the lathe. The tenon should fit easily into the hammer head mortise and then split down the middle on the bandsaw. This will allow me to make a wedge that will hold everything together very snug with wood glue.
For aesthetic reasons I wrapped the handle with baseball bat tape and tapered off the ends of the hammer head. And just for fun I laser engraved MC Hammer on one side and the phrase “Please Hammer” on the other referencing the hit album “Please Hammer Don’t Hurt ‘Em.”


Bandsaw Tips and Tricks
Tips and tricks to help you succeed on the bandsaw.
Bandsaw Blade Selection
Most bandsaw problems come from either a dull blade or using a blade with too many teeth per inch. For the type of woodworking I do I only need two blades.
3/16″, 4 TPI Skip Tooth Blade
This is the blade I use for 95% of all my bandsaw cuts. This blade works great for cutting tight radiuses and can also be used for resawing pieces up to 3″. If you’re thinking about making bandsaw boxes then this is the perfect blade. Having only 4 teeth per inch is perfect for efficiently removing all the waste while cutting the curves. Get the blade here.
Wood Slicer 1/2 inch Resaw Bandsaw Blade
I only use this blade for about 5% of my bandsaw cuts but it’s a must if you plan on resawing wood over 3″ tall. Get the blade here.
Bandsaw Blade Tension
Bandsaw blade tension is a subject I think receives too much unneeded attention. I rarely worry about tightening and tensioning the blade and just throw it on with any issues. If you do want to properly tension your blade the only thing you need to keep in mind is that the blade should defect about 1/4″ with moderate pressure. Watch the video above to see how this is done.

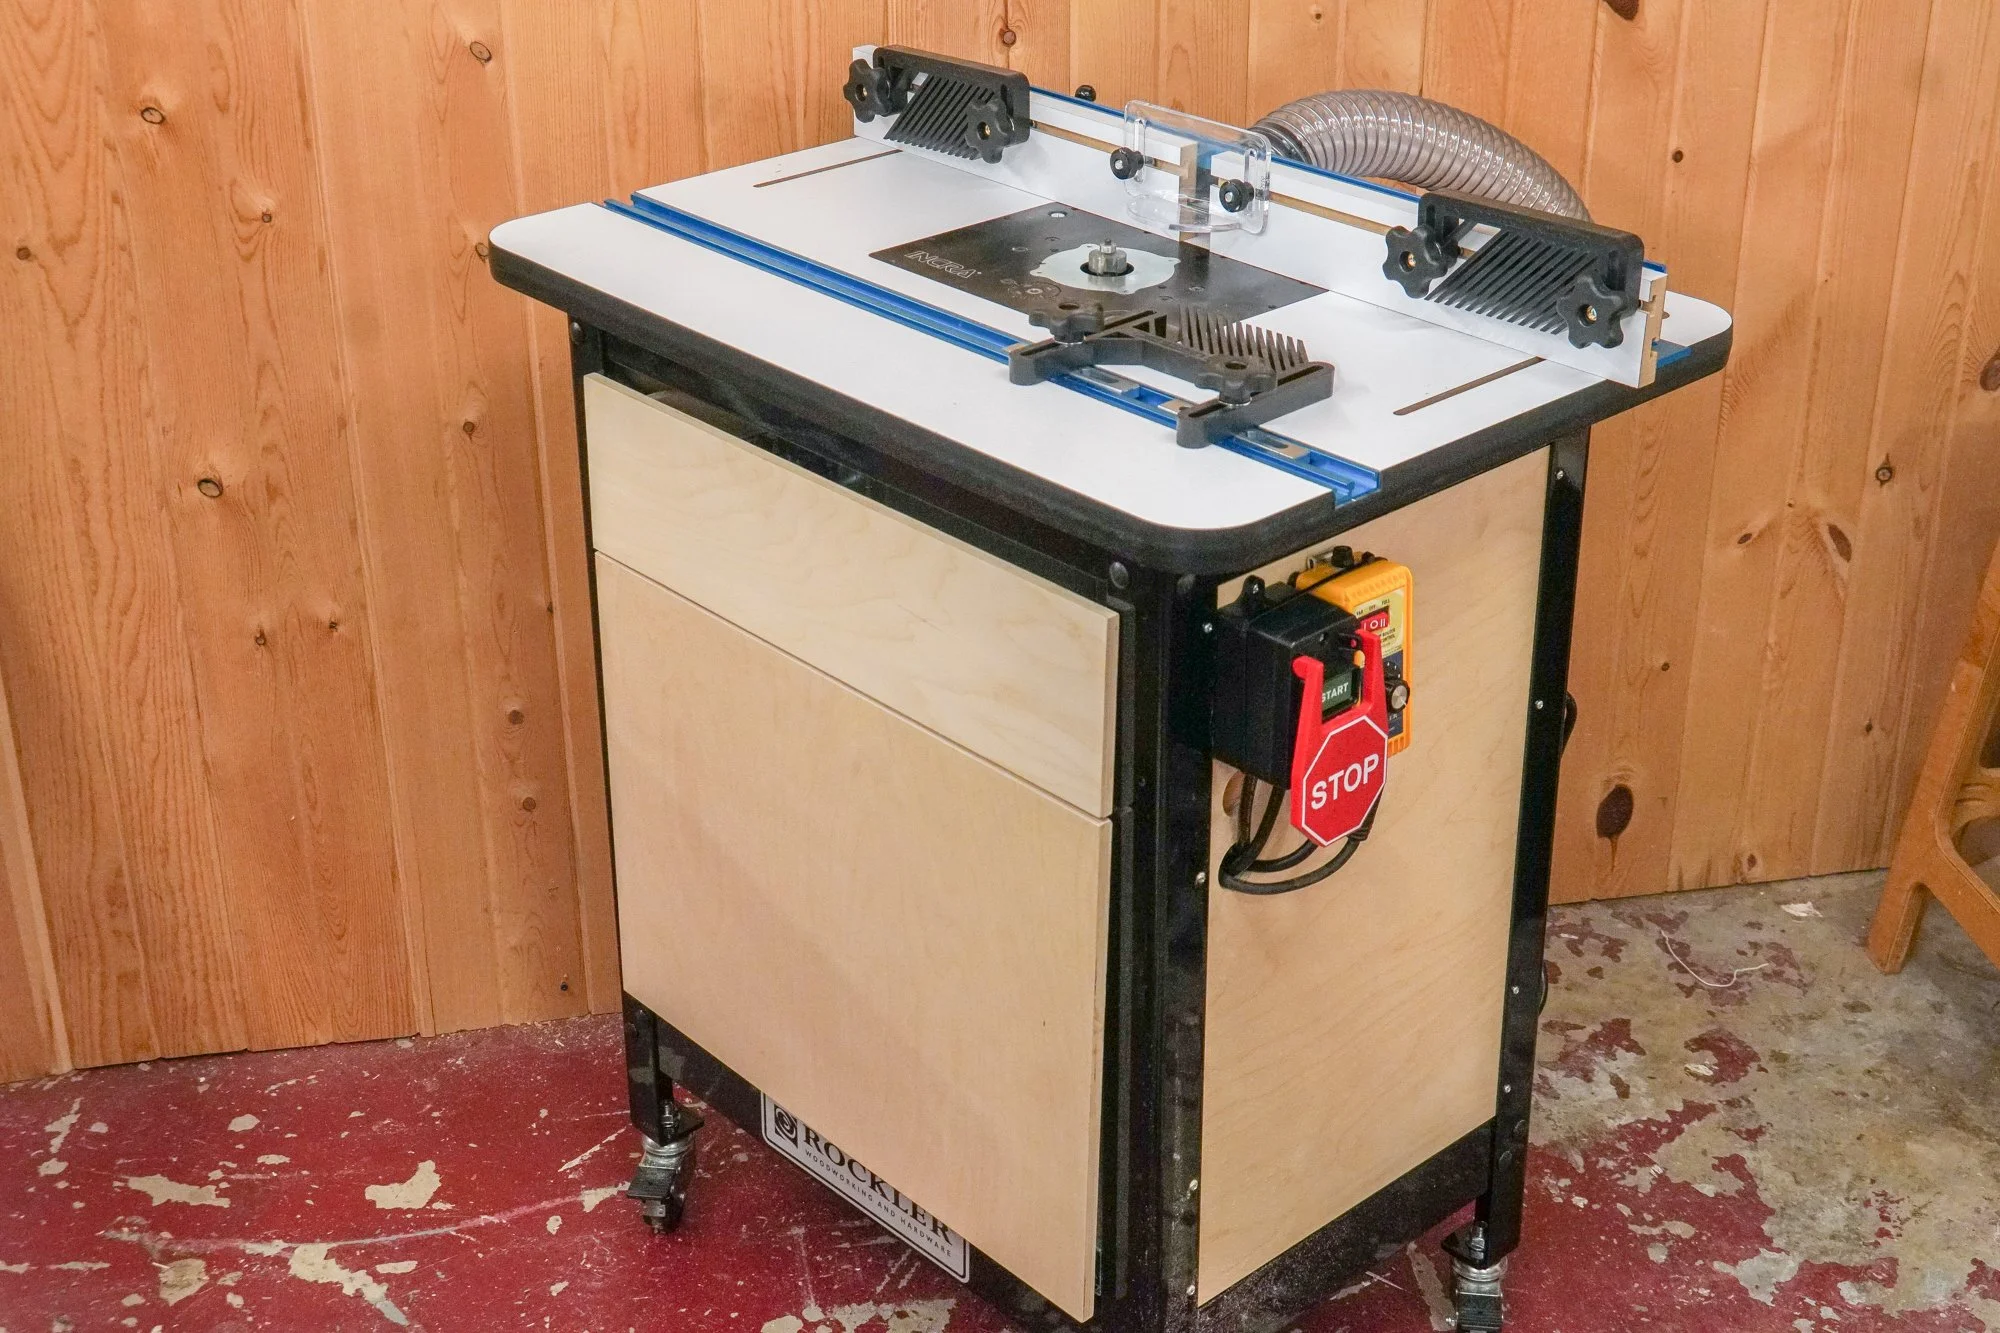
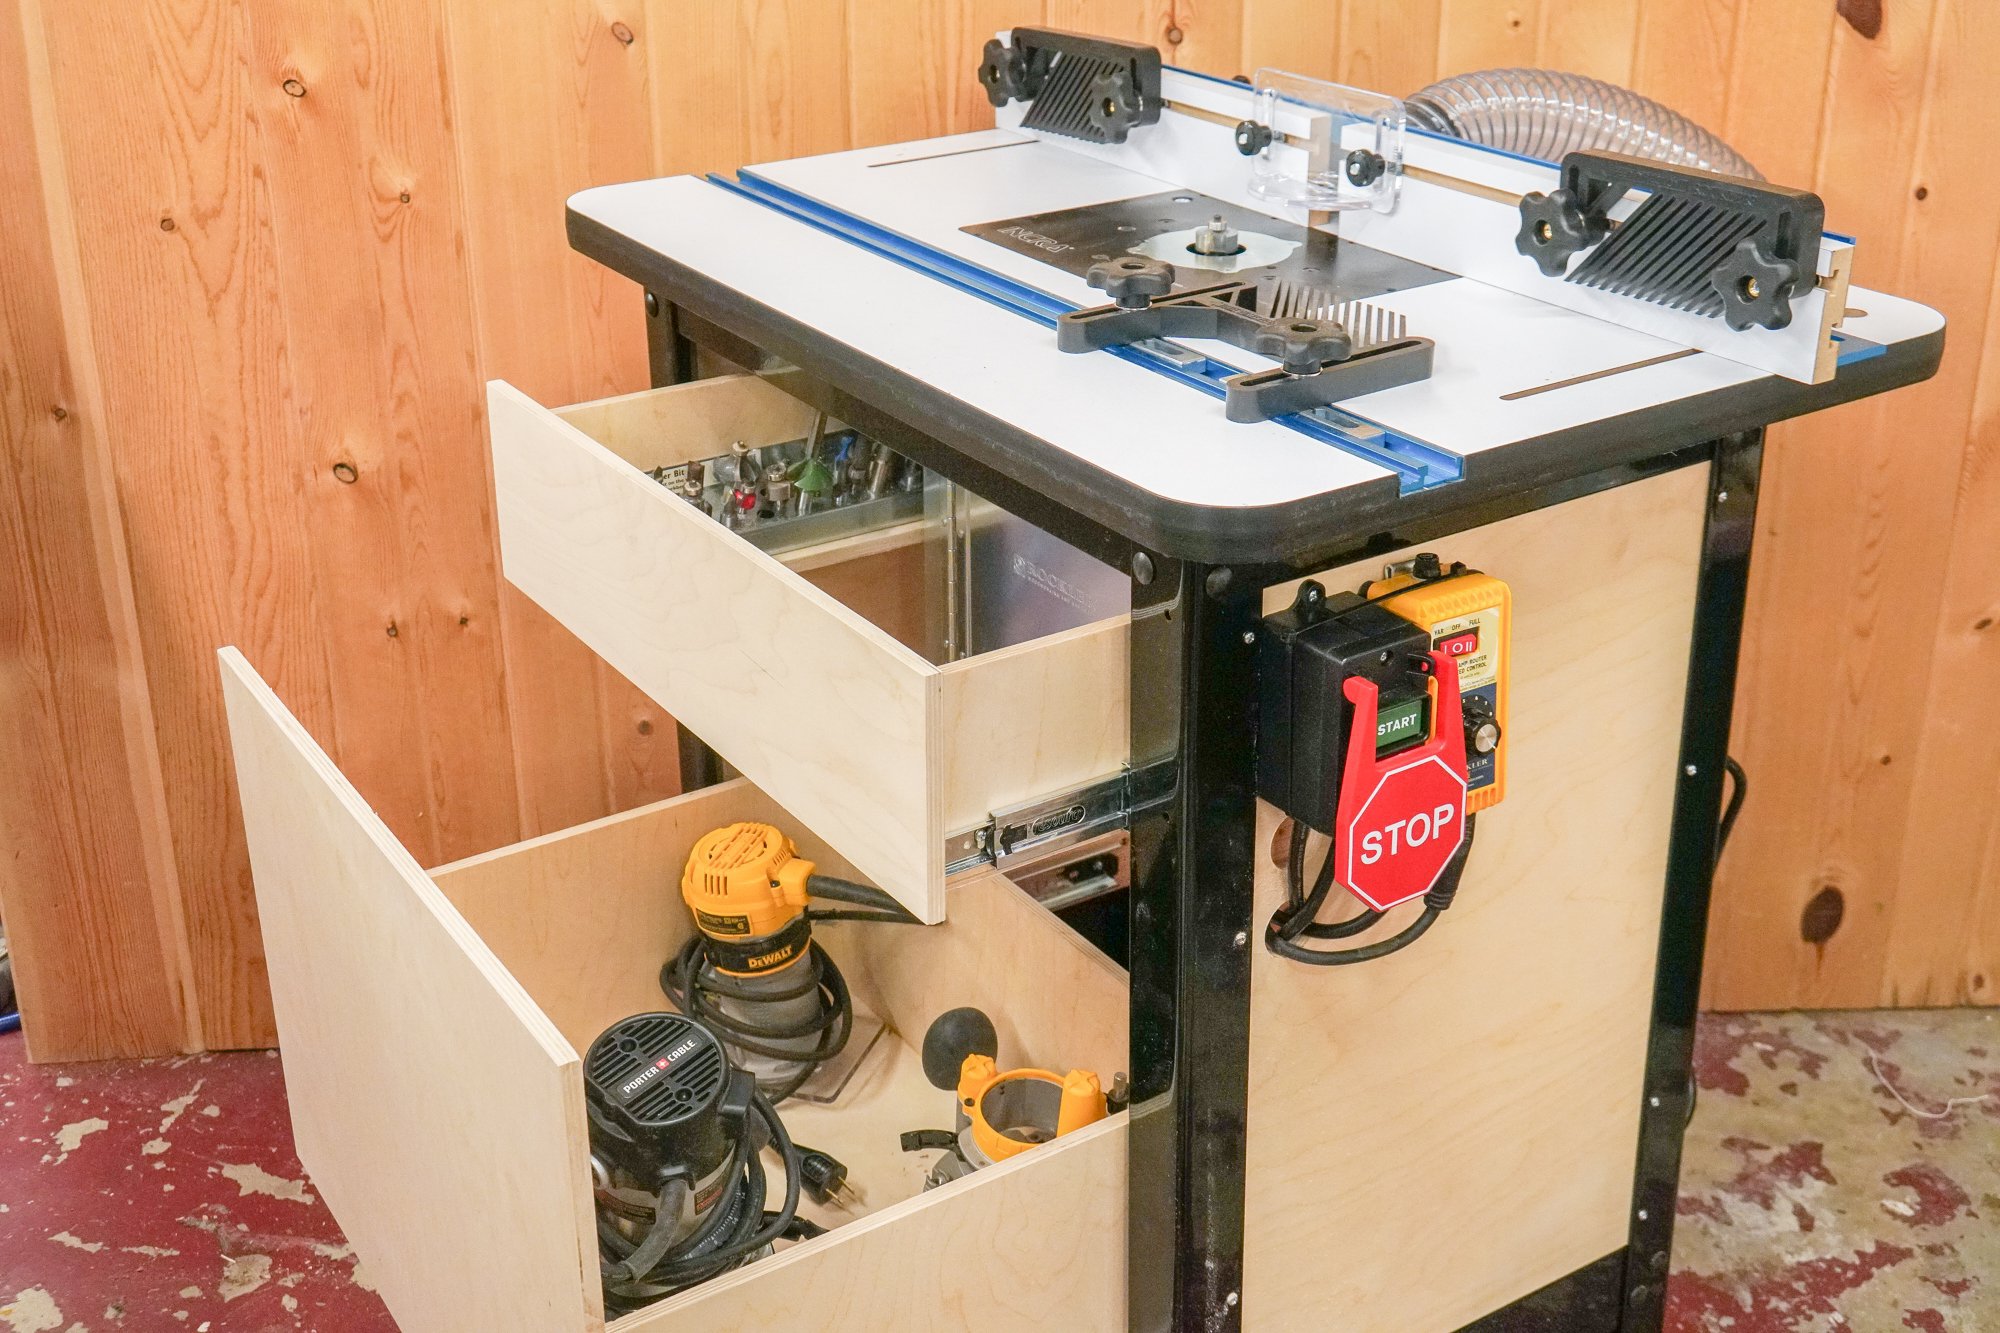
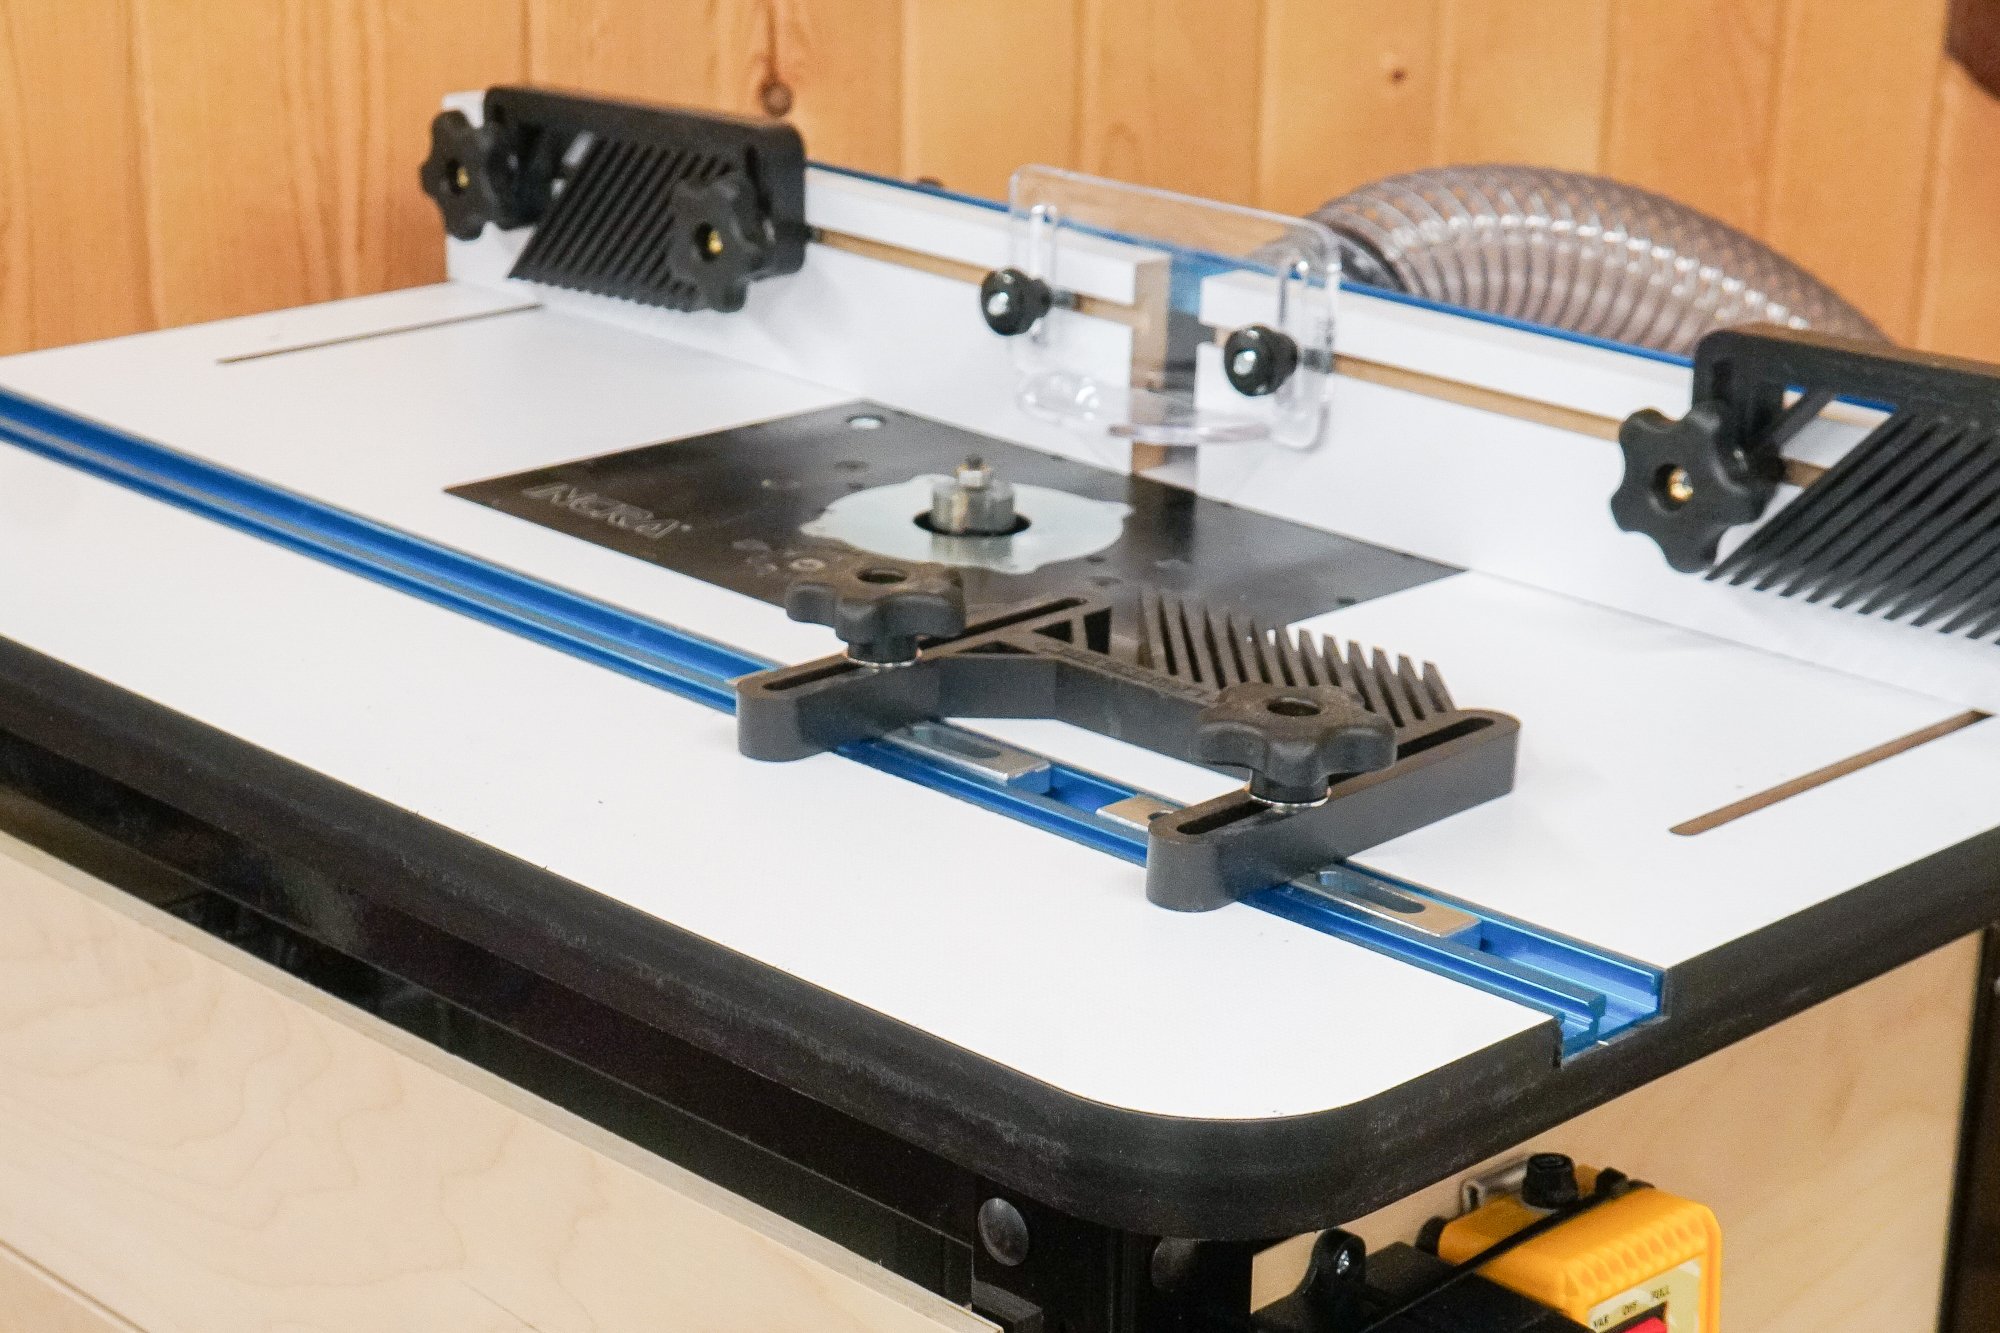
How to Make The Ultimate Router Table with all the Accessories
Build the dream router table with all the bells and whistles! With all the router table accessories you can think of.
Build the dream router table with all the bells and whistles! With all the router table accessories you can think of.


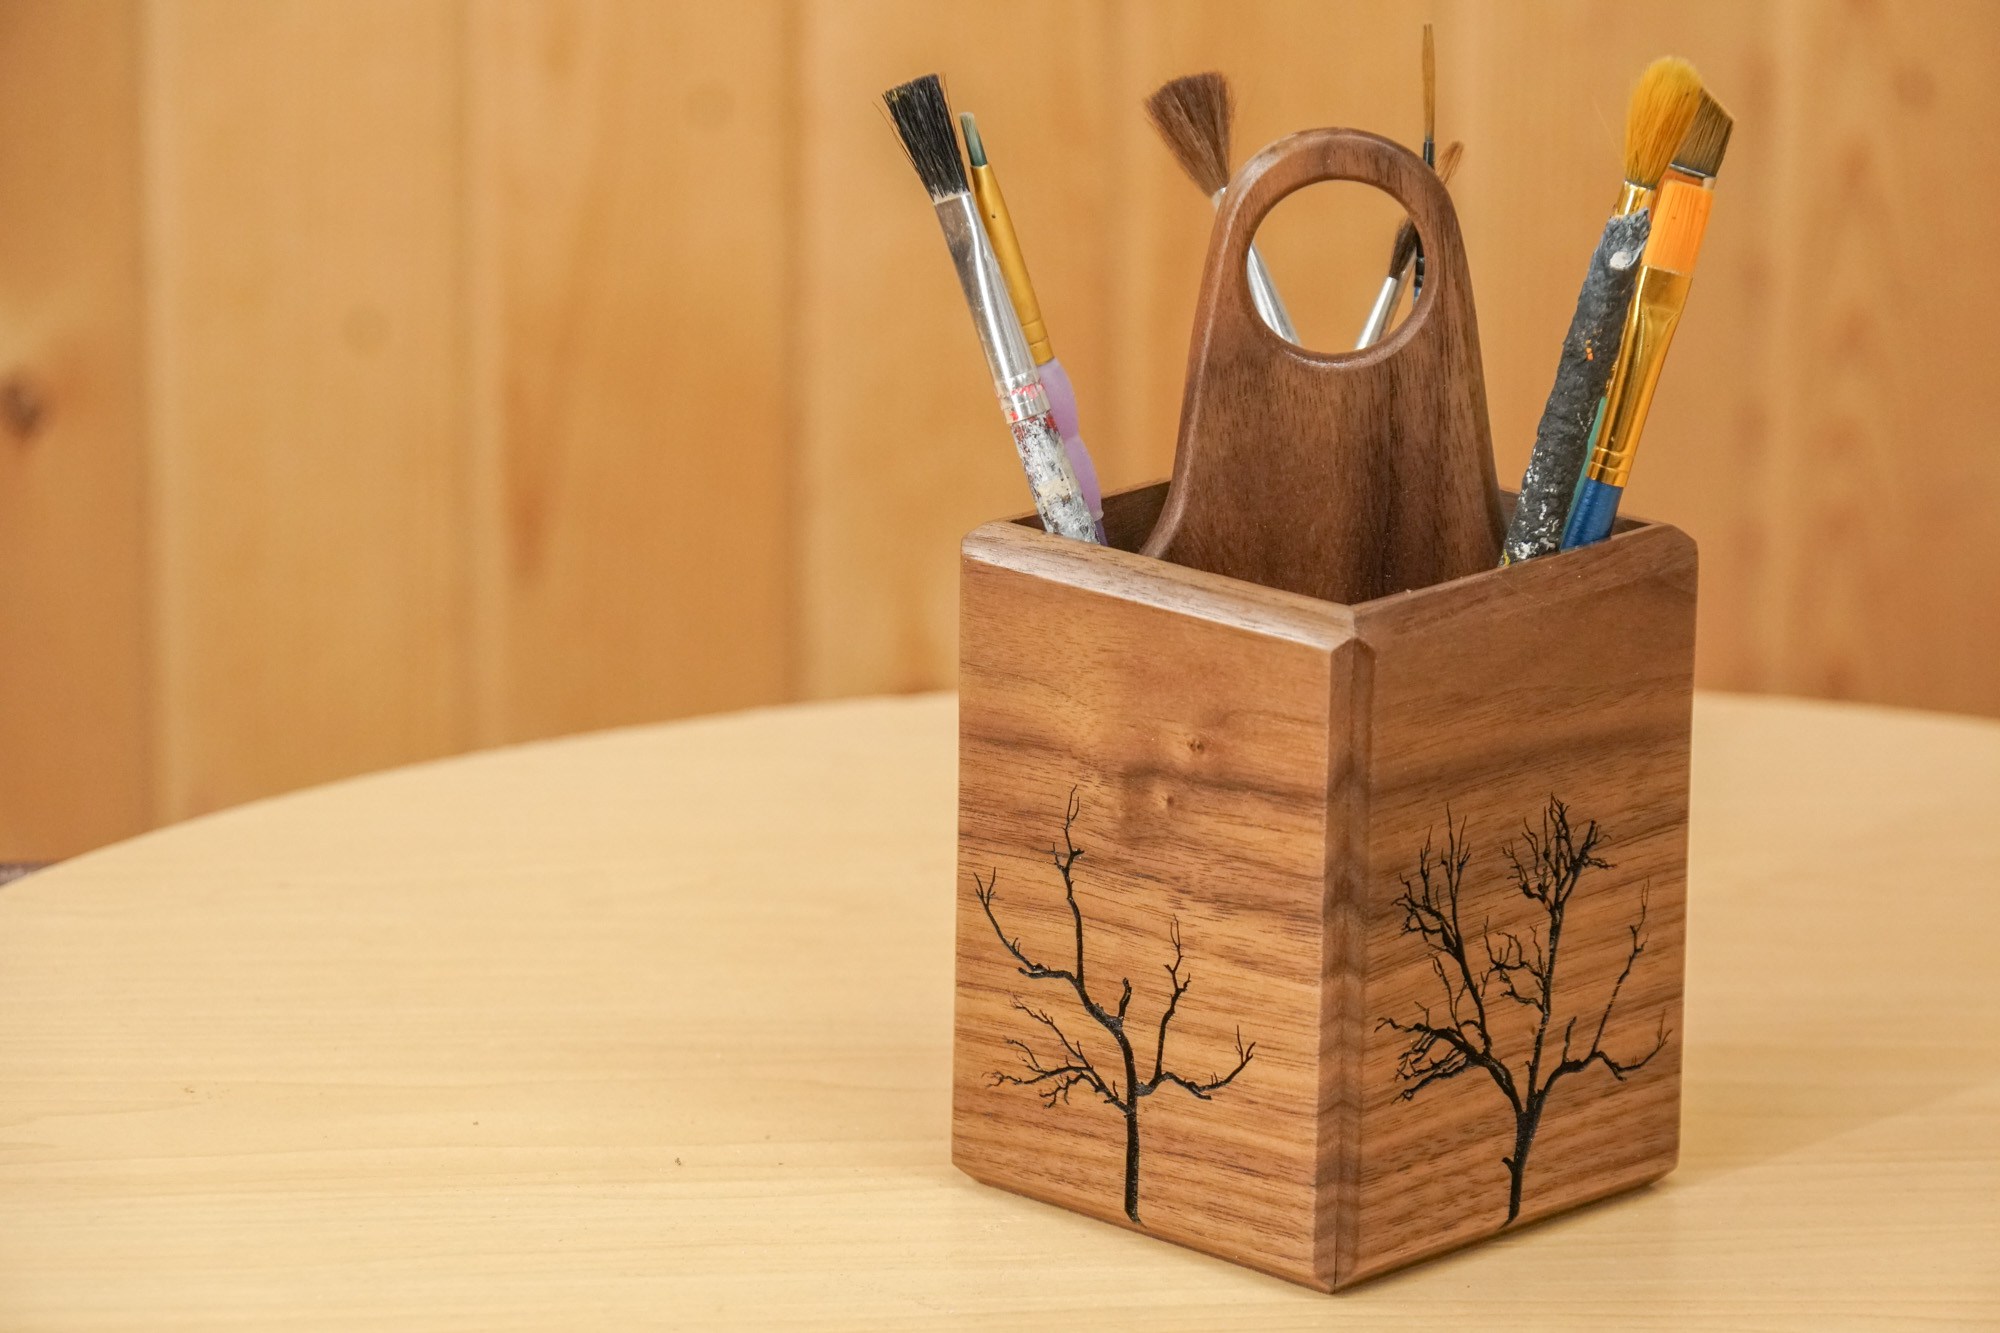
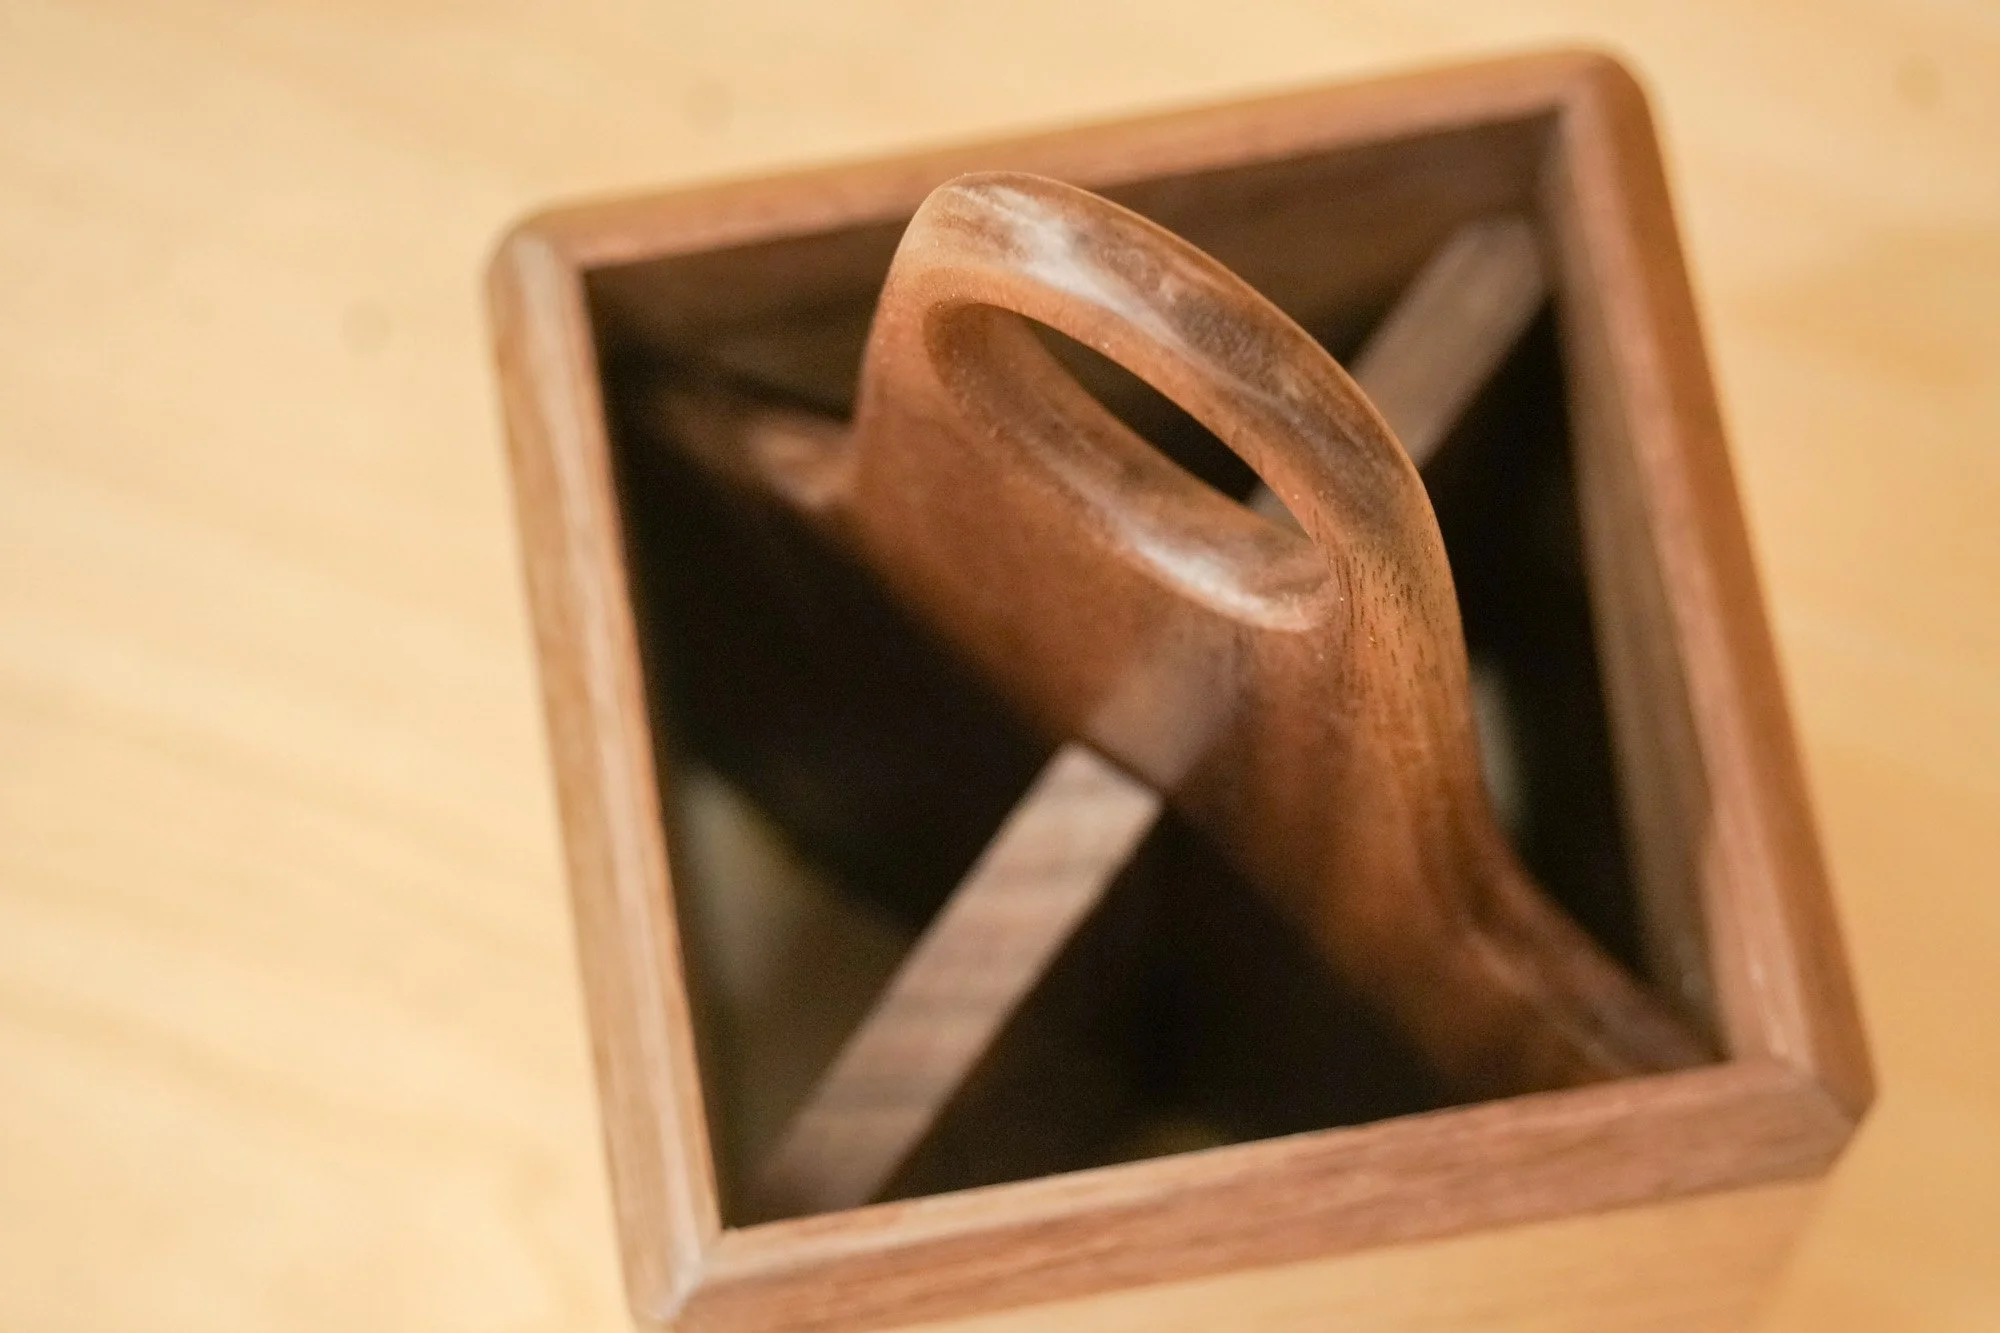
How to make a Pencil Holder/Art Caddy
Making this pencil holder/art caddy is a quick and simple woodworking project that can easily be made in an afternoon.
Making this pencil holder/art caddy is a quick and simple woodworking project that can easily be made in an afternoon. I began my resawing some 3/4″ walnut in half to use for all the pieces. The 4 main side are all cut to the exact same size with a 45° bevel on all the edges for easy joinery. The pieces are glued together and clapped with nothing but blue painters tape. There’s an inserted divider to keep different utensils separated and everything is coated with 2 coats of shellac.


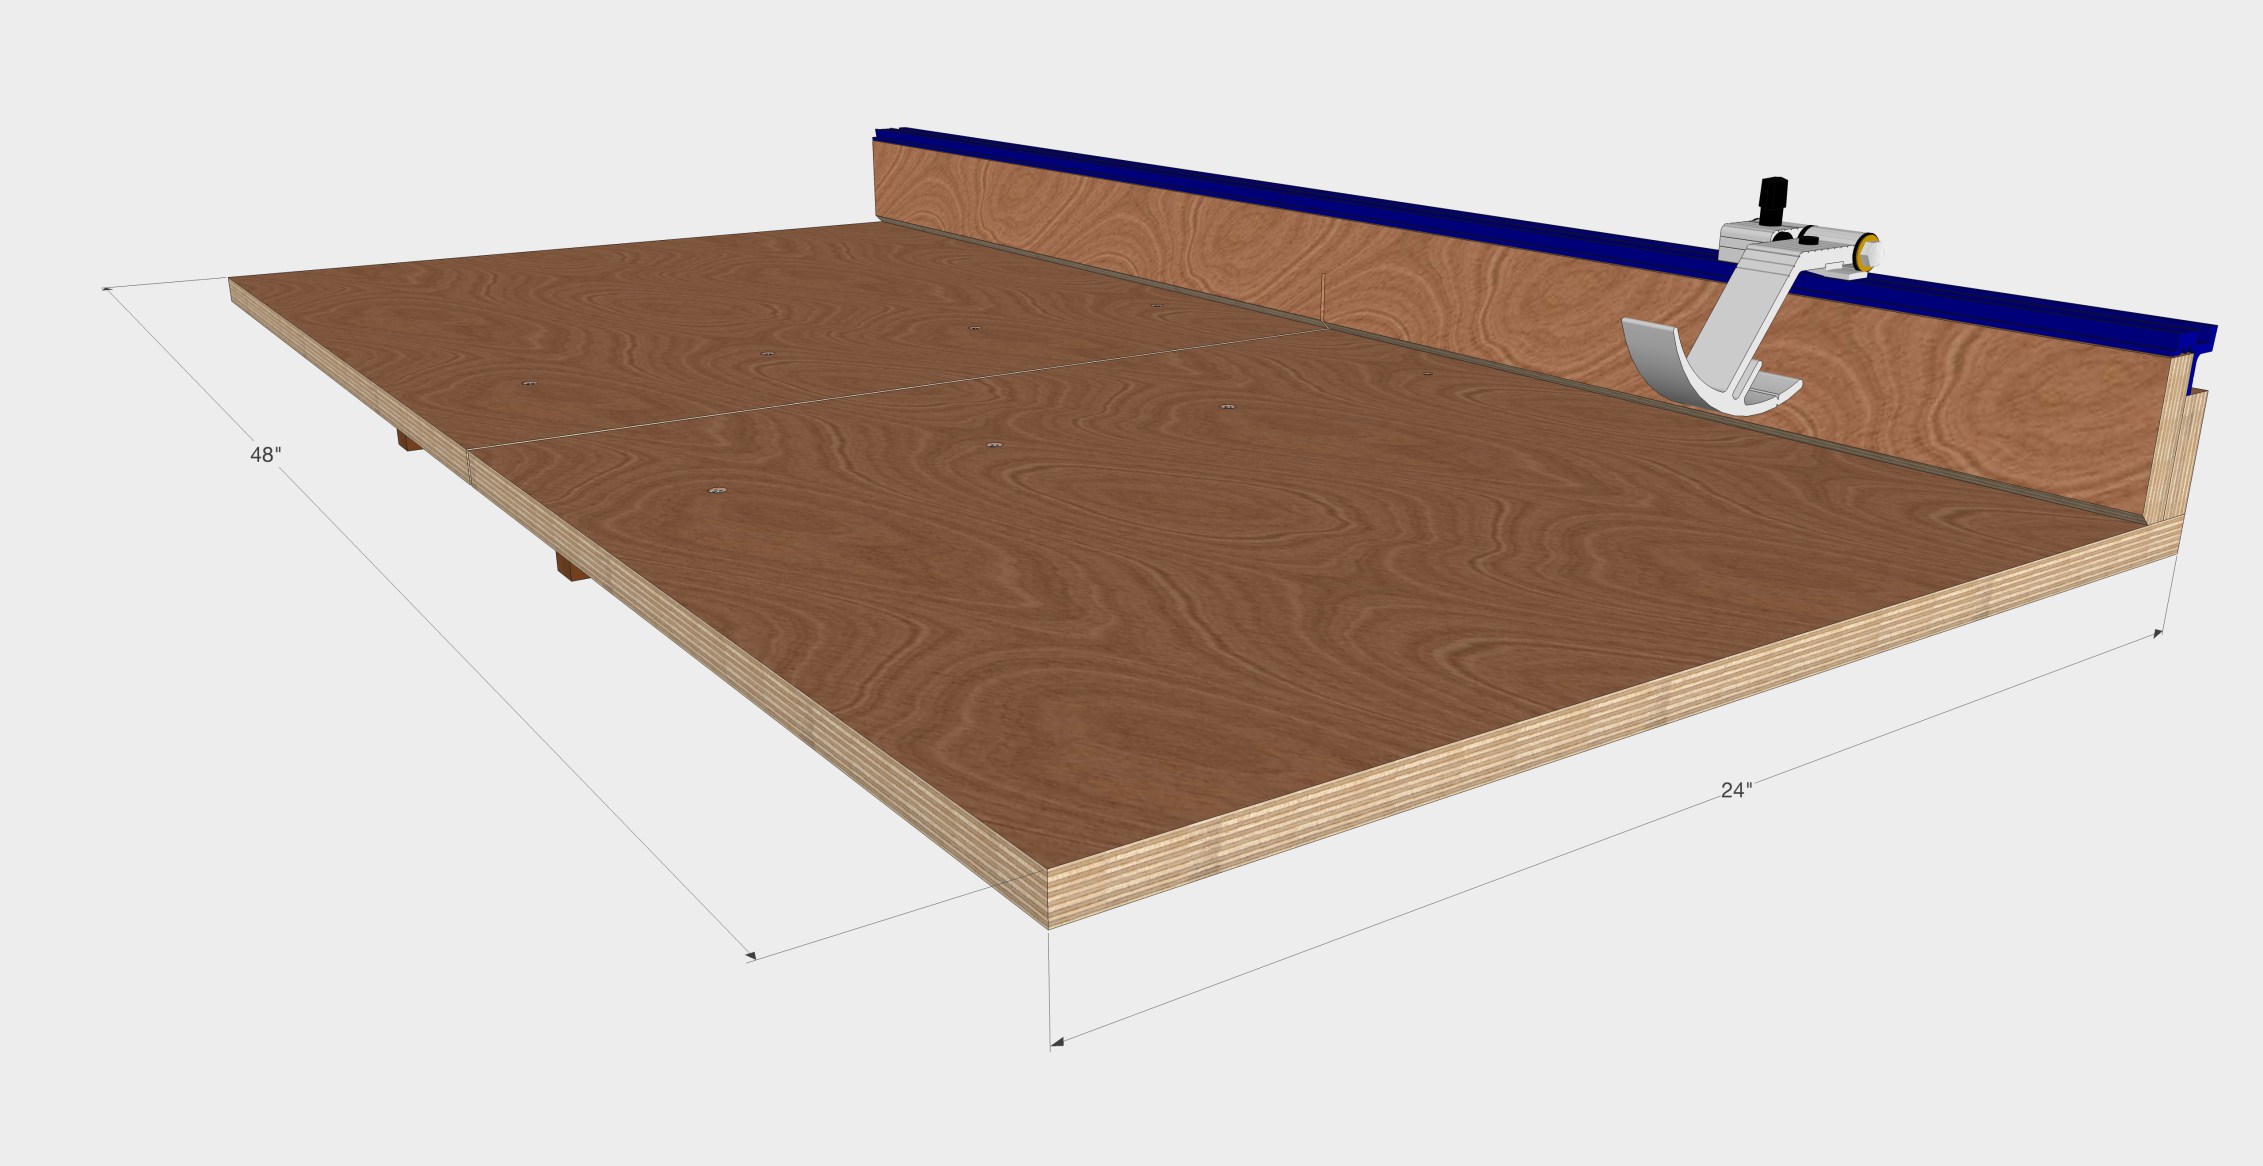
How to Make a Crosscut Sled for Tablesaw
How to make a cross cut sled for the table. This is a must have shop jig for every woodworker.
Tools and Supples Used In This Woodworking Project


CNC Machining a Mailbox On An Inventables X-Carve
I challenged myself to make all the pieces on my CNC for this mailbox project.
Limited Tools CNC Project
In this fun woodworking project we cut out all the pieces on my Inventables X-Carve CNC. We are purposely limiting ourselves to only the CNC and non-stationary tools like a drill, router and random orbit sander. No tablesaw, no bandsaw and no miter saw. I like to show that there’s more than one way to perform a task in woodworking. It’s not about the tools, it’s all about using what you have and finding creative ways to problem solve.
The mailbox is made from beautiful straight grain walnut with the house number inlayed with some contrasting maple.
Tools and Supplies Used In This CNC Woodworking Project


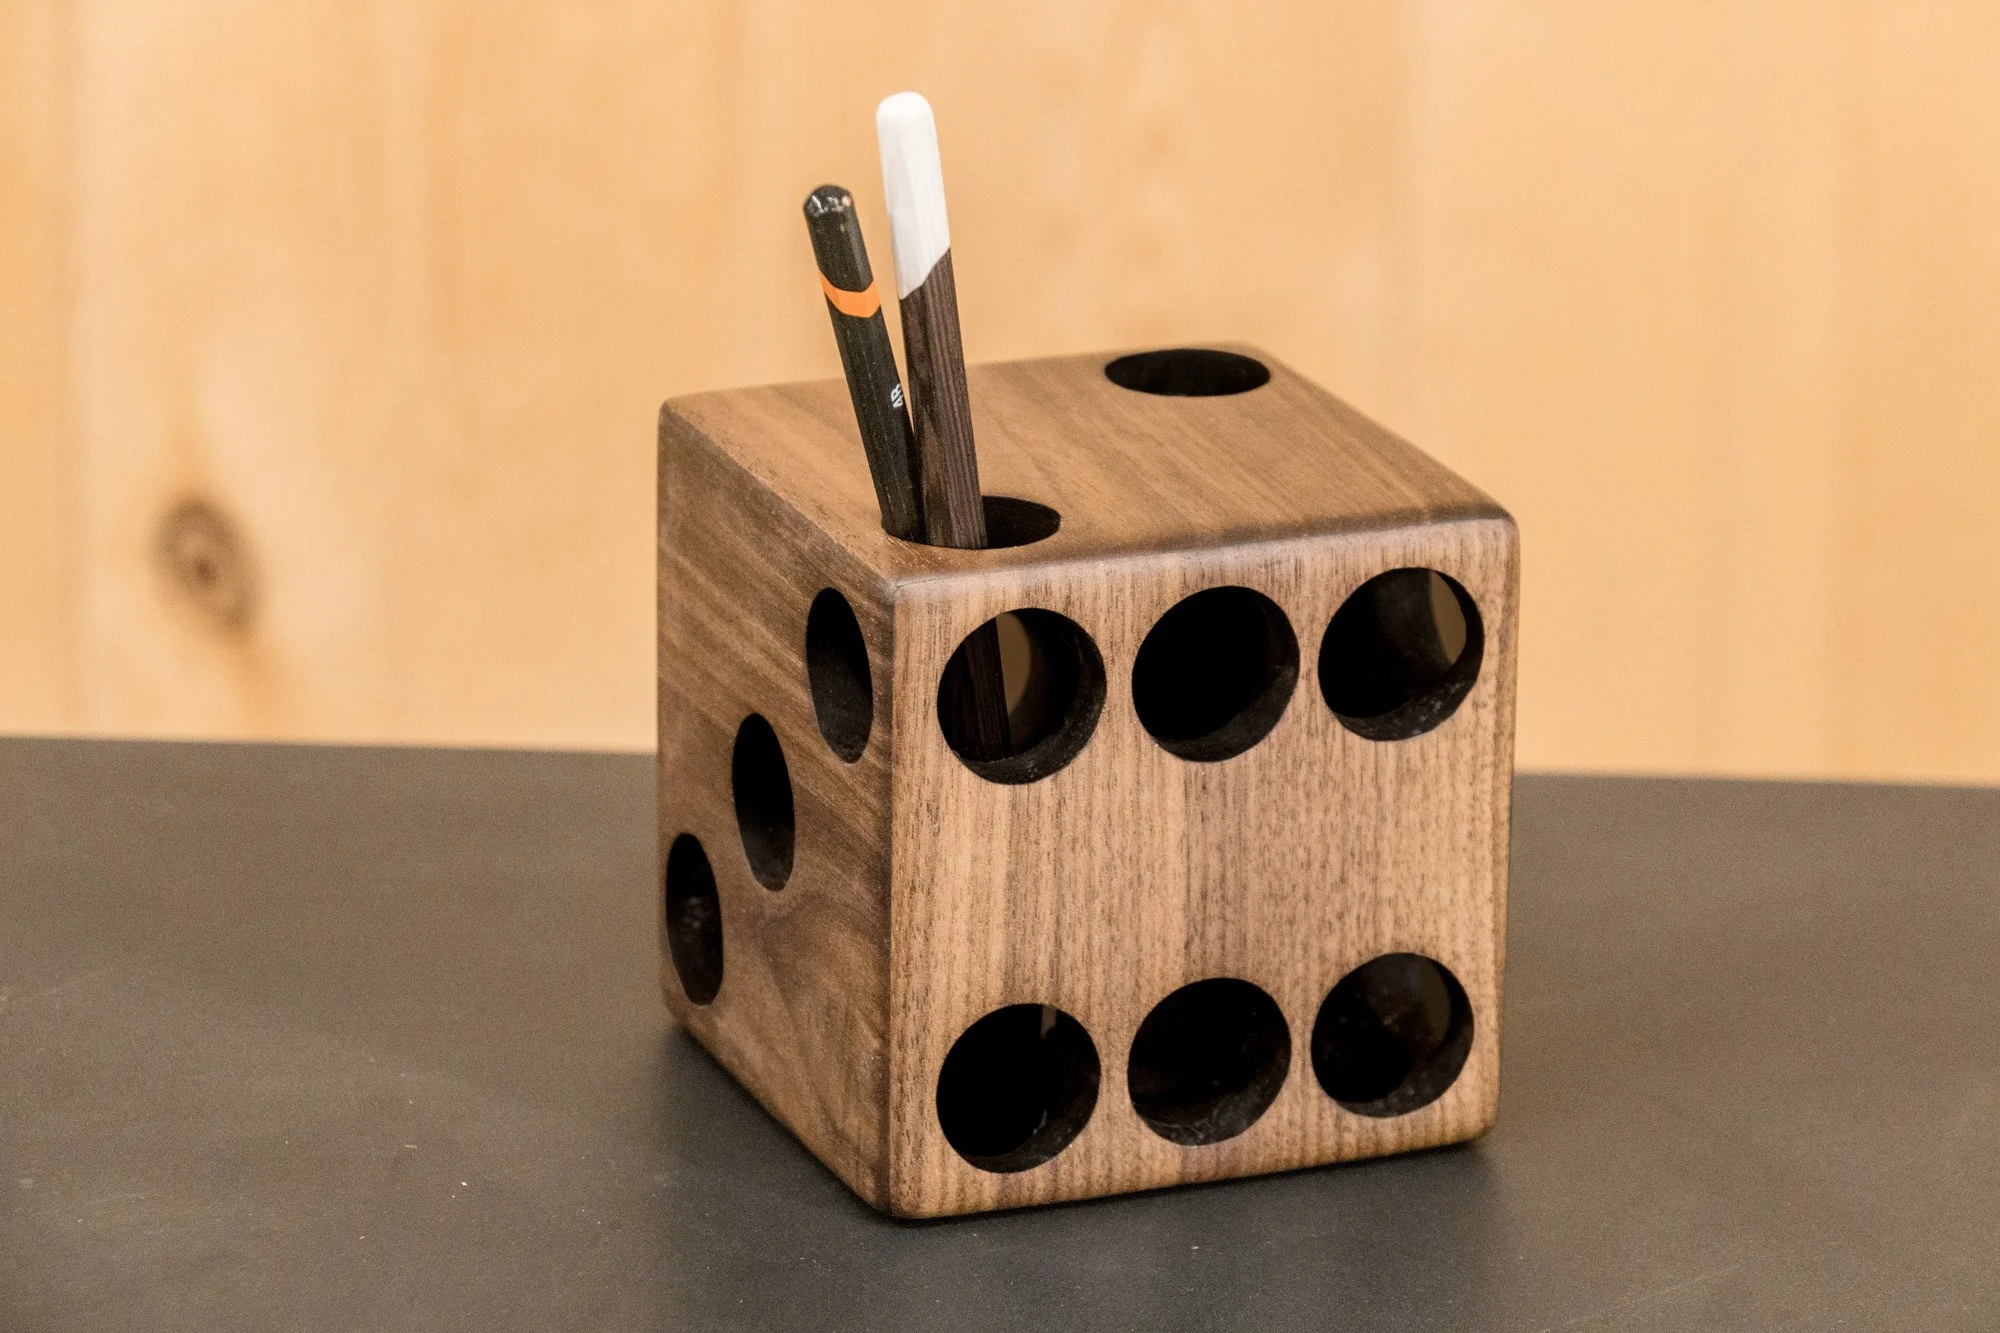
How to Make a Walnut Dice Pencil Holder
This is a simple and easy woodworking project that can be made with just a few tools.
Easy Woodworking Project. Great for Craft Shows!
This is a simple and easy woodworking project that can be made with just a few tools. I’m using walnut planed down to 1/2″ thick and cut in perfect squares on the tablesaw. All the edges are mitered for easy joinery with just some blue painters tape and some Titebond wood glue. Originally I had painted the inside black with white paint around the hole edges. Halfway through the project I decided I prefer the natural look of the walnut without paint and sanded everything back down to bare wood. Finished with boiled linseed oil and paste wax. You can find the templates down below by signing up for my email list.
Tools and Supplies Used in this Woodworking Project


Woodworking Books

Make Your Own Cutting Boards
15 cutting board projects to make as gifts or sell! Get your signed copy!

The New Bandsaw Box Book
8 bandsaw box projects you can make and sell at craft shows. Signed copies now available!