
Making a Plaque From Wood and Brass
Making a wood plaque using a laser engraver and CNC.
How to Make a Wood Plaque from Mahogany and Brass
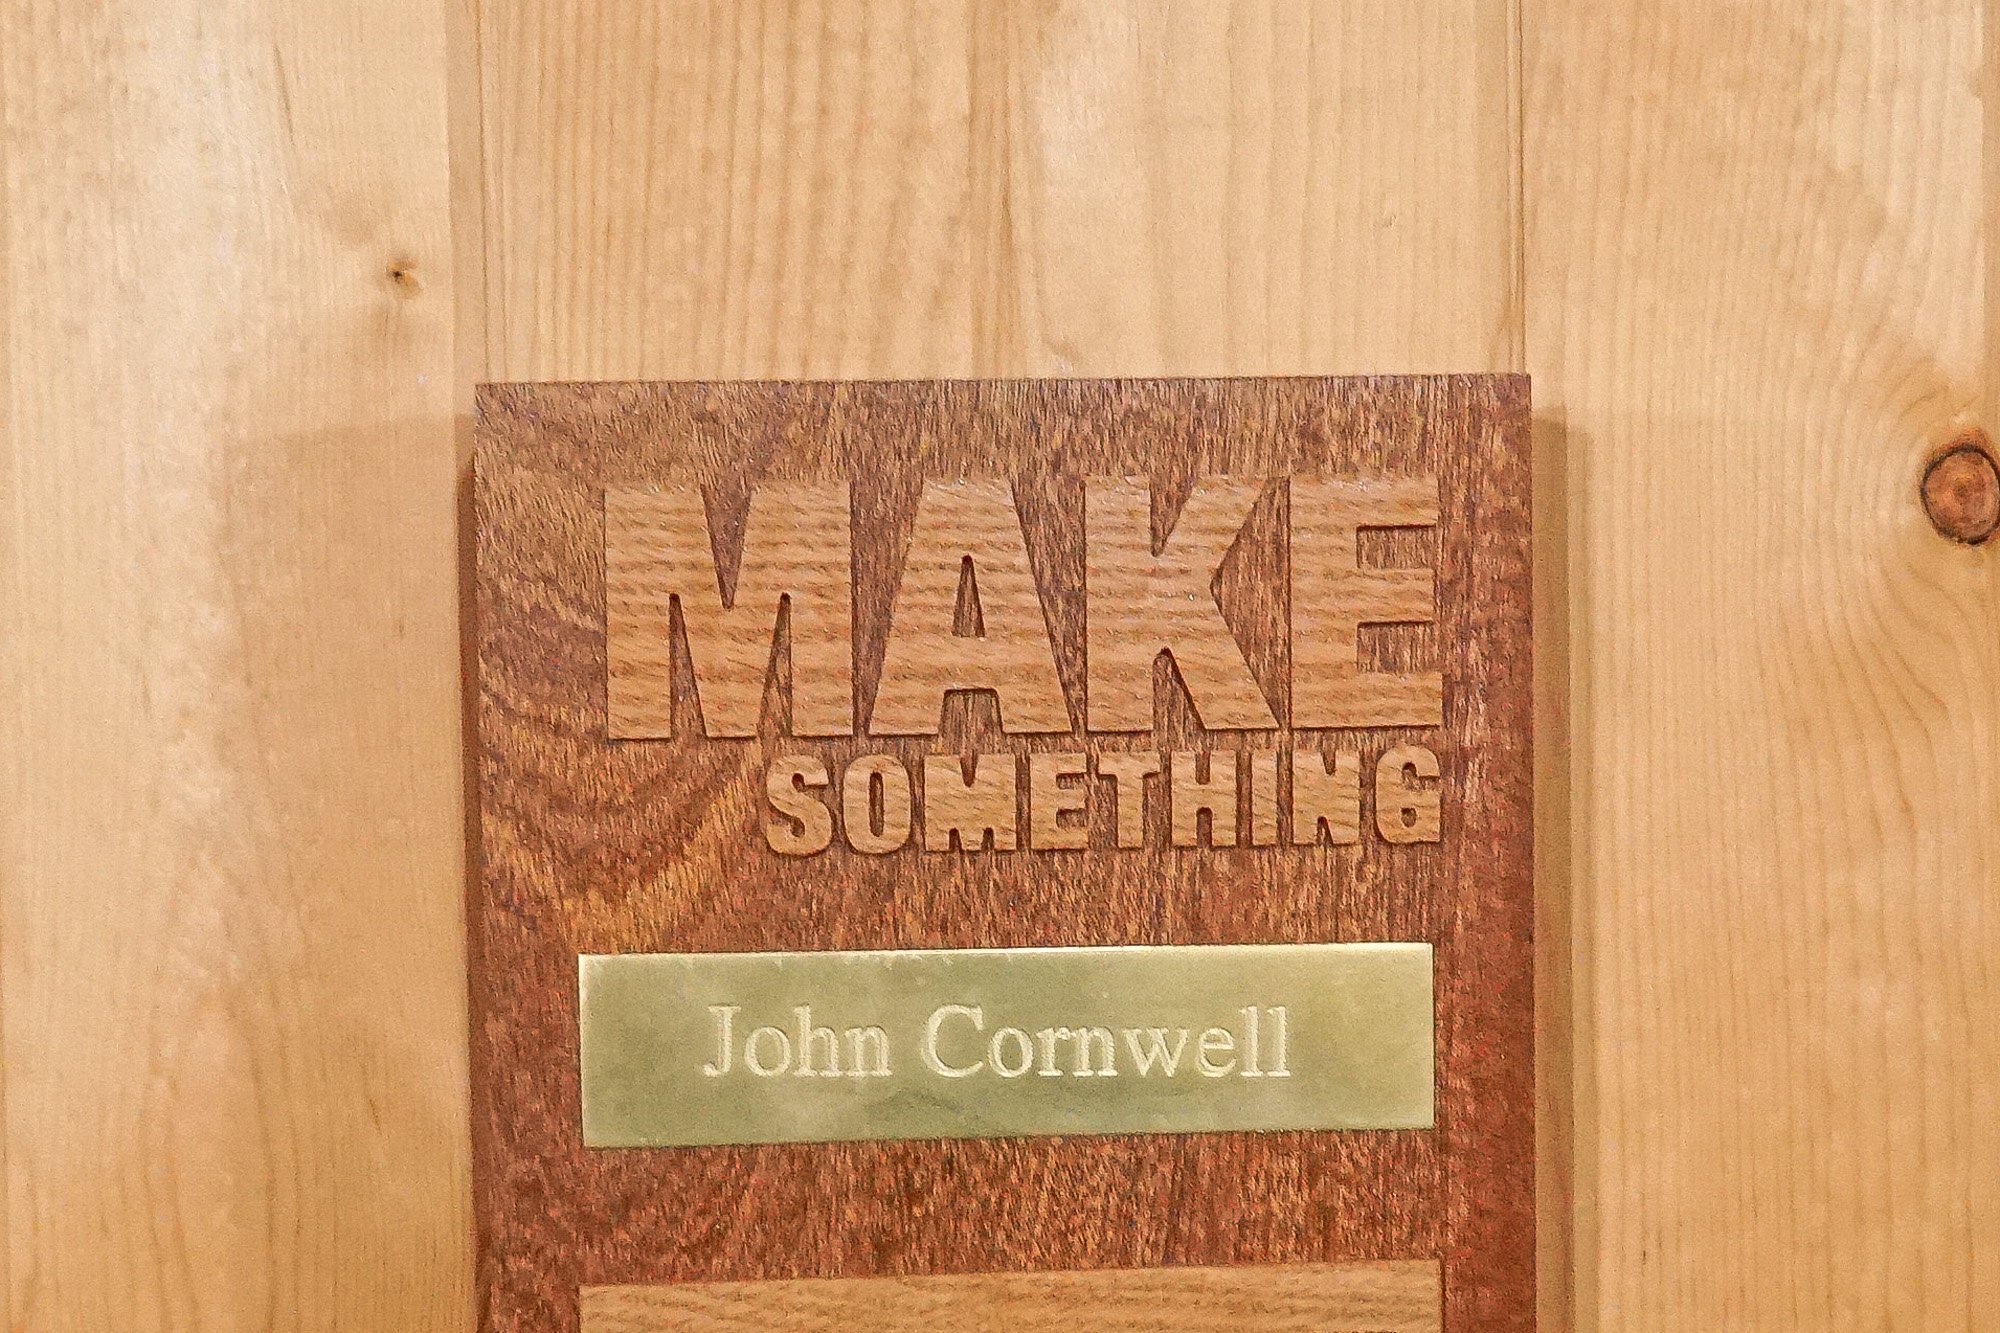
In this week’s project we make a wood plaque using a laser engraver and CNC. The Make Something logo was carved out backwards on the CNC while leaving a thin layer of wood on the front face. This allows me to glue it in place and keep all the letters perfectly aligned and spaced. The front face is then sanded away, a technique called onion skinning. The Making It logo was laser engraved into the wood and the brass plate was etched with a CNC and cut out on the bandsaw. In the above video I also answer a few questions that came in from Twitter. If you would like to learn more about the Making It Podcast I host with Jimmy Diresta and Bob Clagett from I Like to Make Stuff, check it out here. As always, have fun and Make Something!
Tools and Supplies Used in this Woodworking Project


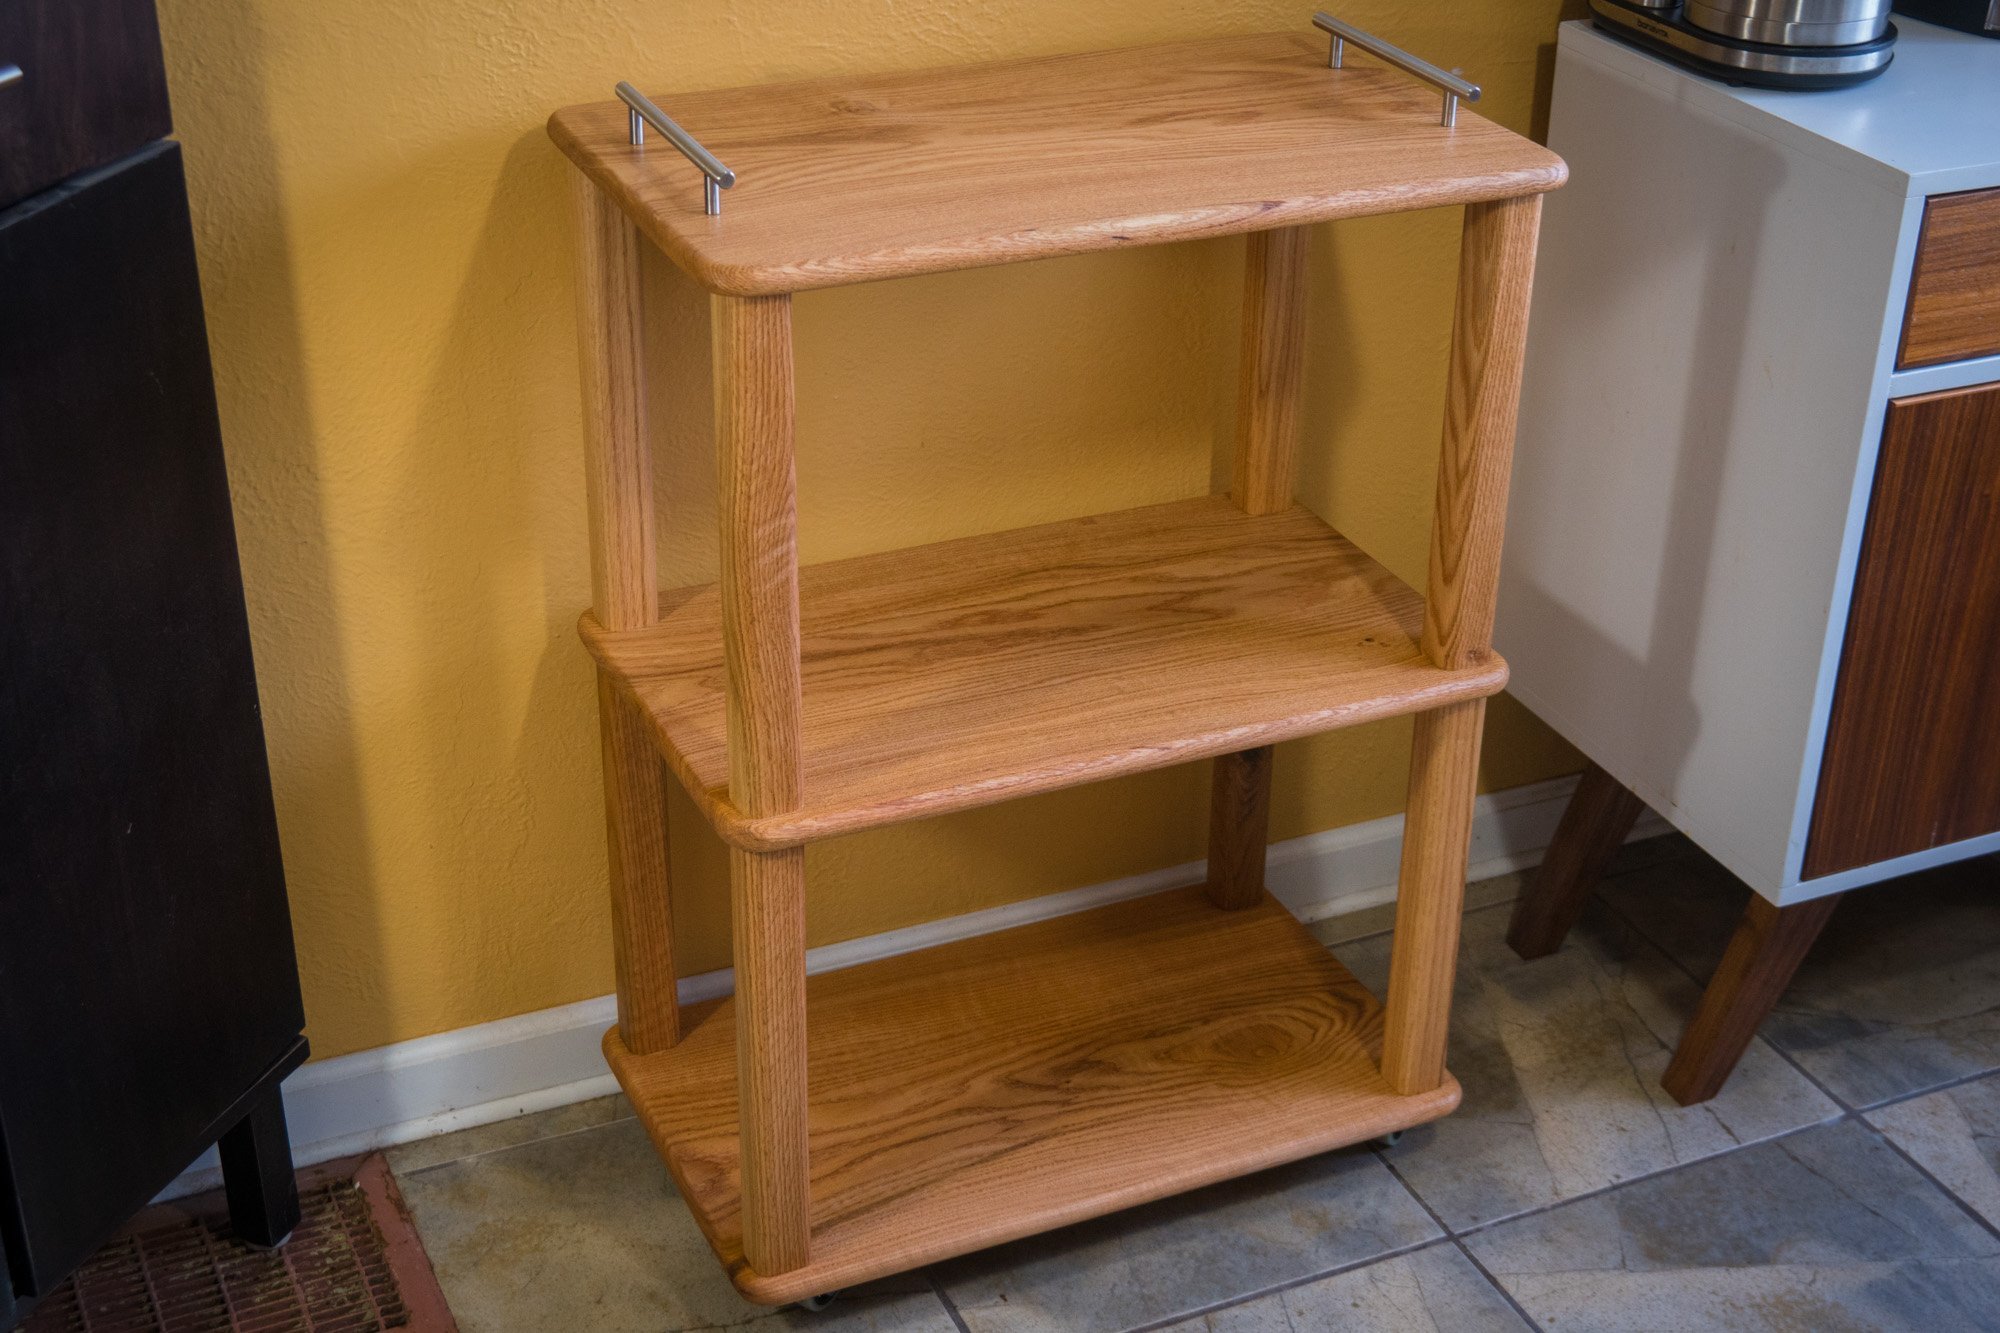
How to Make a Kitchen Cart
How to make a kitchen cart with removable top shelf that turns into a serving tray.


Super Mario Made From Wood. Pixel by Pixel
How to make a Super Mario Bros wood art piece pixel by pixel using different wood species.
Although tedious, this was a fun woodworking project. Like many I grew up playing Super Mario Bros. on the NES and I still find myself playing once in a while as an adult. I’ve made this once before a few years ago before I was making videos and thought I’d recreate it to show how it’s done. I’m using three different species of wood for the three colors of Mario. Hard maple, walnut and mahogany are used for the skin color, shirt and overalls. Each piece is a 1” x 1” square glued to a piece of baltic birch plywood with CA glue. To give each piece more definition I chamfered the edges on my disc sander. The frame made from walnut measures 27” x 27” square and also has a matching chamfer.
Tools and supples used in this woodworking project


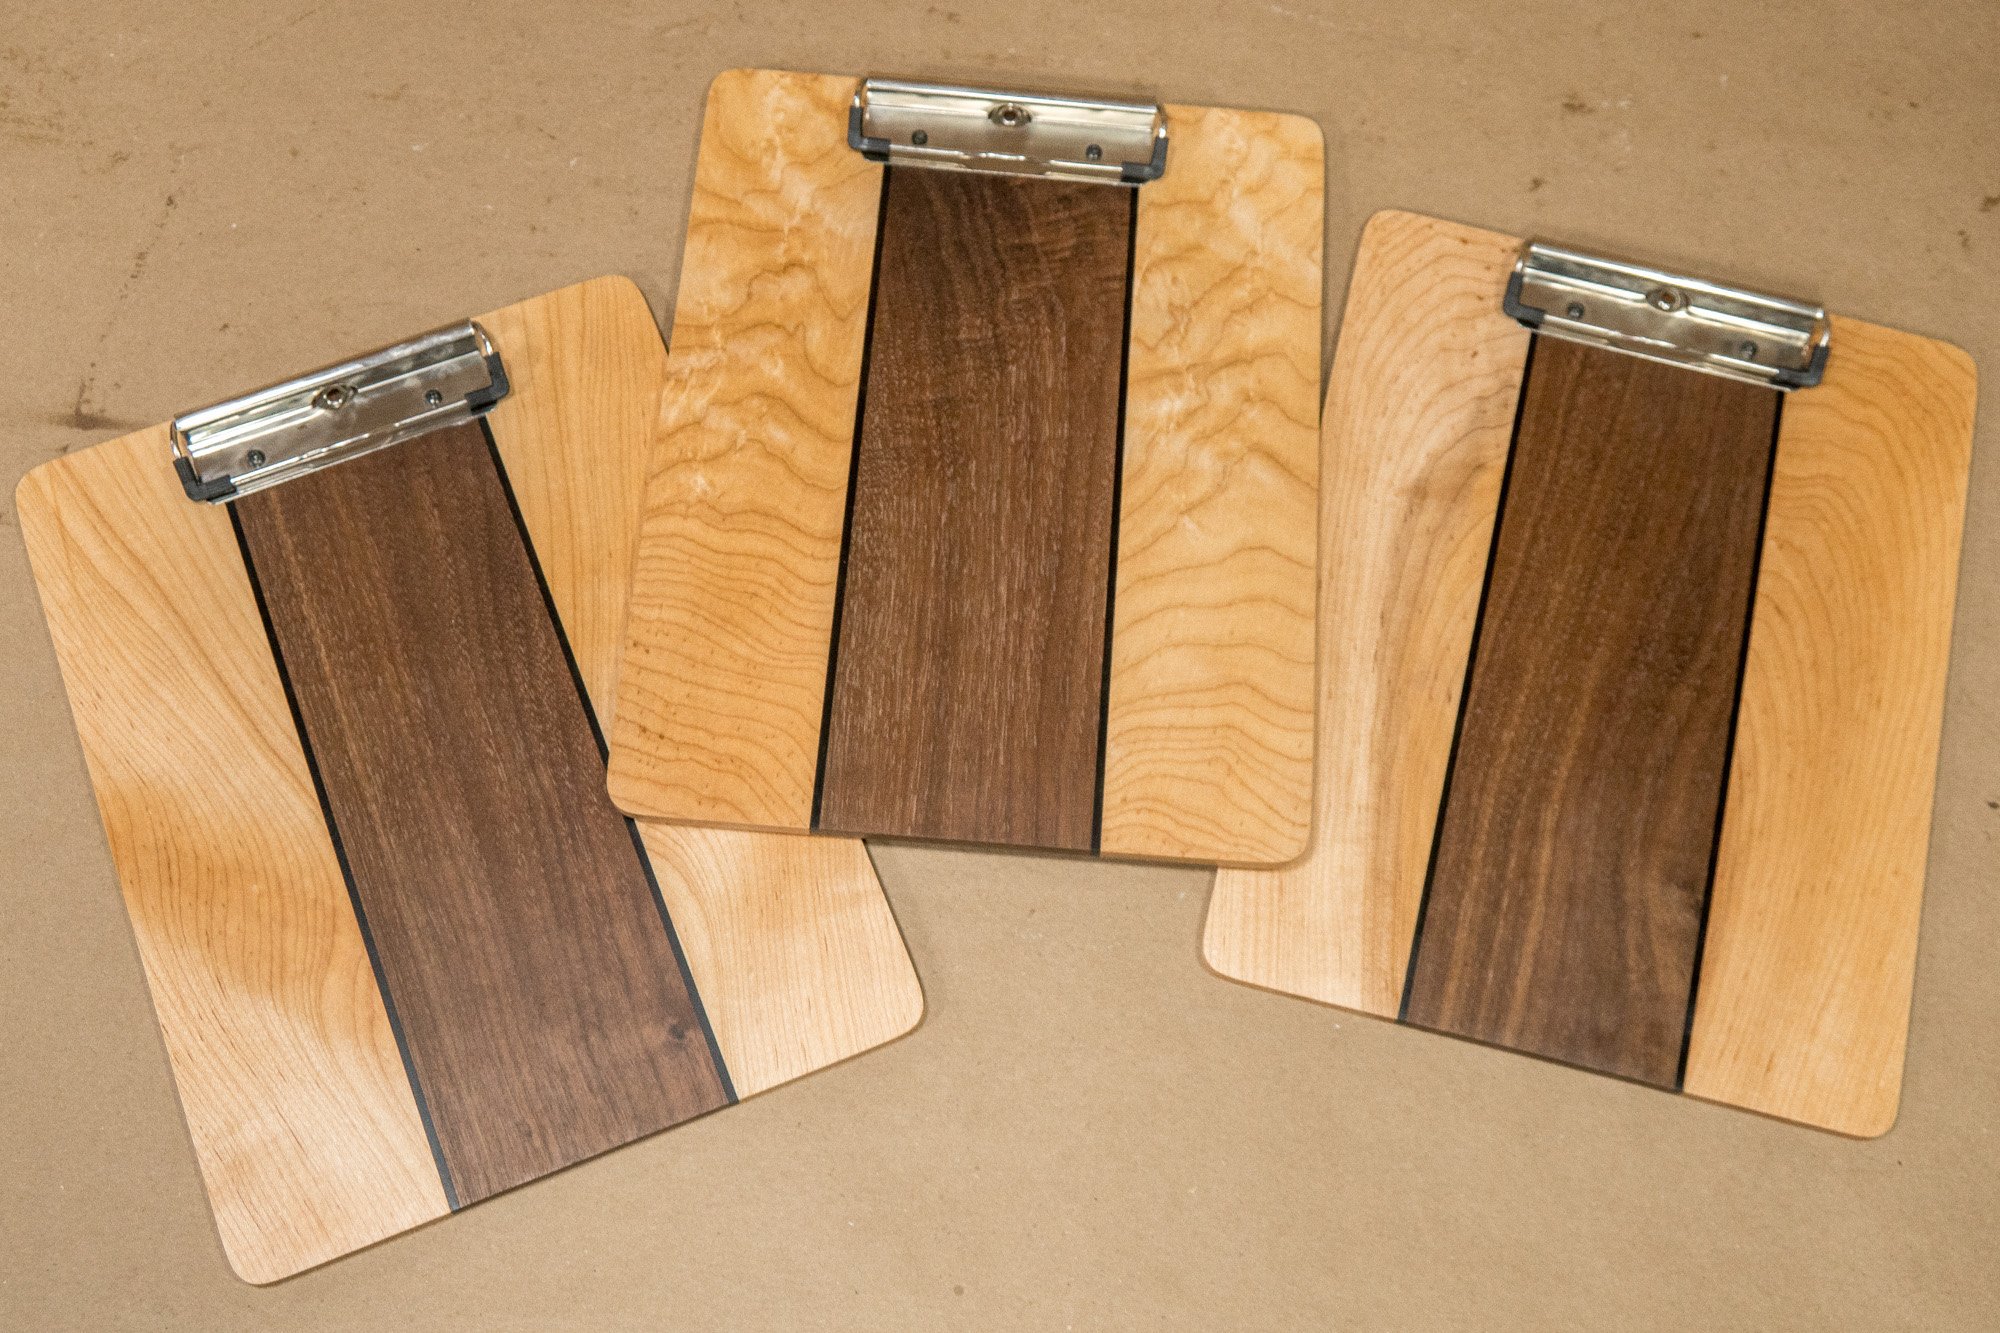
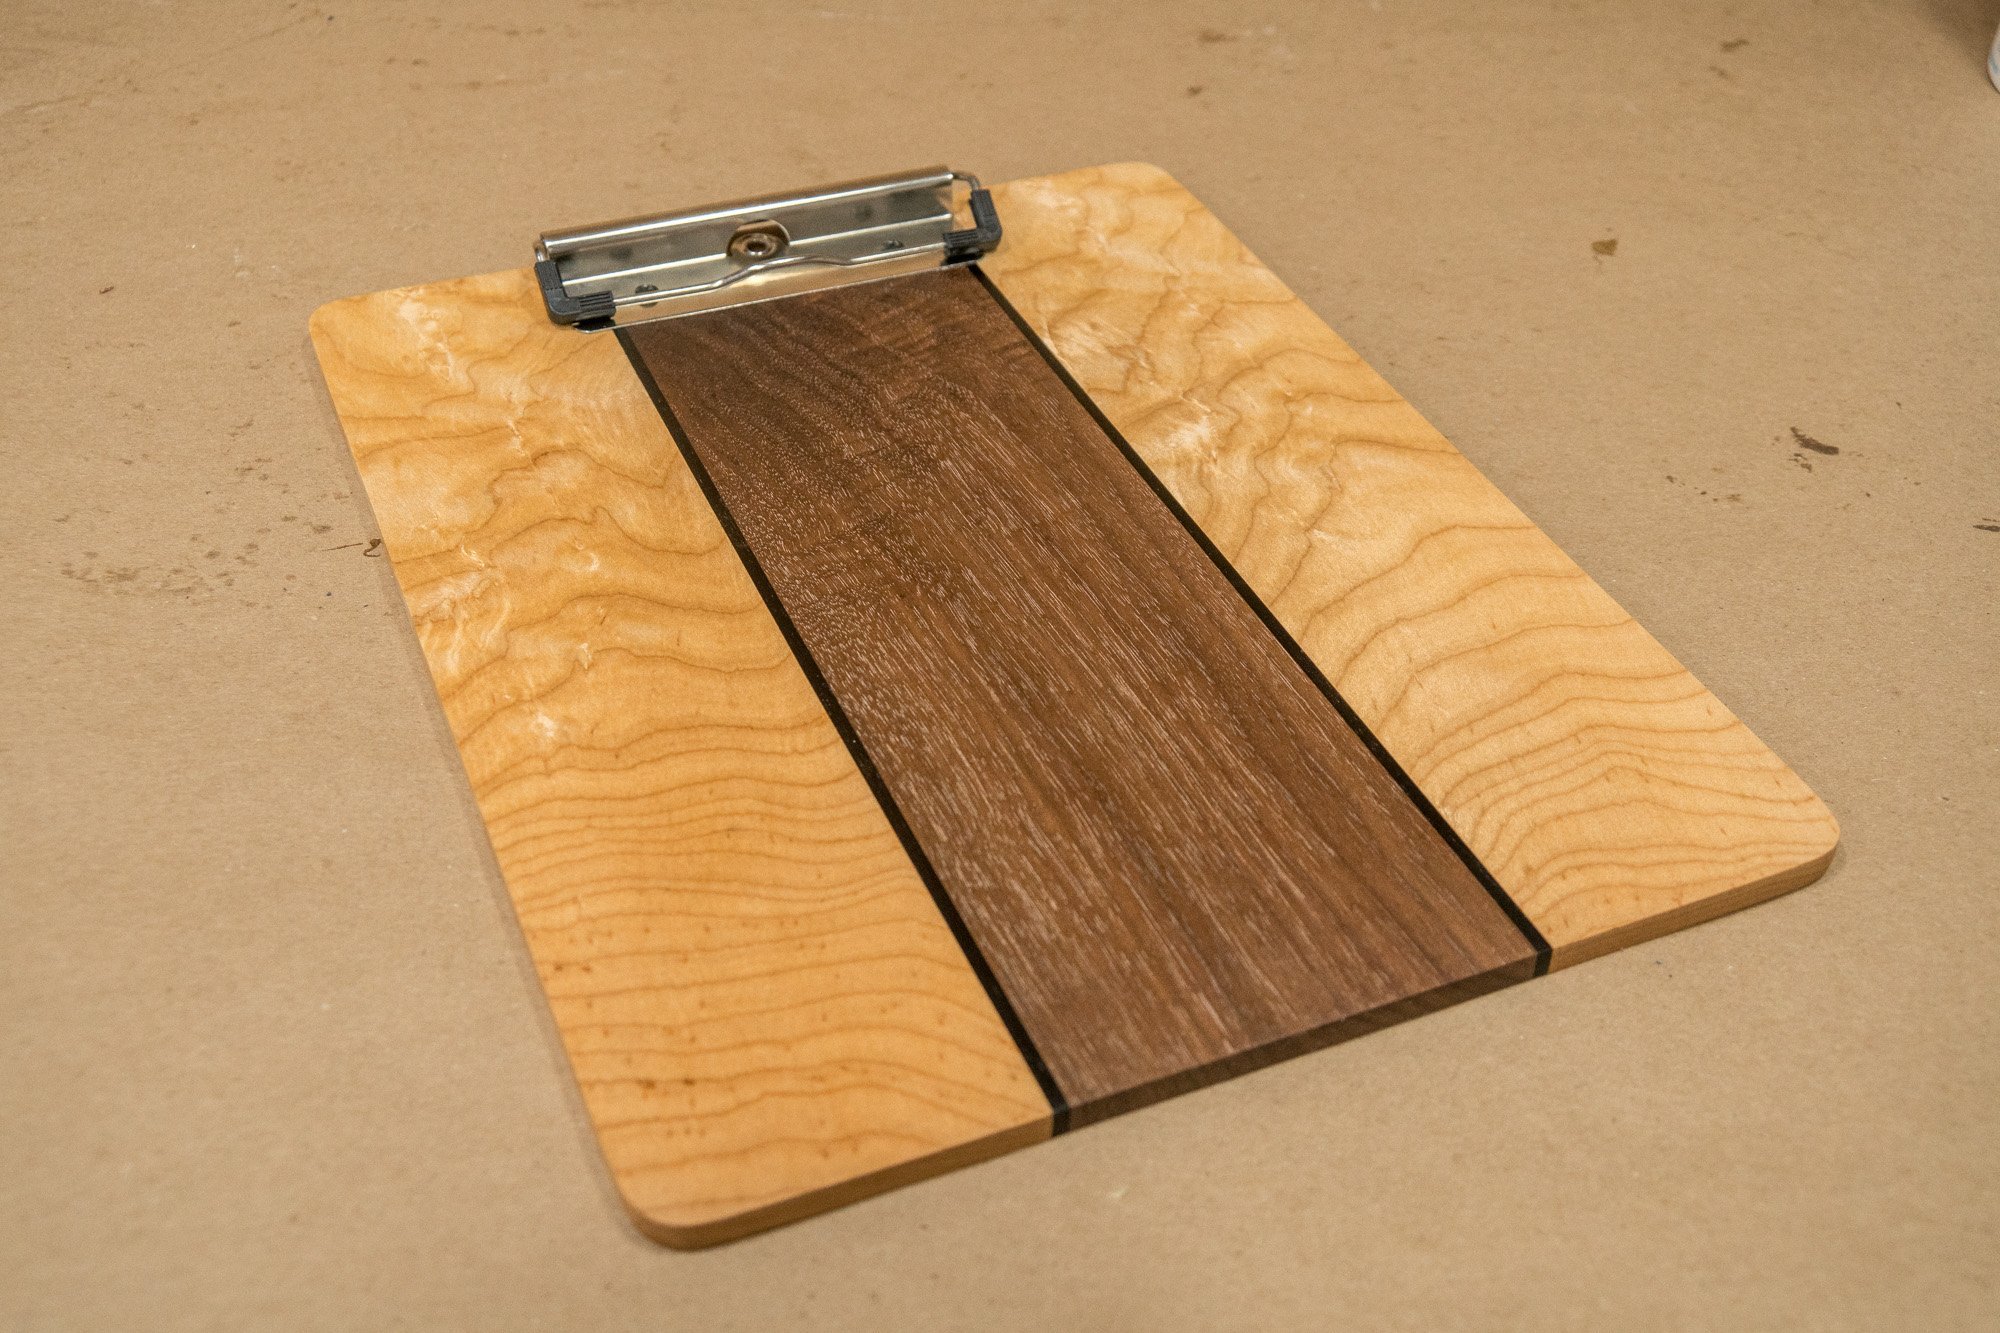
How to Make Wooden Clipboards
This is a real easy woodworking project anybody can do with a few basic woodworking tools.
Easy Woodworking Project For Beginners
This is a real easy woodworking project anybody can do with a few basic woodworking tools. It’s also a great woodworking project that you can easily redesign and make your own. These clipboards get planed down pretty thin so make sure you source well stable wood that’s not going to warp on you. You’ll also want to use closed grain or tight grain wood. And open grain is not a suitable material to write on. Using strips of multiple species will help keep everything flat. I also find that since they are so thin the screws that hold the clips down may need some help so I like to use a 5-minute epoxy as well. This is a great project that can be batched out and at the right price can sell well at craft fairs.
Final dimensions: 9″ x 12″ x 3/16″
Tools and Supplies Used in This Woodworking Project


How to Make a Rotating Crayon Holder
This is an easy and fun woodworking project that works great for displaying and organizing a set of 64 crayons!
Easy Woodworking Project
This is an easy and fun woodworking project that works great for displaying and organizing a set of 64 crayons! I’m using a lathe to do most of the work but this could easily be made without one using a bandsaw. The handle is made from a globe squishy ball found at my local craft store which is a great alternative to using wood. When I originally designed the project I planned on using a lazy Susan base for spinning but decided in the end it was overkill and not needed. If I were to make more of these wood crayon displays I would take the plastic sharpener that comes with the crayons and mount it on the side with a removable base for emptying out the shavings.
Tools and Supplies Used in this Woodworking Project
- Microjig GRR-Ripper
- Microjig GRR-RIP Blocks
- Crayons
- Grizzly Bandsaw
- Dewalt Planer
- Table Saw
- Aluminum Bar Clamps
- Titebond Wood Glue
- Bessey Clamps
- Festool Miter Saw
- Combination Square
- Compass
- Jet Lathe
- Black & Decker Drill
- Festool Drill
- Turning Tools
- Dust Mask
- Festool Random Orbit Sander
- Jet Drill Press
- Shellac
- Felt
- Squeeze Globe (similar)


Quick & Easy Pencil Holders That You Can Sell
Looking for a quick and easy project that you can batch out and sell at craft shows? These pencil holders are a great way to earn some extra cash.
Looking for a quick and easy project that you can batch out and sell at craft shows? These pencil holders are a great way to earn some extra cash.


How to Make a Block Plane
How to make your own wood block plane. It’s easier than you might think!
Making a Hand Made Wooden Block Plane
Even though I’m not much of a hand tool user I find myself reaching for my hand made wooden block plane all the time. It’s great for rounding over corners or cleaning up an edge. The block plane I’ve been using comes from a kit by Hock Tools. In today’s project we’re going to make a new block plane that’s just a bit bigger using the same methods and shapes. Making your own planes is much easier than you might think and just as good as those expensive metal planes.
In this tutorial I’m breaking a few rules and using coconut palm wood. This is not the type of wood typically found in wooden hand planes but I love to experiment and have fun. Coconut palm is just absolutely beautiful and visually unlike any other wood. It’s is a bit splintery but once you get everything sanded smooth and rounded over it works just fine.
Tools and Supplies Used in this Woodworking Project
- Festool Miter Saw
- Table Saw
- Microjig GRR-Ripper
- Digital Angle Gauge
- Jet Drill Press
- Hock Tools Block Plane Kit
- Titebond Wood Glue
- Adhesive Sand Paper
- Grizzly Bandsaw
- Disc Sander
- Spindle Sander
- Sharpening Stone
- Diamond Sharpening Stone
- Honing Guide
- Random Orbit Sander
- The Perfect Edge Book
- Boiled Linseed Oil
- Wood Files: Wood Files


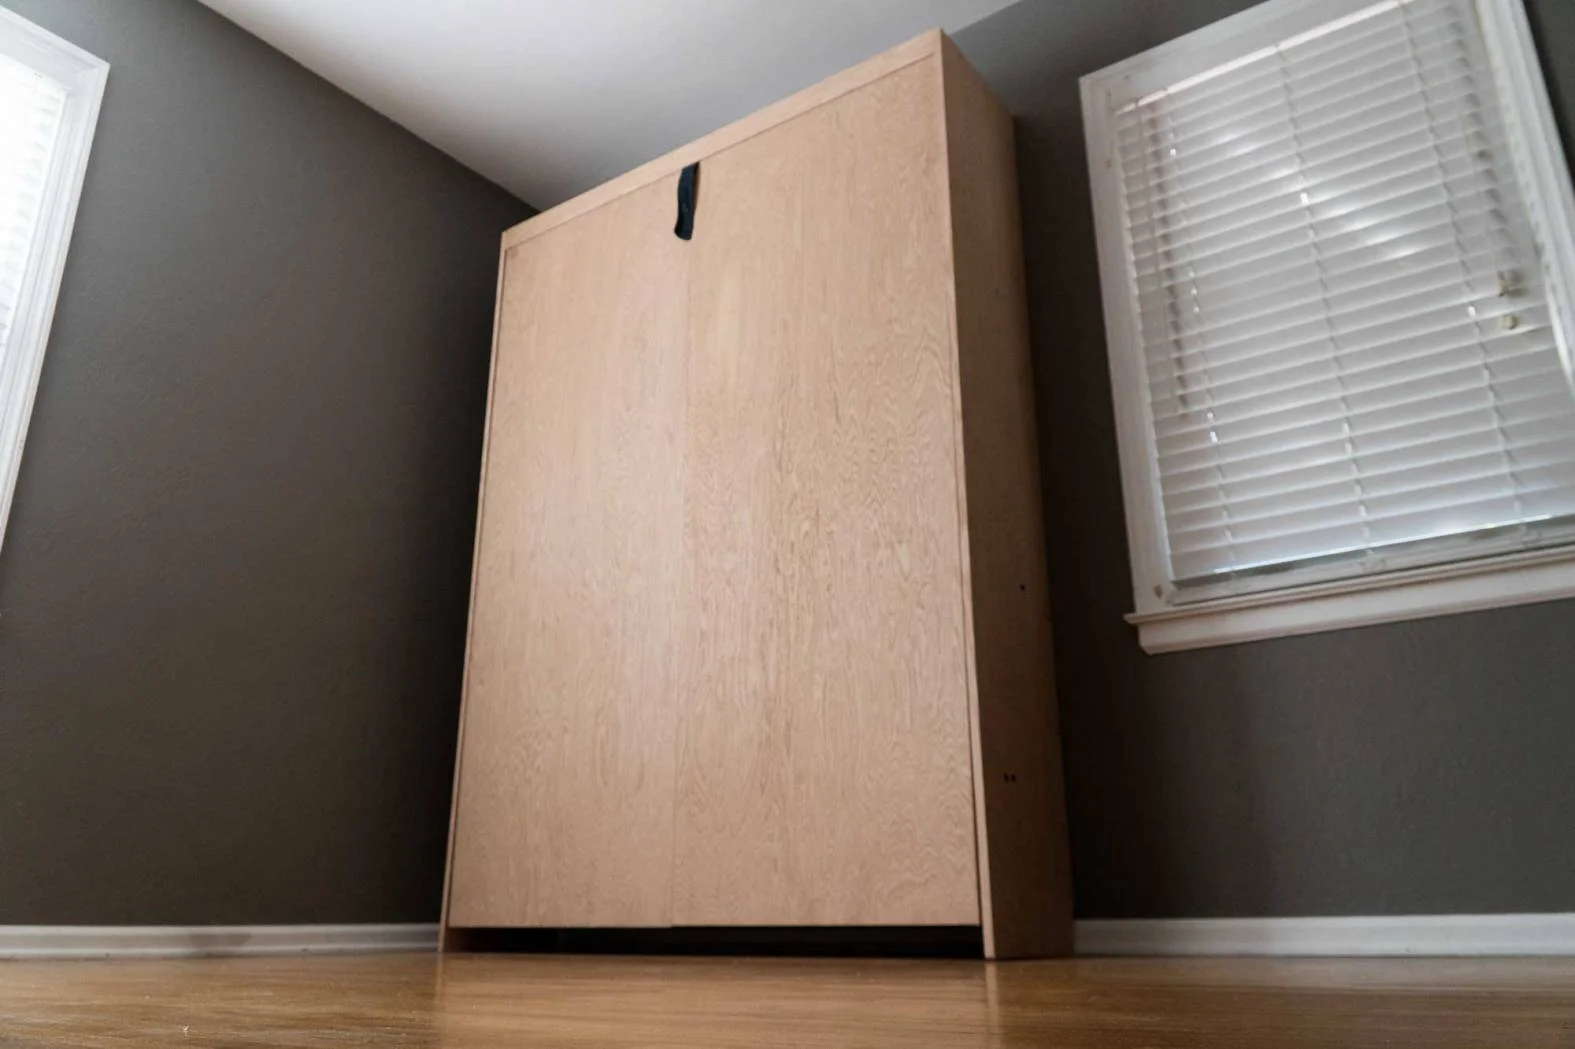
How to Make a Murphy Bed
How to make a bed that folds up into the wall.
Making a Bed That Folds Up Into the Wall
In our house we have one spare bedroom that Kelly uses as a basket making room. We would like to use this as a guest bedroom as well so we thought a Murphy wall bed would be perfect. Murphy beds fold up and out of the way into the wall which makes great use of space. I’m using the vertical mount Murphy bed hardware from Rockler.com. On Rockler’s site you will also find side mount Murphy beds. They both work the same so choose one that works best for your room and arrangement. Making the Murphy bed is not difficult but you will need space to move around large sheets of plywood and you will need a buddy for the final installation. I’m building my Murphy bed with the bare minimum plans which calls for four sheets of plywood. In the near future we will be adding trim and molding around the top, bottom and front face. We also plan on staining it and adding shelves and drawers. All of these add-ons will be in a future tutorial.
Tools and Supplies Used in this Woodworking Project
- Vertical Mount Murphy Bed Hardware
- Glue Bottle
- Microjig GRR-Ripper
- Forstner Bit Set
- Bosch Jig Saw
- Edge Banding
- Table Saw
- Wood Screw Clamps
- SawStop Sliding Table
- Tape Measure
- Festool Drill
- Ratchet Bar Clamp (similar)
- Black & Decker Drill
- Festool Miter Saw
- Festool Random Orbit Sander
- Iron
- Edge Banding Trimmer
- Combination Square
- Plywood Purchased Locally


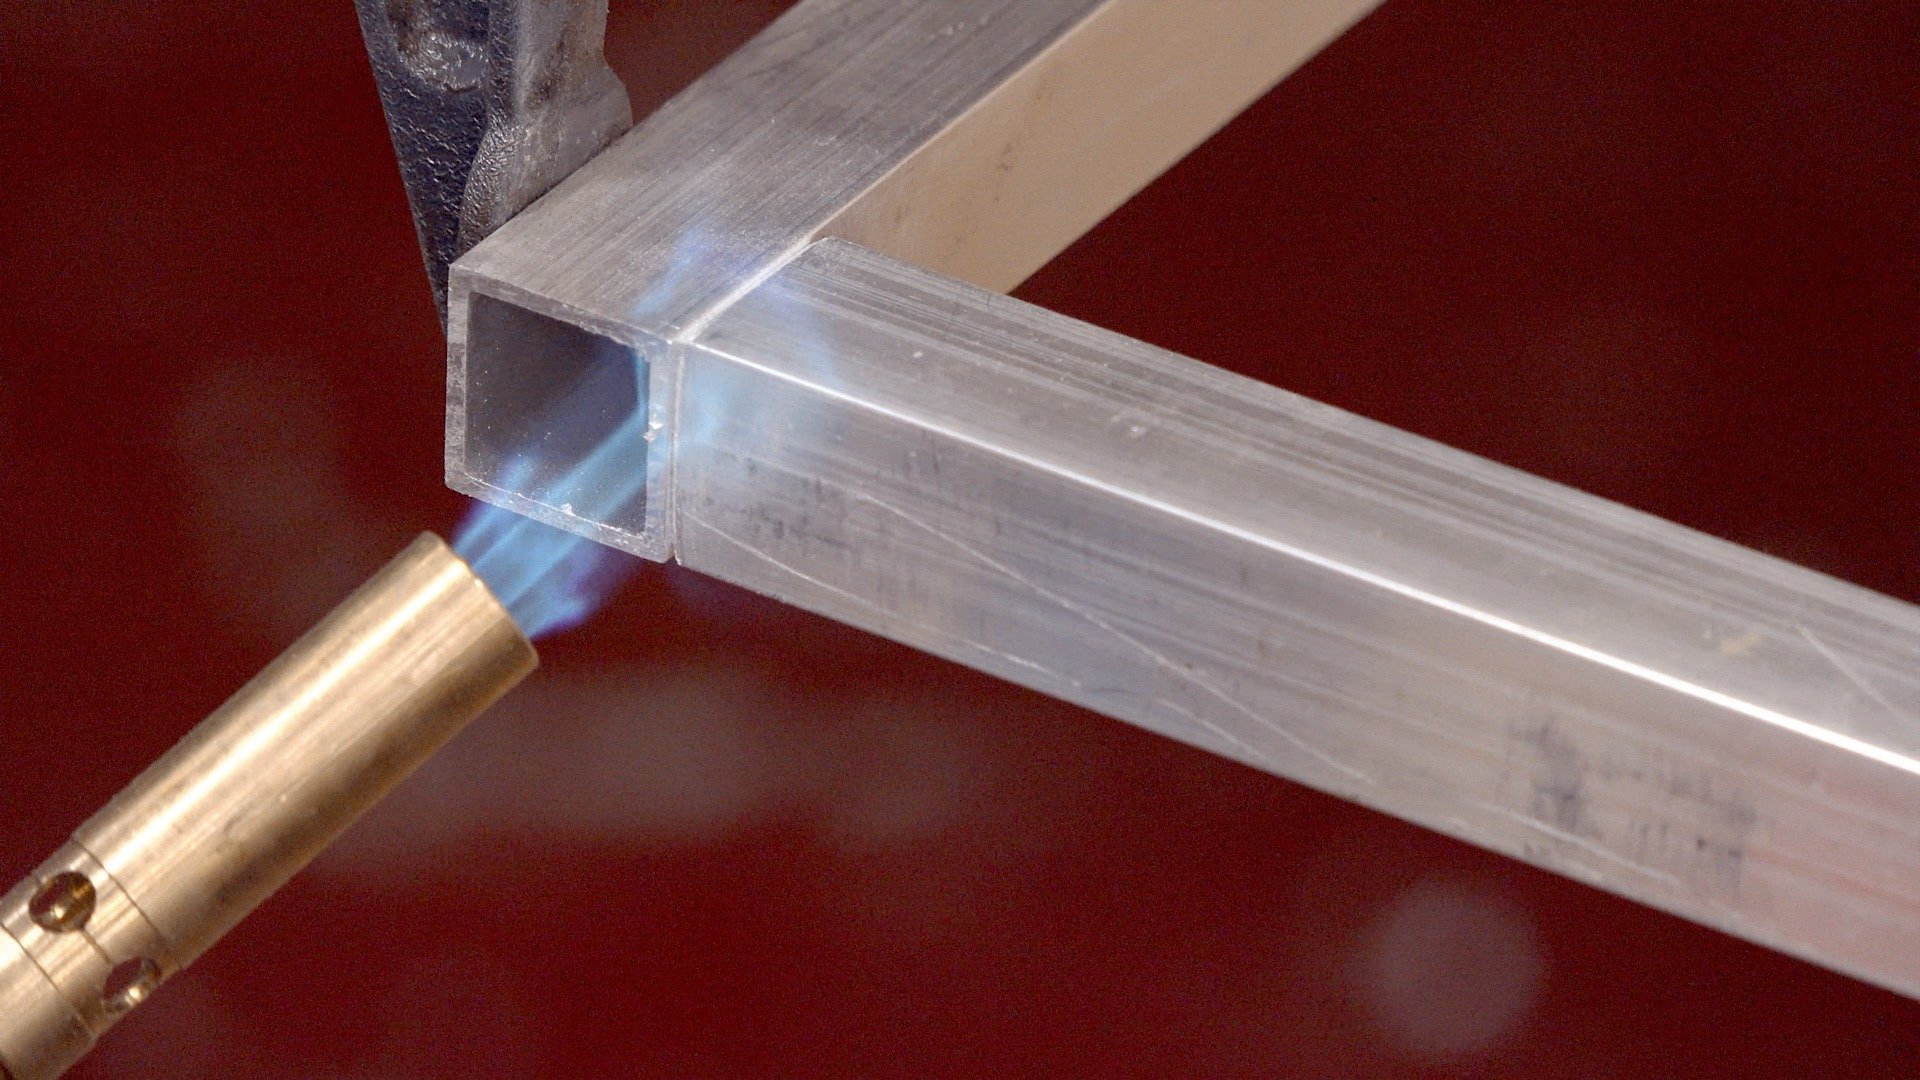
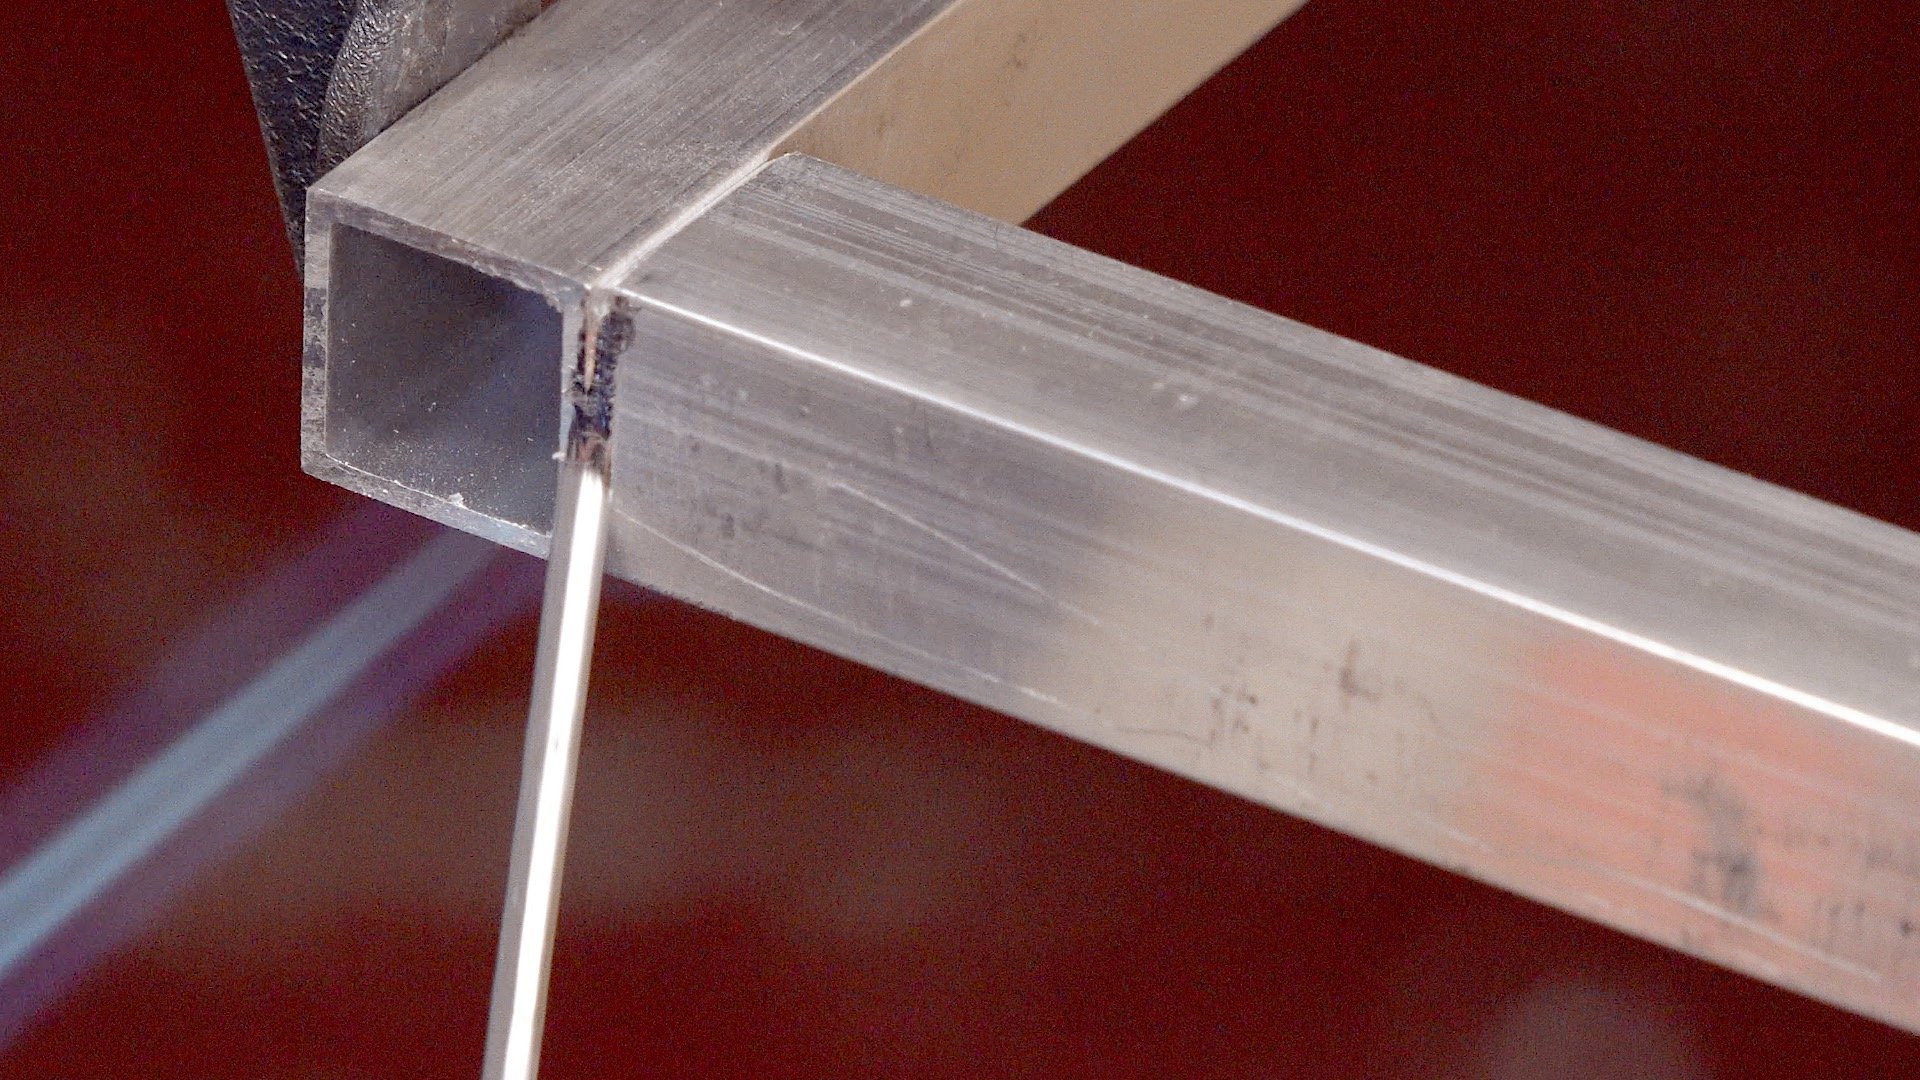
How to “Weld” Aluminum Without a Welder
Using a propane torch and some aluminum brazing rods is a quick way to bonding aluminum without using a welder.
Using a propane torch and some aluminum brazing rods is a quick way to bonding aluminum without using a welder. It makes for a very strong bond and with a little practice can be done quickly with great looking results.
Items Needed for Brazing Aluminum


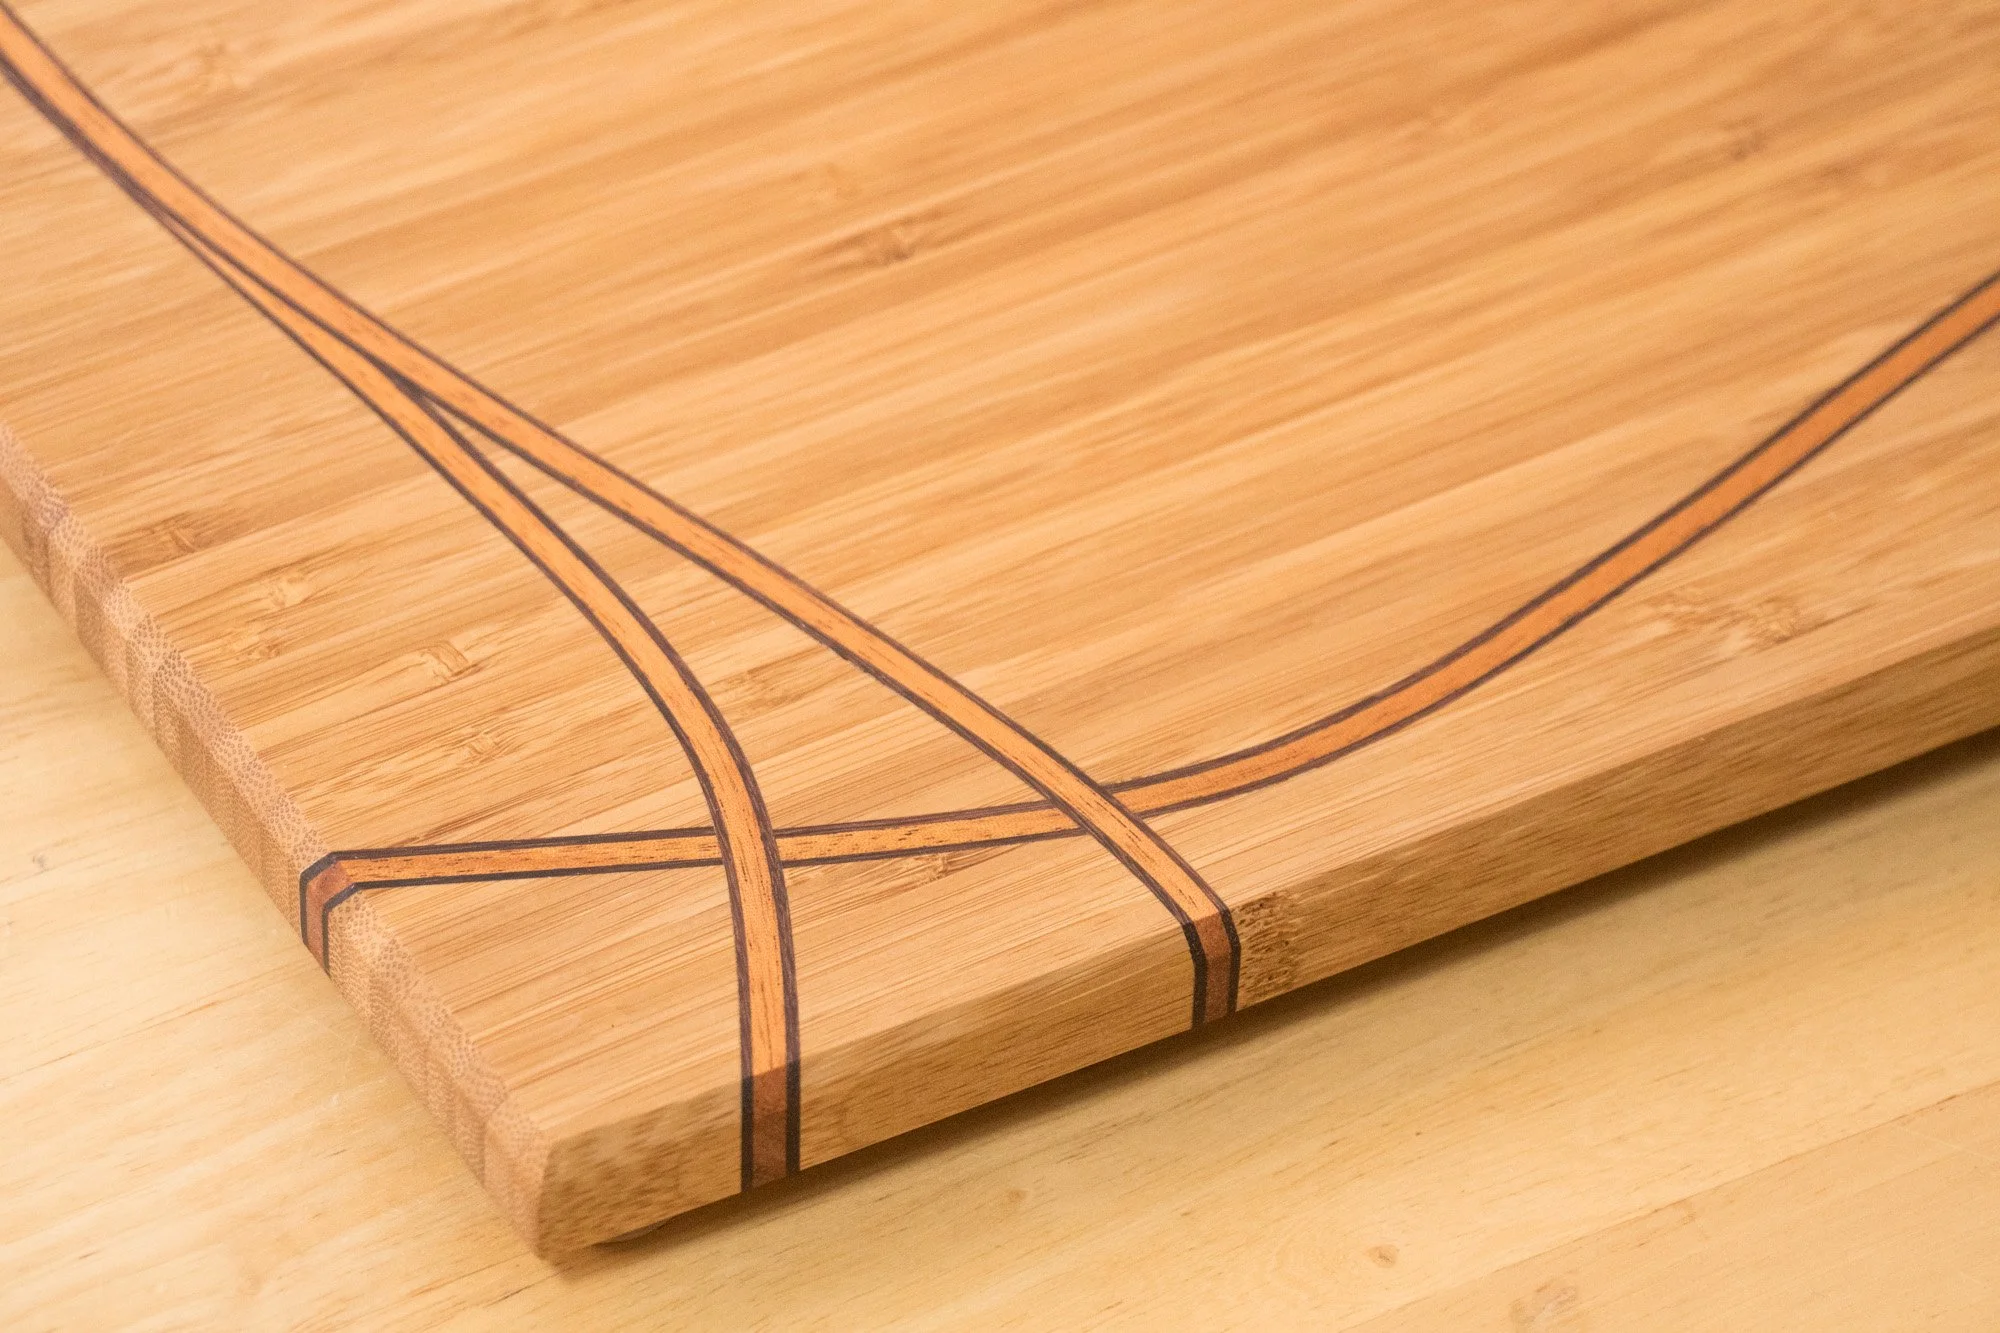
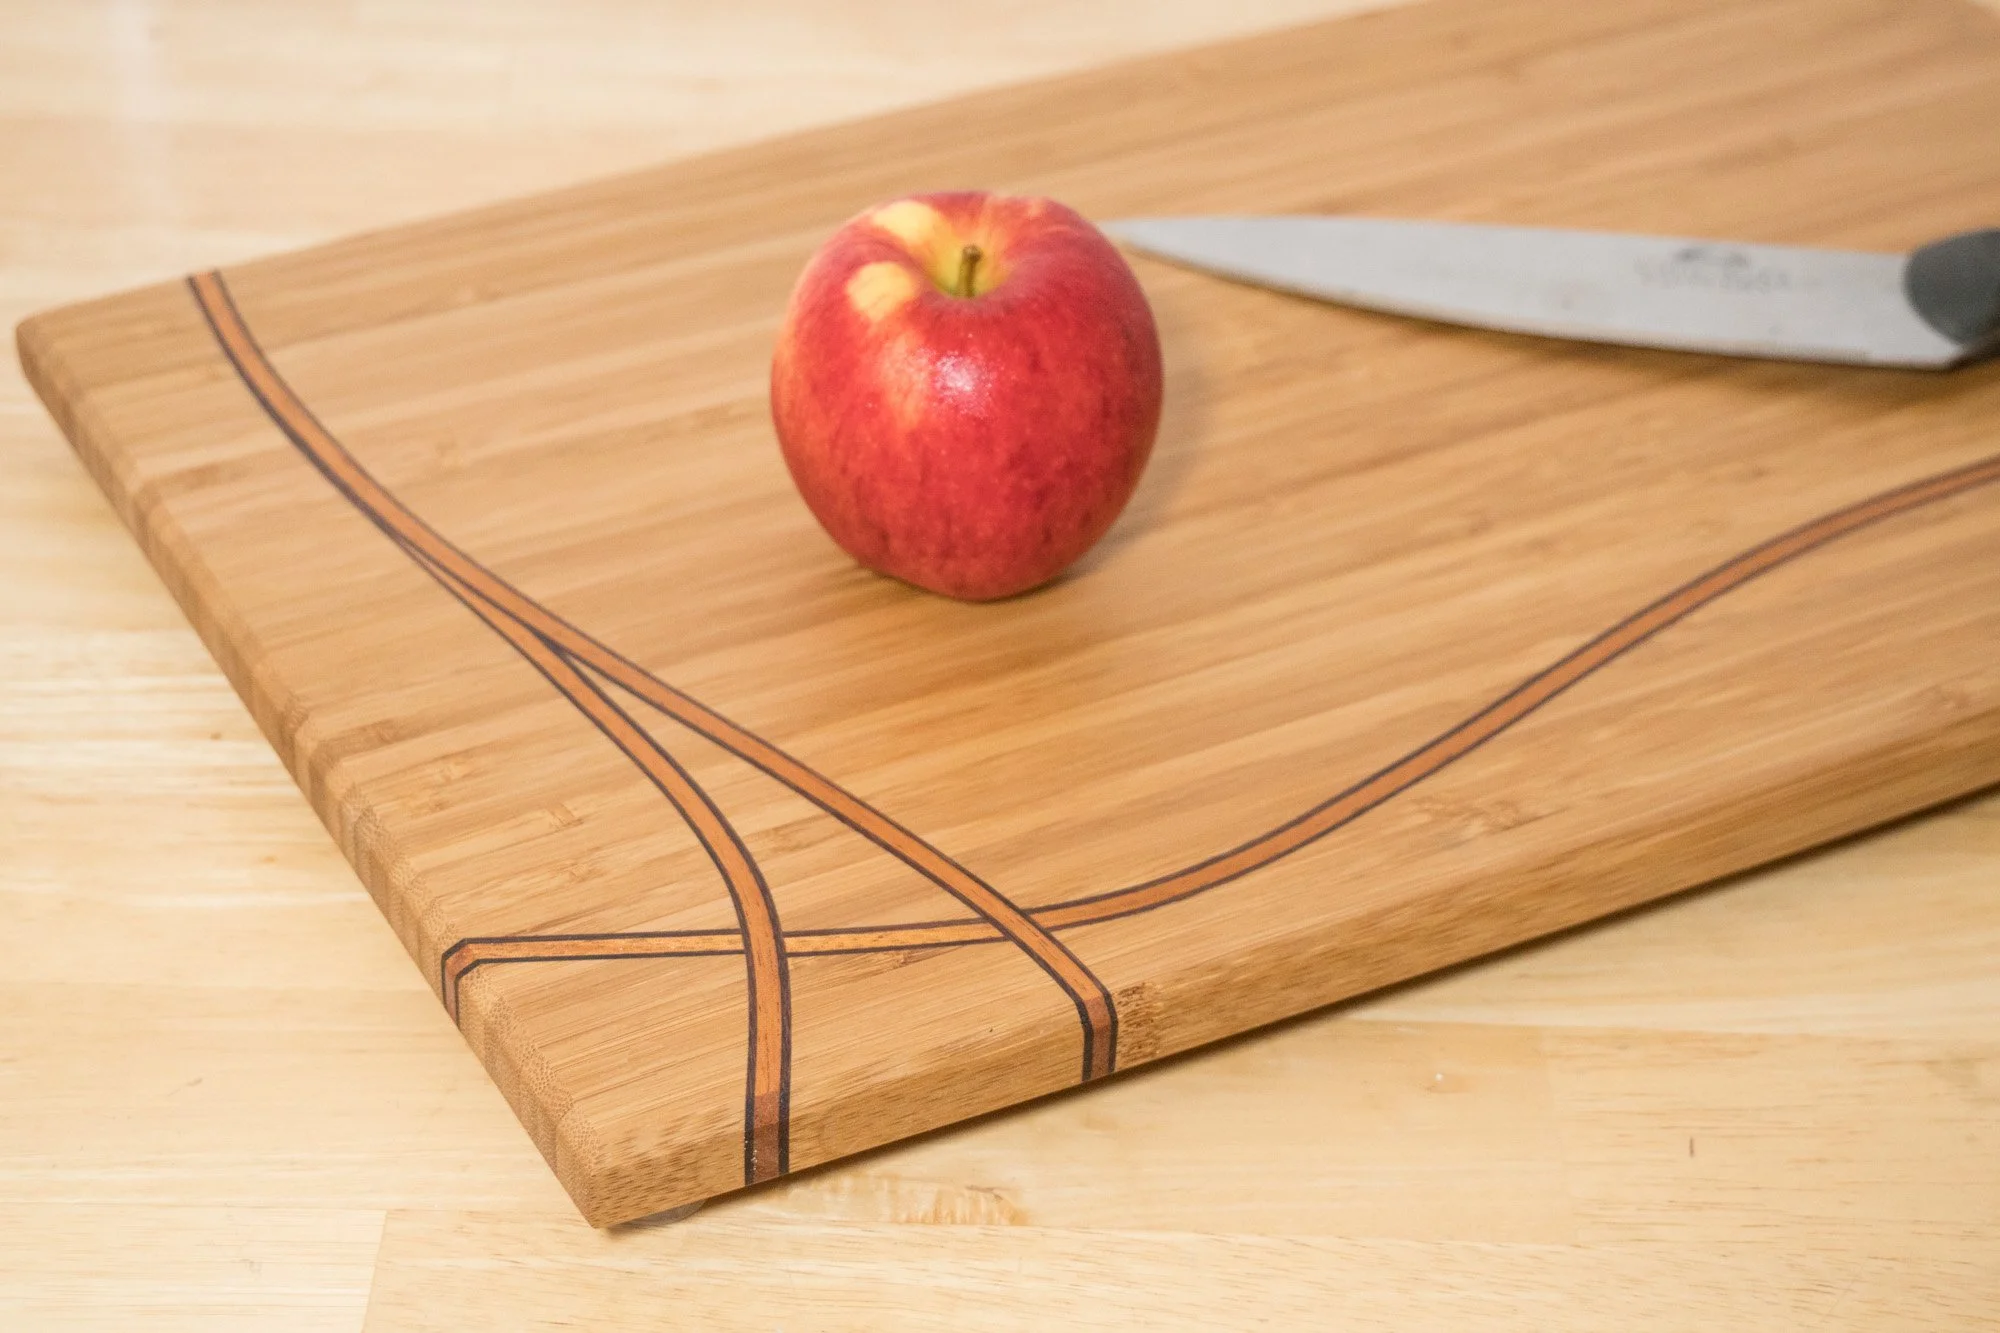
How to Make a Bandsaw Box
How to make a simple bandsaw box with a pencil holder.
Bandsaw Box Making
In this woodworking tutorial we’re making a bandsaw box. Bandsaw boxes is what got me excited about woodworking a few years ago and the reason I am a woodworker. All the bandsaw boxes I make are my original designs and I recently put out a book on making eight different bandsaw boxs. You can find that book on Amazon here. The bandsaw box we’re making today comes directly from that book!
In this how-to we’re using bamboo plywood and mahogany. The drawer will open from both sides and unlike most bandsaw boxes this serves as a pencil and pen holder as well. You can follow along with the tutorial video above or the pictured steps below. If you end up making one of these please send me some pictures via Twitter! I’d love to see them. As always, be safe, be passionate and Make Something!
Tools and Supplies Used in This Woodworking Project
- The New Bandsaw Box Book
- Festool Miter Saw
- Dewalt Planer
- Grizzly Bandsaw
- 3/16” 4TPI Skip Tooth Bandsaw Blade
- Combination Square
- Titebond Wood Glue
- Spray Adhesive
- Handscrew Clamp
- Disc Sander
- Dewalt Router
- 1/8” Round Over Bit
- Festool Random Orbit Sander
- Boiled Linseed Oil
- Spray Lacquer
- Black Flocking Adhesive
- Black Flocking Fibers
- Mini Flocker


Wood Staining: Coca Cola vs Coffee
In this experiment I’m trying out Coca Cola and coffee as a wood stain.
In this experiment I’m trying out Coca Cola and coffee as a wood stain. I have seen in the past many people use coffee as a wood stain but never soda so I thought I’d try them both out and compare. I wanted to use these wood stains on real projects and not just scrap wood to show the results so I made 3 mitered corner boxes with splines out of red oak. I normally don’t use stain in my projects but when I have I’ve had the best luck with red oak as it seems to take stain well.
The coffee definitely stained the wood much more than the soda but had a slightly greenish tint to it. When compared to the other two boxes it seemed to have an unnatural color. The Coca Cola stain only slightly darkened the wood compared to the non-stained box but had the best results. The soda gave it a natural amber tint and was surprisingly not sticky at all once dried.
Would I stain a project again with soda or coffee? Probably not but I will experiment more with other products in the future. Maybe next time I’ll try motor oil and wine. Let me know in the comments down below what you’d like to see me experiment with in the future!


Tie Rack Woodworking Project from a 1959 School Textbook
Making a wiener dog tie rack from an old school text book.
How to Make a Tie Rack | Woodworking Project
I love collecting old woodworking books from thrift stores and antiques stores. There’s so much useful information in them and since woodworking technology moves slow these books are still relevant. Plus the illustrations are just fantastic to look at and represent the style from their time period.
While flipping through the book the other night I found this wiener dog tie project and about lost my marbles! I’m a wiener dog owner/lover and thought I just have to make this! The truth is I only own 1 tie so I had to go out and buy new used ties to demonstrate this project. This is a start to many more projects from old books. As always, be passionate and Make Something!
Tools and Supplies Used for this Woodworking Project


Trash to Treasure: Make a Wall Hanging Guitar Amp
Taking an old beat up guitar amp and giving it new life with an updated look and use.


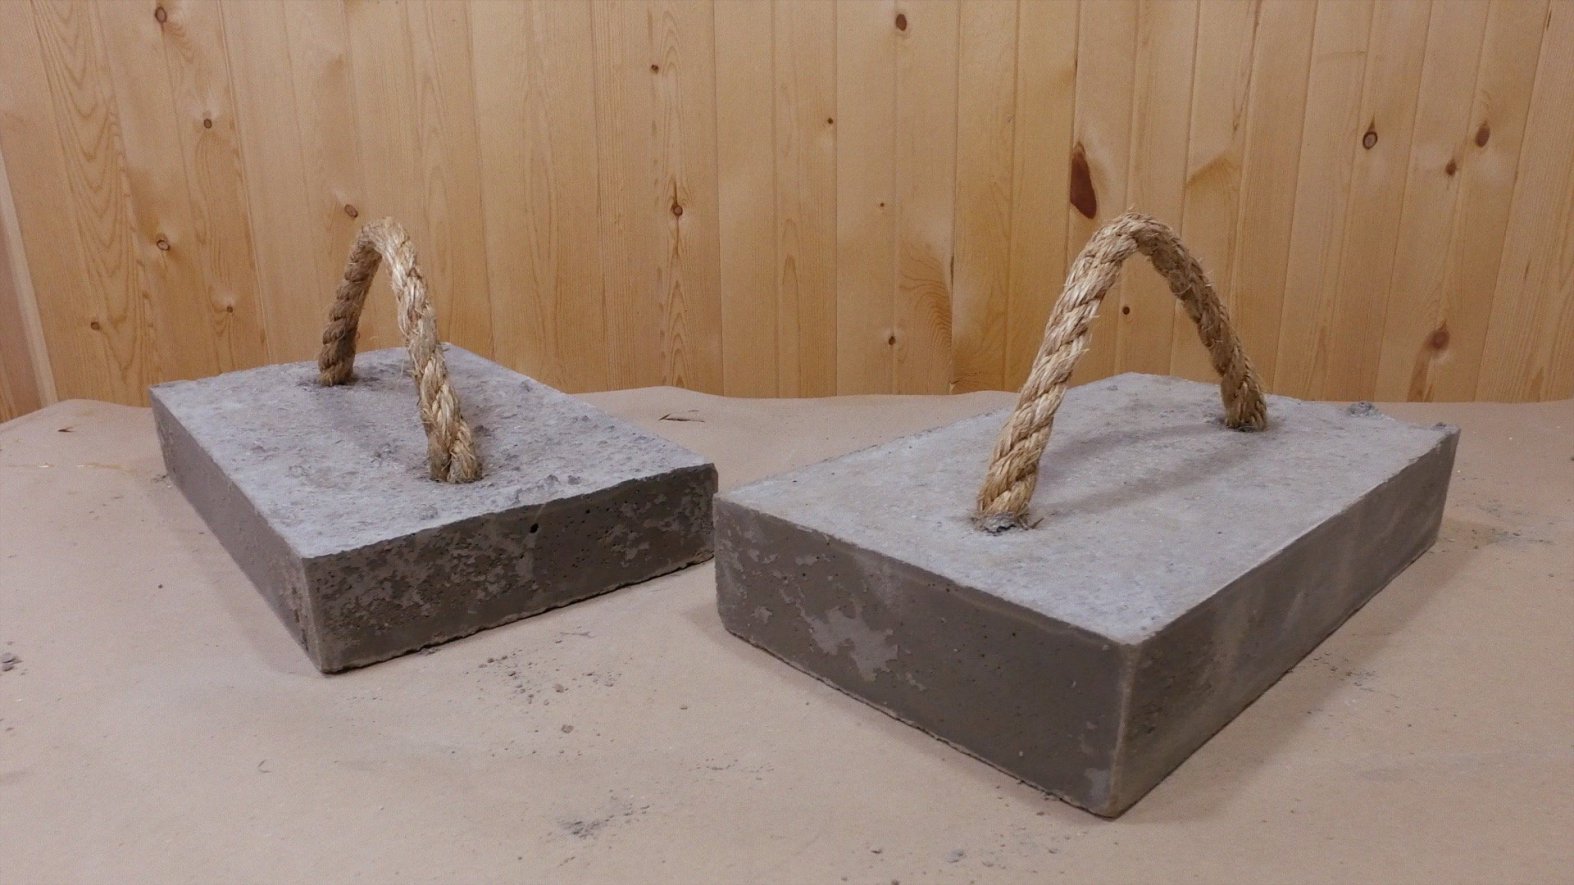
How to Make Concrete Weight Clamps
Making a pair of concrete weights with rope handles for the shop.


How to Make a Puzzle with a Laser Cutter
Use a laser cutter to make your own custom puzzles!

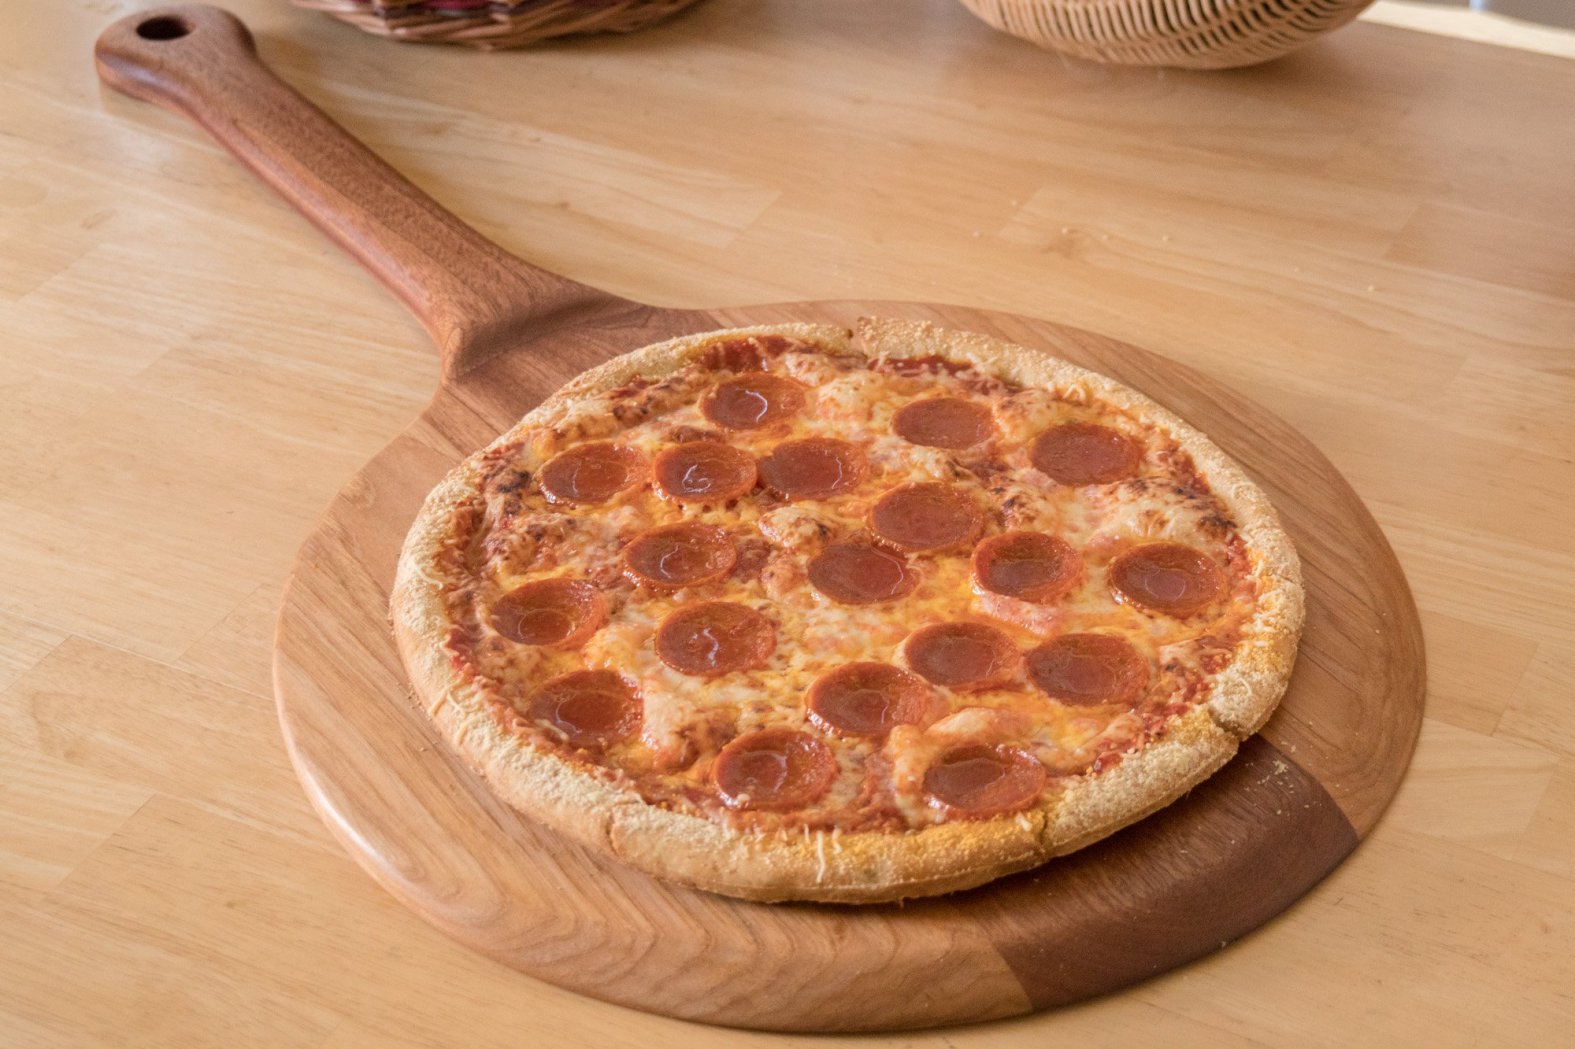
How to Make a Pizza Peel
Having a pizza peel in your kitchen is a great way to pull pizza out of the oven and also doubles as a cutting and serving board.
Making a Wooden Pizza Peel | Woodworking Project
This was a crazy fun and easy project. I didn’t know how useful a pizza peel was until we had one in the house. We generally cook our pizza right on the oven grill so having a pizza peel available to pull the pizza from the oven is very useful. Plus you can cut the pizza right on the peel and use it as a serving tray. The finish used on this is a food grade mineral oil and paraffin wax. Like any cutting board you’ll need to reapply a finish on it after a handful of uses. We like to keep a bottle of butcher’s block conditioner in our kitchen for quick and easy applications. If you like this tutorial please share it with your friends! Let me know in the comments down below what you think and how you would make yours different! As always, be safe, be passionate and Make Something!
Tools and Supplies Used in This Project
- Festool Kapex Miter Saw
- Bar Clamps
- Titebond Wood Glue
- Spring Clamps
- 50 Pack Pencils
- Grizzly Bandsaw
- Disc Sander
- Spindle Sander
- Dremel Tool
- F Style Clamps
- Microjig GRR-Rip Block
- Belt Sander
- Jet Drill Press
- Festool Random Orbit Sander
- Gulfwax Paraffin Wax
- Food Grade Mineral Oil
- Camera Used – DJI OSMO
- Wireless Mic – Sony


How to Ruin Grandma’s Cookie Recipe in Epoxy!
A failed experiment that had unwanted results. It’s all part of the learning process.
So I had this crazy and wacky idea to take a cookie recipe, bake the cookies and encase that cookie and the recipe card in epoxy. This could then hang on the kitchen wall and you could always be reminded of Grandma’s recipe and see exactly what the cookie looks like. I wanted to do this all with supplies you could get from your local home center and not need any fancy woodworking tools. I attempted this twice and failed each time. If you watch the video above you’ll see that I tried to pour all the epoxy at once and I should have done it in layers and allowed it to dry between layers. By pouring it all at once it doesn’t cure evenly. I also used a heat gun to get the bubbles out and that speeds up the curing process which is a no no! Instead I should have used a small butane torch. If you do try this and you’re successful please let me know because I’d love to see this work!
Items Used
Cookie Recipe
- 2 1/4 cup flour
- 1 tsp baking soda
- 1/2 tsp salt
- 1 cup butter
- 3/4 cup sugar
- 3/4 cup brown sugar
- 2 tsp vanilla extract
- 2 eggs
- 2 cups chocolate chips
- Preheat oven to 375°.
- Stir flour, baking soda and salt. Set aside.
- Beat butter, sugar, brown sugar at medium speed until creamy.
- Add vanilla and eggs one at a time, mix at low speed.
- Gradually bled dry mixture into creamed mixture.
- Stir in chocolate chips.
- Drop by tablespoon onto uncreased cookie sheet.
- Bake 9 to 11 minutes.


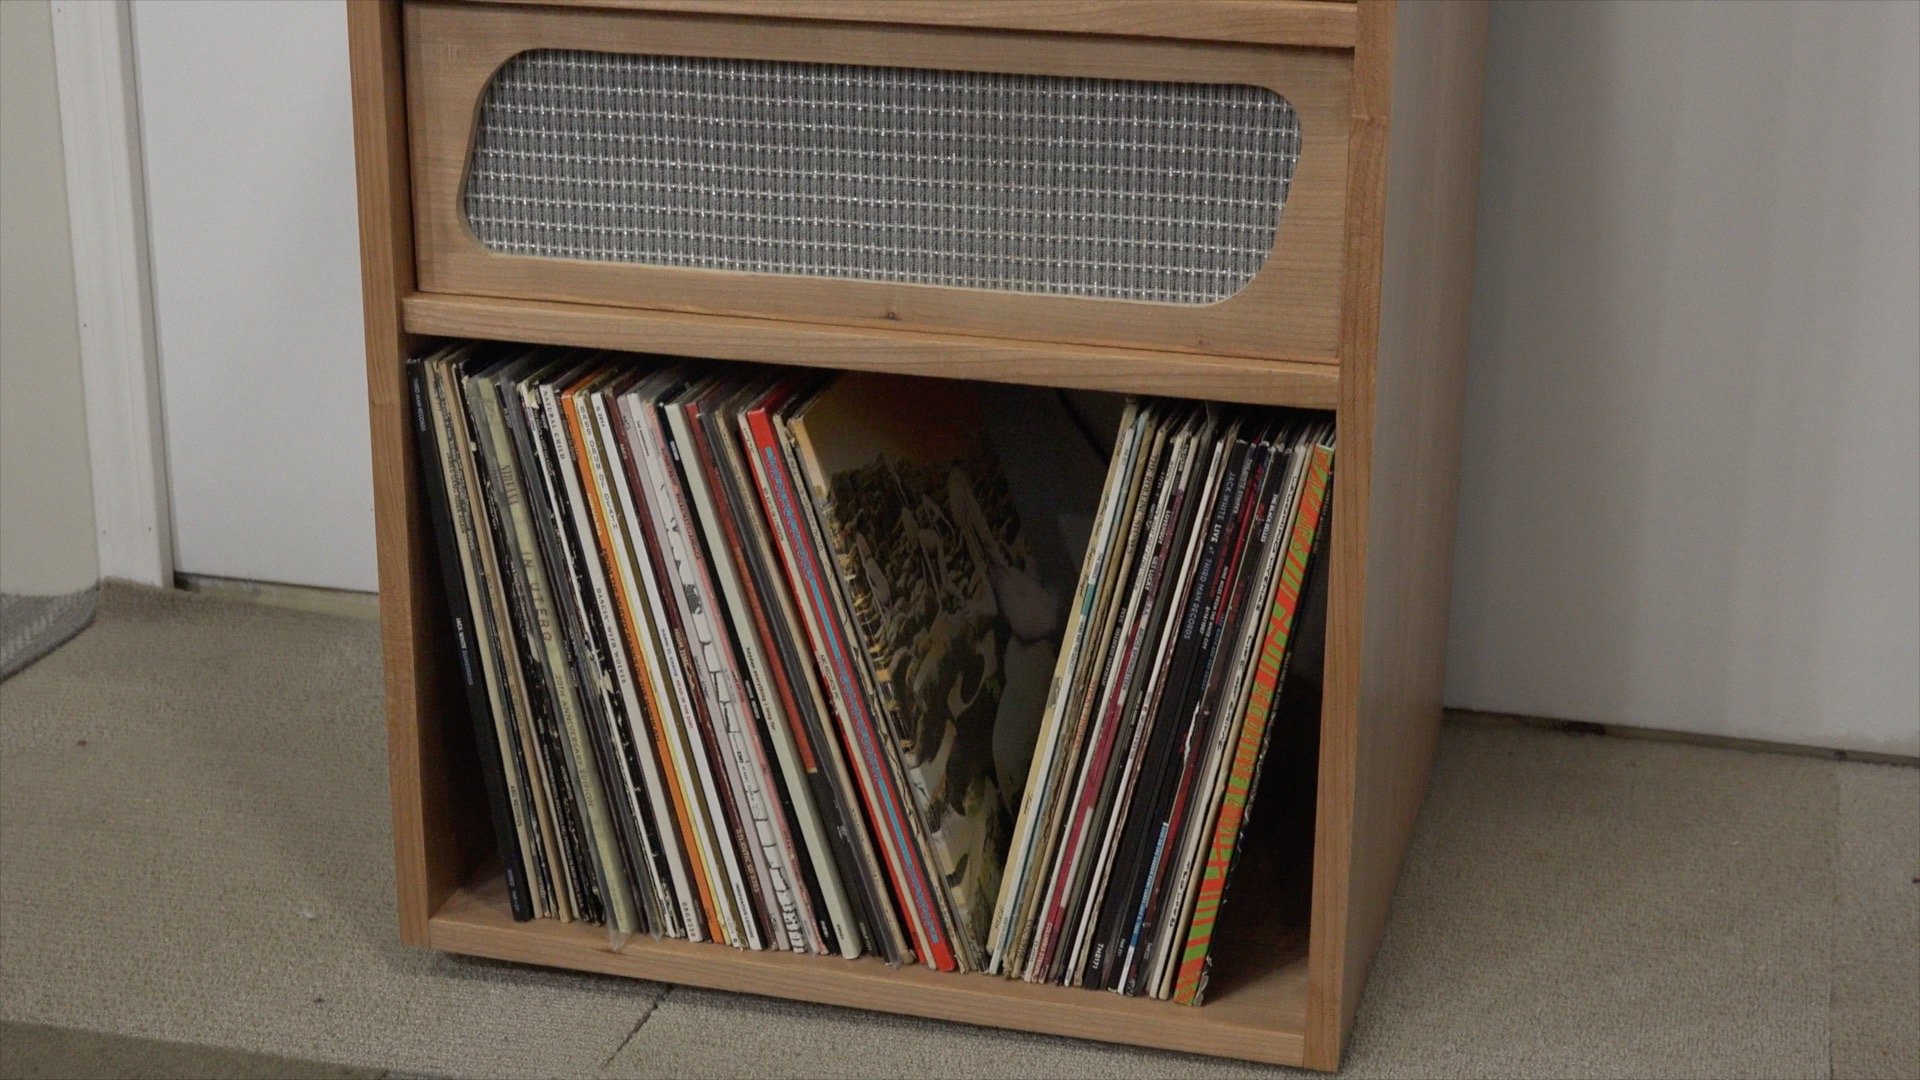
How to Make a Retro Stereo Cabinet
Making a stereo cabinet with a turntable dust cover and record storage.
Making a Vintage Stereo Console
I’ve been wanting to make this retro stereo cabinet for a while now. I spend a lot of time in my basement shop working and wanted to have a turntable in there to play records but also protected from dust. It uses some basic butt joint construction done with loose tenons and made from cherry plywood. The turntable is enclosed with a hinged lid and the stereo component compartments have a removable grill cloth face to keep dust out but allow air circulation.
I did run out of time for a few final details because I’m taking for for a trip. I still need to add some pulls to the front grill faces and lid support or a kickstand to hold the top open while changing records. Once I get back and complete these tasks I’ll post pictures down below and update the steps.
If you make this stereo cabinet please tweet me some pics so I can share it with the world. Thanks for dropping by and as always be safe, be passionate and make something.
Tools and Supplies Used


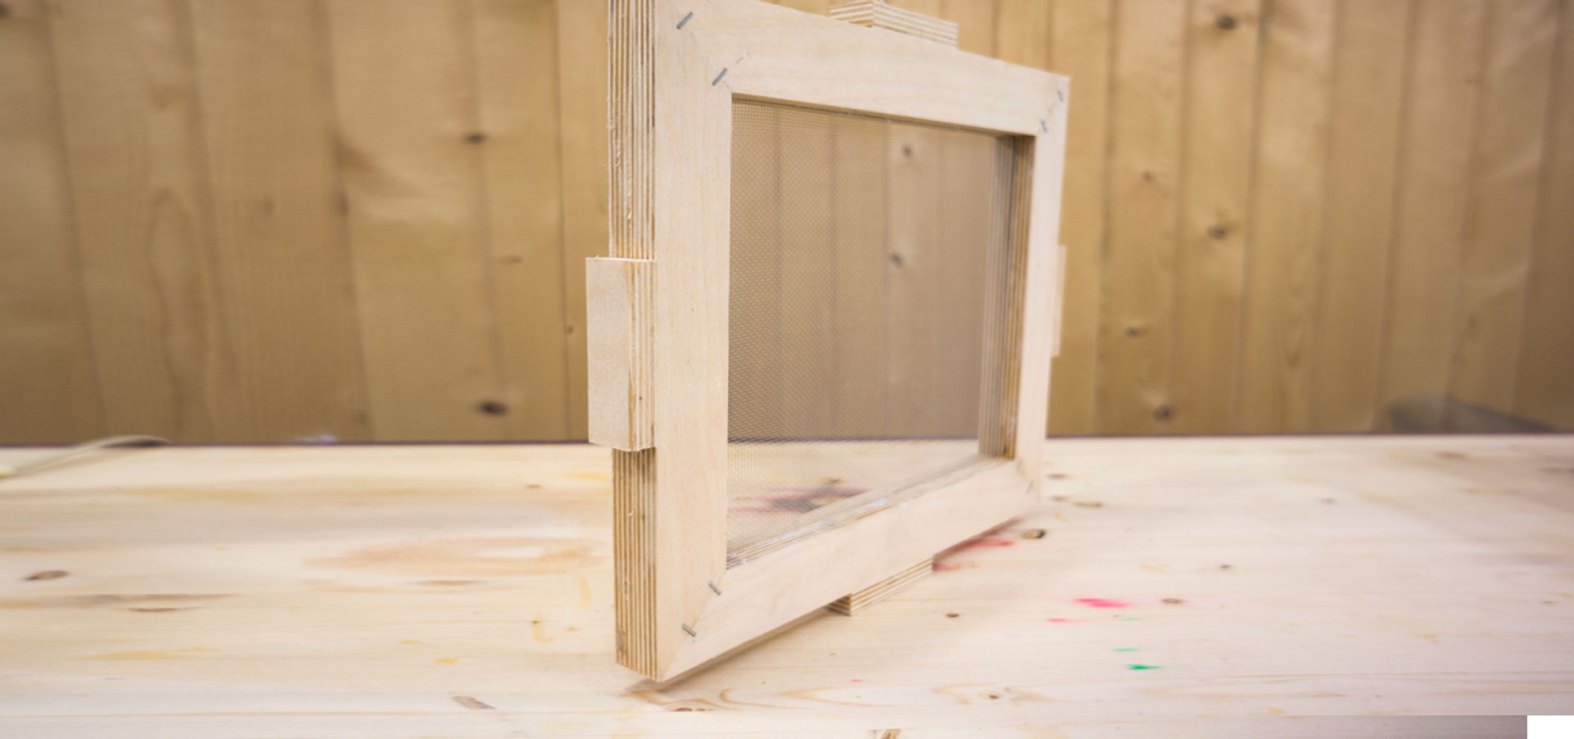
How to Make a Deckle For Paper Making
Making a homemade paper deckle is a real quick and easy project that anyone can do.
Products Used
Making a homemade paper deckle is a real quick and easy project that anyone can do. If you don’t have power tools you could make this paper making deckle with old picture frames. I’m using some scrap 1/2” baltic birch plywood and gluing the mitered corners with CA glue and staples. The screen used on this deckle is just ordinary aluminum window screening. The top half of the deckle is used as the paper mold and friction fits on top of the bottom half of the deckle.
Woodworking Books

Make Your Own Cutting Boards
15 cutting board projects to make as gifts or sell! Get your signed copy!

The New Bandsaw Box Book
8 bandsaw box projects you can make and sell at craft shows. Signed copies now available!